Showing posts with label lemon. Show all posts

Monday, January 7, 2013

Lemon Gojju - Awaken your taste buds with a spoonful

I write a lot about gojjus in my posts since I think this dish really deserves all the attention. What can you expect from someone who cleans up bowls of gojju without bothering about the main dish served on her plate :-). For such a humble name, this genre has so many variations that you don't feel the repetition at all. The name 'Lemon Gojju' makes me drool and I consider this one of nammamma's 'always made to perfection' dishes. Given that she is from the generation that doesn't tolerate tasting while cooking, I just can't explain how she achieved that consistently perfect taste every time.

Nammamma made this usually with the avarekalu kadubu or pumpkin idli and as she calls it is a total tongue cleanser. If you have had string of parties and eaten too much greasy food or sweets and feeling lethargic, this is the gojju to go to as it hits your taste buds in the right spots, awakens your senses and brings you back to life. This is a very simple recipe by any standard, get a couple of juicy lemons and you are on your way to tasting something totally out of this world. There is however a surprise ingredient in this gojju that you don't normally see in any of the other Karnataka gojjus. Nammamma says adding milk in this recipe is to beat the raw tangyness of the lemon juice and mellow it down and I totally agree with it as I have experimented with & without milk, so take my word and go with the milk. I use milk straight from the gallons here, nammamma used the usual boiled, cooled milk in India.

BTW, if you haven't noticed, I added a Recipe Index page over the weekend. Well.. the page got published over the weekend but had it coming for a while as I started to organize and group my various posts sometime over the Holidays. I was pleasantly surprised to see it coming together nicely though I haven't planned my posts in any order. Give it a look and let me know if you have any comments.
What do you need to make Lemon Gojju?
Juice of 2 good sized lemons - about 4 Tblsp
1 Tblsp Urad dal/uddina bele
1/2 Tsp fenugreek seeds/menthya
1 Tsp white sesame seeds/ellu
4-5 green chilies (adjust to suit taste, see notes)
2-3 sprigs cilantro
1/2 cup grated coconut
1 Tsp oil
1 Tsp salt (adjust to taste)
1 Tsp crushed/grated jaggery
2 Tblsp milk
Seasoning:
1 Tsp oil
1 Tsp mustard
1/2 Tsp white sesame seeds
2-3 curry leaves

How do you make Lemon Gojju? 
  • Heat 1 Tsp oil in a thick bottom pan, add urad dal and fenugreek seeds and broken green chilies and fry them on medium heat.
  • Add the sesame seeds to the pan as the urad dal begins to change color slightly and continue to roast until urad dal turns pink and blisters form on green chilies. 
  • Switch off and let cool.
  • Grind the roasted ingredients, coconut, cilantro, salt, jaggery with a couple of spoons of water to a very smooth paste. 
  • Take out the ground mixture to a bowl, add lemon juice and milk and give it a good mix with a spoon. 
  • Heat oil for seasoning, add mustard and sesame seeds, let them splutter, add curry leaves and pour the sizzling seasoning over the gojju. 
  • Let the gojju sit for about 30 minutes for it to absorb all the flavors before serving this lip smacking accompaniment with akki rotti, kadubu, pumpkin idli or Ragi mudde or anything else that you like. 
  • This gojju will have a slightly thick pouring consistency (in between a dosa and an idli batter). The proportions above yield 2 cups of gojju. 
Notes: 
  • It is important to let the gojju sit for about 30 minutes, so prepare ahead if you need. The seasoning can be done later to keep the crunch. 
  • The jaggery, salt, green chilies and lemon juice should balance each other and also outpower each other in this recipe, make adjustments to suit your taste buds.
  • Always remember to break or cut green chilies before roasting them as they will pop otherwise. 
  • Roast the urad, fenugreek and green chilies on low-medium heat and make sure urad is roasted nicely without changing color too quickly to avoid the raw smell of the dal in the gojju. 
  • Use brown sugar in place of jaggery if needed.

Tuesday, October 2, 2012

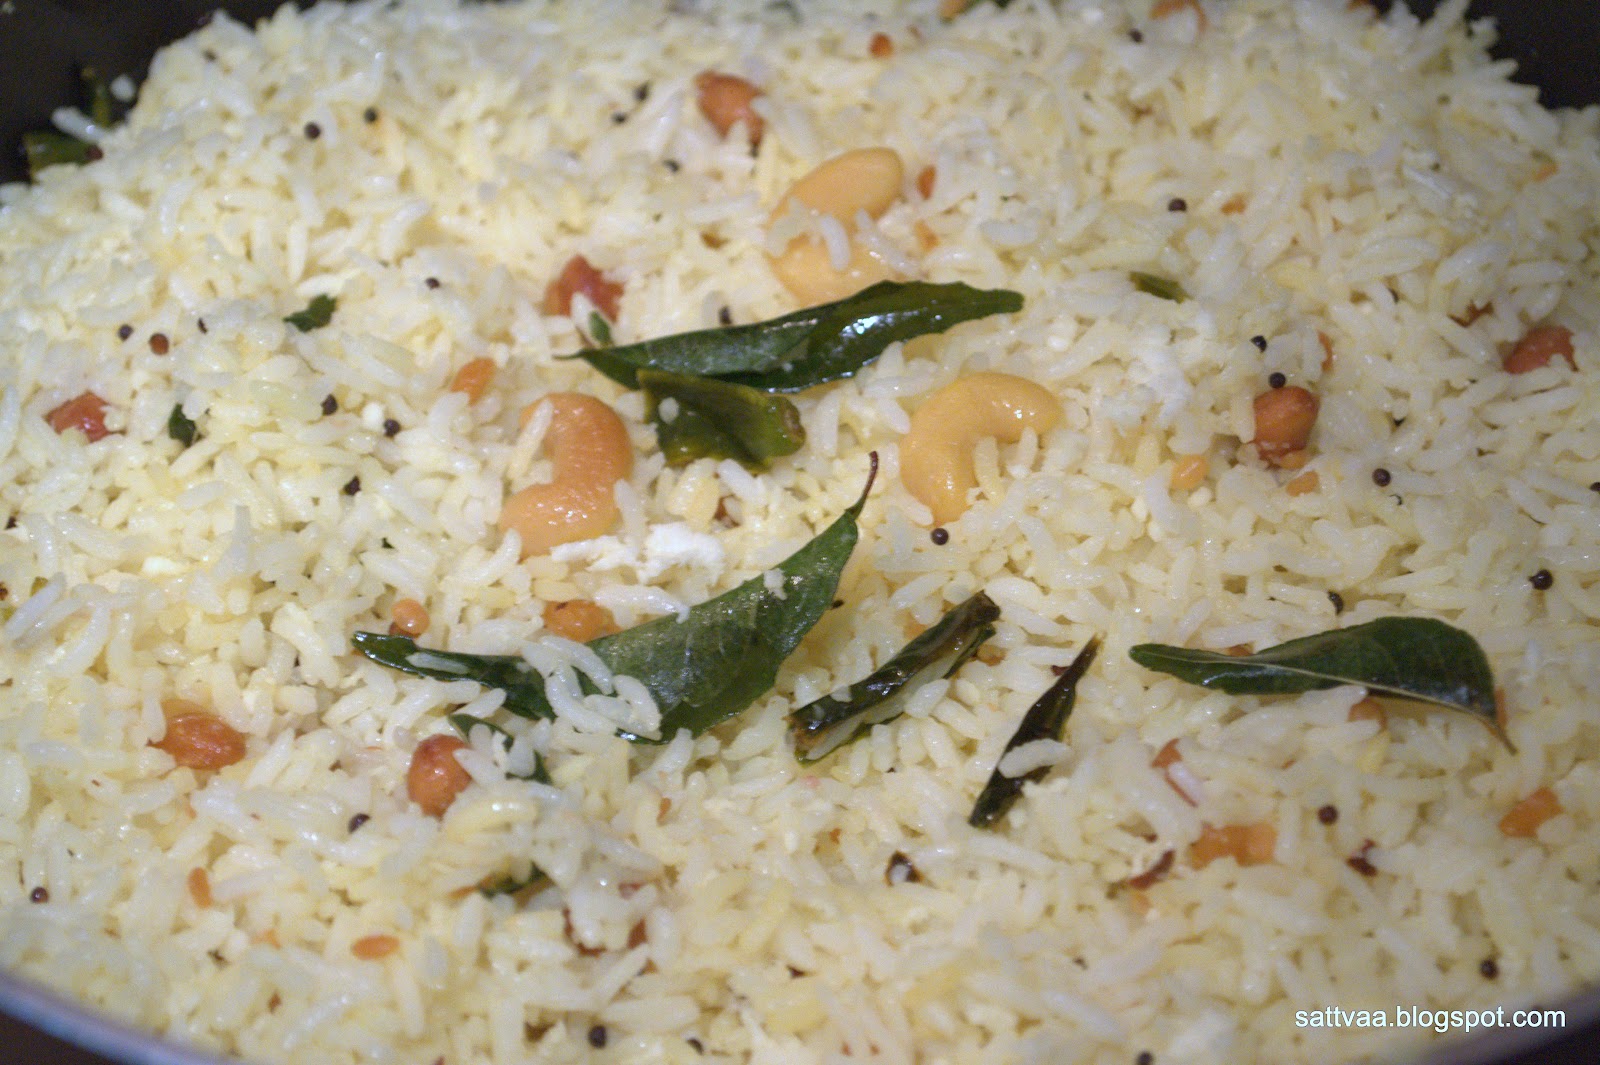
Lemon Rice - very basic, very delicious

Lemon rice has been one of my favorite lunch box recipes for ages. There is something about recipes that makes them click as lunch box recipes and I know what I am talking about since I have been carrying lunch box from my high school days. I love single pot rice items including the humble, every day staple like yogurt rice, I take variations with poha, quinoa. BH is on to salads or oats with vegetables and chickpeas. Our lunch boxes get dressed up with ildis or chapathis/paranthas but never with Dosa :-).

When I got married, amma not only cooked for all of us office goers at home but since she heard that I was used to lunch boxes from nammamma, she started making lunch for me specially. The son never was in the habit of carrying lunch from home so it was a new experience for her making lunch. She went out and bought a 3 tier lunch box (the steel tiffin carriers you see in India) which I never had before and started packing me lunch. I was, to say the least very uncomfortable with this arrangement for one I could never finish all that was stuffed into those boxes and secondly I felt extremely guilty for not only leaving home without any daughter-in-law chores done but also making my MIL prepare lunch for me.

Being the new DIL, I didn't have the heart or guts to tell her not to take the trouble of getting my lunch ready. However I told her that I would carry the breakfast for lunch too with some mosaranna (yogurt rice) to fill that 3rd box. She had made Dosa one morning and packed dosa and chutney with the usual mosaranna. BH & I, while on our way to work, decided on a whim to take a day off and go on a picnic. We packed some naan and curry from a dhabha, called home to let them know and went away. At lunch time, I opened my lunch box also and the dosa had become a cardboard and was in stark contrast to the buttery curry and melt in the mouth hot naans. I always said no to lunch boxes on the days we had dosa breakfast from then on :-).

Back to the lemon rice, this is a very humble (see the ingredients list and you will know what I am talking about) and standard item in most South Indian homes with regional variations. This is called 'Chitranna' in Kannada. Once you have the basic recipe, you can play around with this lemon rice to either dress it up or down depending on your preference and the occasion. Look for some ideas at the end of this post. I made this lemon rice for the Ganesha habba recently and the post has been in my draft ever since.
What do you need to make Lemon rice? 
1 cup rice (preferably Sona masoori variety)
1/4 cup fresh squeezed lemon juice (more or less based on tartness you prefer)
1 Tblsp grated coconut (fresh or frozen)
1/4 Tsp turmeric powder
1 Tsp salt (adjust to taste)
For seasoning:
2 Tblsp oil
1 Tsp mustard
1 Tsp Urad dal
1 Tsp chana dal
1 Tblsp peanuts
1 Tblsp cashew nuts (optional)
6-8 curry leaves
3-4 green chilies - chopped into small pieces
1/2 Tsp asafoetida

How do you make Lemon rice? 
  • Cook rice (rice cooker, open vessel or pressure cooker) so the grains are completely cooked but separate. 
  • Spread the rice in a wide plate, add salt and let it cool.
  • Heat the oil in a pan, add the mustard, dals, peanuts and cashew nuts (if using) and fry until mustard starts to sizzle. 
  • Add the chopped green chilies, asafoetida, turmeric and curry leaves and continue to fry until green chilies form small blisters, switch off and pour it over the rice. 
  • Add the grated coconut, lemon juice and mix everything together gently so the rice doesn't get mushy. 
Notes: 
  • Use fresh lemons for the lemon juice if you can, the taste is different when you use bottled or preserved lemon juice. 
  • Make fresh rice for this simple recipe to taste truly delicious. 
  • You can skip coconut but I would strongly recommend using it.
  • When you cook rice, add a few drops of oil to get a fluffy texture. The rice should be cooked well, else the lemon rice turns dry.
  • Add turmeric towards the end to the seasoning to avoid burning. 
  • Add the lemon juice to the mixture only when the rice has cooled down.
  • If you are using frozen coconut, thaw it and bring it to room temperature before using.
  • Use longer pieces of green chili to make it easier for little hands to pick them out. I slit them vertically before cutting them into pieces to increase the chili heat.
  • Increase the amount of turmeric powder upto a 1/2 Tsp for a brighter yellow color, I like it mildly off white. Too much of turmeric brings a faint bitter taste.
Variations: 
  • Add cubed, par boiled and shallow fried potatoes for a carb rich lemon rice. 
  • I add cooked green peas to the rice for some proteins. You can use frozen peas, just thaw them to room temperature and add them in the seasoning with the green chilies.
  • Garnish with finely chopped cilantro or coriander leaves for added flavor.

Thursday, September 13, 2012

Eggless Meyer lemon cake and a milestone

When life gives you lemons you enjoy lemonade. When life surprises you with Meyer lemons what do you do? I kept coming across many flattering notes about Meyer lemon in the cook books and shows I read or watched. It has been hailed as the wonderful lemon by many chefs and I kept wanting to discover this treat causing such a stir in the culinary world. Last year with our relocation, I missed the season as it runs November through March. But then with so much popularity and demand the fruit has been cultivated and you do notice off-season picks in stores. May be one day, it will be available around the year :-). I found boxes of these mini beauties in Costco last week and immediately brought home a box to feel, taste and experiment with them.

For the uninitiated, Meyer lemons are smaller lemons (compared to the usual ones you find in grocery store isles) and are a mix of lemon and mandarin/orange. They have a rich yellow color bordering on orange. This is a native fruit from China brought to the US and grown locally now. I recently found out that you can grow meyer lemons in pots, and it is on my list of future things to do. Why all the hype around Meyer lemons? These have a tangy flavor like regular lemons but are not as strong as the regular lemons that make you pucker, you can actually eat it as a fruit if you like the tart mandarins. What makes Mayer lemons special is the overwhelming flavor, the aroma simply takes your breath away. It is a very refreshing feel in the kitchen. There are down sides, these are not replacements to lemons or mandarins for that matter because it is a cross between the two and also at the higher price tag you should stick to lemons and mandarin to do their regular job :-). But, it is definitely worth once in a while to indulge in these delicious fruits.
I tried these Meyer lemons in various recipes and the verdict: it gives a wonderful boost to cakes and quick breads and makes a quick pickle (the skin softens faster than the regular lemon) but is not a good substitute if you are making lemon rice :-). Will I use it again, yes when in season and cheaper but not resort to impulse buy out-of-season denting my pocket.

My daughter loves lemon cakes, the soft, slightly tangy ones are her favorites. So I set out on a search for a lemon cake preferably without eggs (as amma is visiting and she doesn't eat eggs and though no restrictions I would love it without eggs too) and googled quite a bit. Finally zeroed on a recipe from here. She uses regular lemons, adds lemon extract, extra virgin olive oil and maple syrup as sweetener. I made certain changes to suit my family's taste and used what I had in my pantry, we ended up loving every bite of the the soft, moist and 'Meyer lemony' cake.

Oh about the milestone, this is the 100th post on Sattvaa :-). It has been 8 months and I had no targets (still do not have) on the number of posts and here I am with my 100th post. It feels very good and I am grateful to all you readers that visit me often, it makes my day to see your comments and see the stats. Those of you that have chosen to remain anonymous so far for any reason, consider taking a moment next time you visit and leave me a comment (good, bad, ugly anything), I would love to hear from you.

So here is a celebration recipe of a simple eggless, butterless Meyer lemon cake to go with your evening chai. And yes, you can definitely use the regular lemon in this recipe, look for my notes at the end.
What do you need to make Mayer Lemon Tea cake? 
Recipe Source: Chef Chloe
2 cups All purpose flour
1 Tsp baking soda
1 Tsp baking powder
1/4 Tsp salt
1/2 cup cooking oil (I used Sunflower oil)
1/2 cup sugar
3/4 cup water
1/2 cup Meyer lemon juice
2 heaped Tblsp lemon zest (I grated 3 Meyer lemons)
How do you make Mayer Lemon Tea cake? 
  • Preheat oven to 350F.
  • In a wide bowl mix AP flour, baking soda, baking powder, salt.
  • In a separate bowl add oil, sugar, lemon juice, water, lemon extract and whisk it for a couple of minutes. 
  • Pour the wet mixture into the dry ingredients and mix them together until it forms a batter without lumps. Do not over mix and I didn't use my hand mixer either. 
  • I used my bread baking pan -  pour the mixture in and bake it for 25-30 minutes until a toothpick comes out clean. 
  • Let the cake cool down completely before slicing and eating. 
  • Enjoy the lemony goodness with a hint of tangerine flavor. 
Notes:
  • If using regular lemons, reduce the amount of lemon juice to 1/4 cup to not make the cake taste too tart. 
  • As I mentioned, the original recipe calls for maple syrup but I used regular sugar for sweetener. 

Thursday, June 7, 2012

Lemony rice noodles - Quick fix to a bad craving

When I think about rice noodles, the image I have is of my parents planning and executing the ottu shavige (that is what it is called in Kannada)project.  Since it is a labor intensive preparation, amma starts getting the rice flour ready by soaking the rice for a couple of hours and letting it drain and dry inside the house, the rice would then be sent to the flour mill to come back as a fine powder. Ottu shavige is a full day affair and made in large quantities with a variety of toppings and mixings to go with it. We each had our favorites, my younger brother who loves sweets would go for the gasagase payasa(kheer made with poppy seeds) while I always asked amma for a spicy chutney and a bowl of seasoning to mix with it.

By itself, ottu shavige is bland like rice and is eaten with side dishes. You will find it served with stew/gravy if you were in Kerala. In our house, it was usually variations of lemon shavige, tamarind shavige, pepper shavige for the savory fare while the sweet versions had payasa or jaggary-coconut chutney.

Anna had got the ottu shavige maker (a hand operated device) from Mangalore. The principle is same as the chakli/murukku maker where you put the cooked rice balls and turn the handle to get thin strands of noodles. Because of the size and shape of the device, making shavige is easier with it compared to using a small chakli/murukku maker. I do not own a shavige maker but make small quantities with my murukku maker for the 3 of us which turns out well. While I will blog about the real deal later, here is a quick fix to a bad craving when it strikes me.

It is a very simple recipe, the raw green chilies and lemon juice makes the dish taste unique. It is called hasi(raw) chutney shavige. Enjoy this authentic shavige variation with store bought rice noodles for breakfast or a light dinner.
What do you need to make lemony shavige? 
1 packet of rice noodles (See notes) - I got a 6oz packet
1 big juicy lemon
2 Tblsp grated coconut (fresh or frozen)
3-4 green chilies (adjust according to your spice tolerance)
1 Tblsp salt (adjust to taste)
For Vaggarane/seasoning: 
1 Tblsp cooking oil
1/2 Tsp asafoetida
1 Tsp mustard seeds
1 Tsp chana dal/kadle bele
1 Tsp urad dal/uddina bele
1 Tblsp peanuts
4-5 curry leaves
1 dry red chili broken into 2(optional)
How do you make lemony shavige?
  • If the noodles you have are very long, break them in half so it fits snugly into the pot you use to cook it. 
  • Get about 5 cups of water in a sauce pan with 2 drops of oil and bring it to boil, add the noodles in, stir it once and let it boil for 3-4 minutes (See notes)
  • Take the pot off the stove, drain the water, spread it in a wide bowl and let it cool.
  • Take the coconut and green chilies to a blender or vegetable chopper and blend them into a rough, almost dry chutney. Do not use water, this chutney doesn't have to be smooth. 
  • Prepare vaggarane/seasoning: Heat oil in a pan, add mustard, red chilies, dals and peanut (if using), let mustard crackle and peanuts pop. Add curry leaves, asafoetida and switch off. 
  • Work with the cool, cooked noodles gently and break them into about 1-1/2 inch pieces. Take care not to mash the shavige. 
  • Add the chutney, lemon juice and salt along with the prepared seasoning to the cooked shavige and gently mix it in. Let it sit for atleast 15 minutes for the flavors to get absorbed. 
Variations: 
  • I do not use turmeric in this recipe as I love the light green color of the final product. You can use turmeric while preparing the seasoning if you like the yellow color. 
  • You can add a couple of twigs of cilantro while making the chutney for a cilantro flavor. 
  • Add cashew nuts to the seasoning instead of or in addition to peanuts.
Notes: 
  • Get the thinnest available rice noodles (I have found good ones in Asian/Chinese stores here) and make the masala. 
  • Refer to the cooking instructions on the noodles packet. Since mine were all in Chinese which I don't read, I just went by experience on this one and checked to see if the shavige cooked soft before switching off. 
  • Be gentle while mixing the chutney as you want the noodle strands to stay intact.