Showing posts with label lentils. Show all posts

Sunday, November 22, 2015

Huli Tovve - can't get any more homely or traditional than this

I had every plan of writing my post last weekend as usual and then Friday the 13th happened. I just didn't have the heart to celebrate food in the wake of such violence and spent the weekend away from all electronics. What would it take to stop this senseless violence and live a life of harmony? What would it take to provide loving homes to countless children around the world that are uprooted from the homes they knew of? Acts of love are always pure and can start small in our own little neighborhoods and they do not need to be associated with any specific group or religion. Hope the world finds the love and peace we all seek so fervently. Here is to leaving behind a more loving, respectful world around us.
I forget what it was all about but recently a friend of mine had posted the question on FB asking 'what is home'? and as with fb responses there were a multitude of opinions ranging from parents to siblings to music to love to food and other things (both materialistic and non materialistic) that brought a feeling of home. As I reflect on that question I think the closest I would come to a cozy home feeling inevitably will have something to do with food :-). A happy crowd of people around the dining table eating healthy, home cooked food has an appeal to me that is rarely surpassed by other things in this world. Maybe I am not the only one that relates food with love, relationship, comfort, safety, care, taste and ultimately home?

The other day, I sent a package of uppittu mix and pongal mix to DD. She has a small rice cooker and it would be easy for her to just measure a cup of the mix and pour in the water, switch it on before she heads out to classes. The hot stuff would be ready and waiting when she gets back to the room. While she mostly eats at her cafeteria, she sometimes needs the taste of home just to ground things back. I didn't really pay a lot of attention when she called up to say it was the best uppittu she ever had but then realized that more than the taste it was probably the connection it made to the kitchen back home. She has not been a fan of eating uppittu while at home :-) but now not only is enjoying it herself but also is sharing it with a few of her floor mates who seem to be happily eating it too.
She will be home in 2 days and I already have instructions on what she wants to eat and what should not be on the menu for those 4 days (Cheese, tofu, pasta, pizza..) :-). She is well on her way to connecting love of home with comforting food among other things.

November is the month of 'giving thanks' and the markets are already flooded with the seasonal colors of yellow and orange. The carving pumpkins of the Halloween have made way for the orange hued pie pumpkins as we near Thanksgiving celebrations. I love pumpkins as they are some of the easiest vegetables to cook and also are very versatile in nature. From warm, toasted fragrant breads to hot, spicy idlis to crispy, kurkure cutlets to soul warming soups, pumpkins can stand up to any treatment and impart their subtle, yet tasty flavors in each of these recipes. Pumpkins in India are grown easily at homes and harvested on a regular basis.
I picked up a small pumpkin the other day and as I cut it open, I was transported back to an occasion many years back. The color of the pumpkin brought up memories of a wedding where I was the star (well, one of the stars atleast) and was getting ready to embrace a new life. Ours was a simple wedding, the ceremony was very personal and limited to immediate and extended family on both sides, wedding took place in my parent's home and the lunch was served under a covered shamiana on the roof top with a view of the majestic Chamundi hills in Mysore. My new family was not entirely familiar with the Mysore style of food but enjoyed it a lot.

As newly weds, we were required to share a plate for lunch that day and my bridegroom made sure he called dibs on all the favorites in the shared plate before I even looked up to see what was being served :-). The love story was just made stronger with him accepting and enjoying the world I came from. It has been many years and we continue sharing on both sides and the love seems to grow more as we do it. Of all the things served on the plate that day, the one dish that he fell in love with was this Huli tovve (also called bisi kootu) that is served with white, fluffy cooked rice as the first course once the meal officially begins. He loves his dal, he loves his vegetables and he loves food cooked fresh and the huli tovve satisfied all 3 simple criteria.
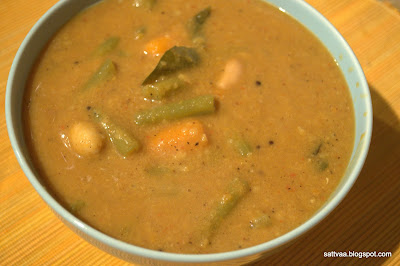
As Oct is the month we celebrate our wedding, I thought of making the huli tovve for BH to see if the love (for the dish I mean :-)) still lingered through all these years. And when I served it for lunch, the gleam in the eye, the slurp of fingers were more than enough to confirm that the love story continued. A combination of this tovve, majjige huli and a side of ambode is the ultimate festive food and a sure ticket for sleep, something you have to experience atleast once :-). Knowing BH's simple tastes, I skipped the majjige huli and ambode and let him enjoy the huli tovve all by itself and it was a hit.

Despite the 'Huli (tangy)' in the name, this dish is not a sour gravy. It is very well balanced with tamarind, jaggery, salt and the highlight is the freshly roasted and ground spices. The consistency tends to be thicker than regular huli or sambar and is made on special occasions with different combinations of vegetables. There used to be a time a few years back when no wedding or auspicious ceremony in the Mysore region would miss this huli tovve, I am not so sure about it now as food during celebrations have become more continental now :-). See notes at the end for a list of vegetable combinations that work well in this dish.

What do you need to make Huli Tovve?
1/2 cup toor dal/tuvar dal/togari bele
1 fistful shelled peanuts
1/2 Tsp crushed jaggery or brown sugar
2 cups of cubed pumpkin
8-10 green beans
1 big carrot
1 Tsp salt (adjust to taste)
To roast and grind: 
1 Tbsp oil
1 Tbsp chana dal
1 Tbsp coriander seeds
1/2 Tsp Urad dal
1 Tsp black pepper corns
2-3 dry red chilies (use Byadagi variety for a nice hue)
2 pieces of 1 inch cinnamon
2 cloves
small piece nutmeg (about 1/4 Tsp when grated)
2 pieces of mace
2 Tbsp shredded coconut
key lime size tamarind
Seasoning: 
1Tbsp oil
1 Tsp mustard
1/8 Tsp fenugreek seeds
few curry leaves
1-2 pieces of dry red chilies (optional)

How do you make Huli Tovve? 
  • Take tuvar dal and peanuts in a pressure cooker, wash them in running water. 
  • Add 2 cups of water, pinch of turmeric powder and cook until you get 4-5 whistles. 
  • Switch off and let cool. 
  • Heat a small pan and add all ingredients under 'To roast and grind' except for coconut and tamarind. 
  • Roast on medium heat stirring frequently for 2-3 minutes. 
  • Once the dals turn light pink and the spices are fragrant, add coconut and tamarind piece. Switch off and let cool. 
  • String the beans and break/cut them into 1.5 inch pieces. 
  • Peel the carrot and chop them into pieces of the same size as beans. 
  • In a sauce pan, add 2 cups of water, beans and carrot pieces along with 1/2 Tsp of salt. 
  • While the vegetables are cooking, peel and chop pumpkin into big bite sized pieces.
  • Once the beans and carrot have about 10 minutes of headstart, add the pumpkin pieces into the pan and let them cook for another 6-8 minutes or until the vegetables are fork tender. 
  • Grind all the roasted ingredients along with 1/2 cup water into a smooth paste. 
  • Open the cooker, mash the cooked dal with a whisk or blender. 
  • Pour the dal into the vegetables pot, add the ground masala paste and give a good mixture. 
  • Add the remaining salt and jaggery. Let it come to a gentle boil. 
  • Heat a small pan, add the seasoning ingredients and let mustard pop. 
  • Pour the seasoning into the tovve container, cover and switch off. 
  • Let it rest for 10 minutes before serving it with rice or roti.   
Notes: 
  • Typical vegetables and vegetable combinations used for huli tovve - Beans, carrots, ash gourd, pumpkin, ridge gourd. 
  • Do not use egg plant, okra or radish in this recipe
  • Pumkins and ash gourds cook very fast, give a head start to the beans and carrots to soften up before adding these vegetables to avoid mushy, disintegrated pieces. 
  • You can use dry coconut (Kobbari) or fresh grated coconut in this recipe. 
  • Do not use more than specified amount of nutmeg as it tends to over power other flavors. 
  • Peanuts cooked along with dal add a great taste to the gravy, if you are allergic to peanuts skip them. 

Sunday, August 9, 2015

Unde Huli (spiced lentil balls cooked in yogurt based sauce) - High dose of delicious proteins

Imagine yourself being an awkward young adult with limited social skills and a clam shut mouth especially around new people. It is the age when you don't easily fit into any age group. I was one of them a few years (who am I kidding?) many years ago. Big brother had just got married and as the 2 families lived in the same city, we were trying to get acquainted with each other and get to know each other while the newly weds were far, far away in another country :-). It was an exciting and happy time and I was asked by the aunts and uncles of my SIL to their homes. Mine was a more informal visit as I had a 2-wheeler and could just drop by on my way home in the evenings than having to arrange for a real dinner or lunch with all the elders.
One of those visits, one of the well meaning aunts brought out a cup filled to the brim with a somewhat milky looking dish in it and offered it to me. My first impression of the dish was that it was some sort of payasa or kheer. Being the sweet hater (I know it is a strong word but I used to really despise sweets that time, I am glad it was just a phase and it passed and I enjoy all kinds of sweets now), I politely told aunty that I was full and she should really get half the cup emptied out before I would touch it. Aunty went in and came back with the cup now filled only a little below the half way mark. Comfortable I could swish down that amount with a handy water glass and not look too rude infront of the new family, I strategically placed the water glass close to me and took a spoon ful of the dish from the cup.

It definitely wasn't payasa, nor was it any kind of dessert, instead it was a delicious sensation of yogurt and spices in the mouth followed by a quick touch of a bite of something that tasted vaguely familiar and I was kicking myself (mentally ofcourse) as to why I made aunty take away half the cup before even knowing what it was. I am sure if I was a more mature person, I would not only have readily asked aunty for more but also checked out the recipe with her. The natural inhibitions of the young adult made me not ask for more as I greedily wiped the cup clean and kept it. And unfortunately the conversation was so engaging all around that aunty didn't notice my enthusiasm and didn't offer me any seconds. I agree the loss was entirely my doing :-)
I came home and told nammamma about what I ate and demanded why she had deprived all of us of that delicious dish all these years. Here was the problem, I never noticed what aunty called the dish and so nammamma ofcourse had no way of knowing what I was talking about with my limited culinary vocabulary at the time. She just brushed me aside and went about her ways. It was many days later that I somehow was able to communicate what I ate and my SIL told nammamma that it must have been her aunt's famous "unde huli (unde~round, huli~general term for the sauce)" and nammamma also acknowledged that she hadn't made that in years at home.

Since nammamma never got interested in making this at home, I went after my SIL and pestered her to make it for me and discovered that she makes them as good as her aunt. I have even been sneaky enough to soak the lentils when my brother & SIL made a trip to my home so she wouldn't have a choice but to actually prepare it for me the moment she landed here. So in that sense, it is handed down to me from SIL and her aunt.

So here is the mystery dish, it is called Unde Huli and is made with ingredients similar to those in nuchinunde but the look, texture and taste are vastly different. I strongly believe that there are 2 kinds of people in this world, one that live to eat and the second one that eat to live. If you belong to the latter category (which I also refer to as the 'non-foodies'), then you might just feel that unde huli and nuchinunde dipped in majjige huli taste very close but I am the former category person or the foodie and to me the two are miles apart and both take you on a gastronomical journey that is superlative. Unde huli is not steamed but simmered in liquid/broth until cooked which gives it a glistening coating on top and makes every bite soaked in the yogurt sauce. The sauce is not served on the side rather is part of the dish itself.
I can eat this by itself in bowls without making it a side dish. This dish is like taking proteins intravenous instead of swallowing small tablets, so plan accordingly as it will cover your protein needs for the entire day. It is totally filling and you can skip cooking anything else once you have made this. If you like lentils and looking for a one pot, concentrated dose of proteins, this dish is for you. Enjoy!

What do you need to make Unde Huli? 
1 cup Togari bele/Toor Dal
1/4 cup kadle bele/chana dal
4-6 green chilies
1-2 red chilies
1 inch piece of ginger
1 Tbsp salt (adjust to taste)
2.5 cups water
1 Tbsp rice flour
2 Tbsp grated coconut (optional but recommended)
1/2 cup yogurt
2-3 sprigs of cilantro
Seasoning: 
1 Tbsp oil
1/2 Tsp mustard
1/4 Tsp fenugreek seeds
1/2 Tsp cumin
pinch of turmeric powder
1-2 pieces of dry red chilies (skip if you do not like it)
1/8 Tsp asafoetida

How do you make Unde Huli? 
  • Wash, pick any dirt and soak the lentils in plenty of water for 2-3 hours along with red chilies
  • Wash & remove the stalk ends of green chilies and chop them or break them into pieces. 
  • Wash, peel and slice ginger. 
  • Once the lentils are soaked (they look bigger and feel softer to touch), drain all the water and take them to the blender along with the chilies, ginger and coconut and grind into a coarse paste. Do not add water, use blender on pulse mode. 
  • Take the mixture into a bowl, add salt and rice flour and mix well. 
  • Take small lime sized mixture in hand and make them into a ball. Keep them aside in a plate. 
  • Heat water in a deep and wide vessel with a pinch of salt until it comes to a gentle boil. 
  • Turn down the heat to lowest on your stove and drop just one of the balls into the water. 
  • If the lentil ball disintegrates immediately, then you need to add more rice flour to the mixture and make them into balls.  
  • If the ball holds shape (a little bit of disintegration is fine and actually needed. 
  • Drop the balls one by one (do not crowd them in the vessel, you can do this in batches if needed) and let them come to the surface on their own, takes about 7-9 minutes. 
  • Once the balls surface to the top, gently flip them over and continue to cook for another 6-8 minutes. 
  • The liquid would have thickened up a little with the lentil mixture and got the taste of the mixture - This is what makes the dish delicious overall. 
  • Whisk the yogurt with a spoon and add it to the sauce. 
  • Add chopped cilantro, let the mixture boil for a few minutes before taking it off.  
  • Heat oil in a pan, add mustard, fenugreek and cumin. Let the seeds pop, add red chilies, and asafoetida. 
  • Pour the seasoning into the pot, cover it add let it stand for 10 minutes before serving.
Notes: 
  • If you are in a hurry or forgotten to soak the lentils, you can put them in hot water to gain some time. They will plump up in about 30 minutes. 
  • Adjust the amount of chilies (between green & red) depending on the spice level you are comfortable with. Soak dry red chilies along with lentils if you are using them. 
  • If you are cooking the lentil balls in batches, remove the cooked balls onto a plate before adding new ones. Add them all back to the pot before adding yogurt.
  • Once cooked the balls will have a shiny texture all around and will not break unless you cut them with a spoon. 
  • Seasoning the curry is essential to give it that extra flavor, don't skip it.
IMPORTANT NOTE: The balls tend to break and disintegrate in the water for 2 reasons - 
1. If the water is too hot, reduce the heat to lowest, make sure the bubbles have died away before you place the balls in the water.
2. If your mixture is watery, adding rice flour helps to absorb some of this moisture but don't use a lot of rice flour as the taste changes and the balls tend to become harder after cooking. 

Sunday, March 1, 2015

Punjabi Chole - vibrant colors, bold flavors, everything that reminds you of Punjab

Hope everyone had a great weekend and getting ready to the week day routine. Weather Gods seem to have developed an unusual love for Seattle folks and it has been warm, sunny, bright this entire weekend while the neighboring ever sunny California is flooded with rains, hails and storms. I am not sure if this is a good sign of things to come but the optimist in me tells me to be grateful in the present. Beautiful Pacific Northwest is waking up from hibernation to show its colors. We went to visit some blooming daffodils yesterday, miles & miles of happy, sunny, yellow colored blooms had lit up the valley and it was gorgeous. Had a great couple of hours walking around in the open air, sitting down next to rows of daffodils and ofcourse taking pictures. The early spring is doing its magic and flowers are blooming earlier than usual.
All those rows of yellow flowers brought me memories of my all time favorite 'Dilwale Duhaniya Le Jayenge' :-) and I had to cook something from my Punjabi menu to feel totally satisfied. So it was all about a Punjabi brunch in our South Indian kitchen today.

Garbanzo beans are hearty, healthy and very satisfying whether you put them in a curry or a salad or a hummus. There is something very earthy about these beans that brings instant gratification and cheer. We have a couple of Punjabi joints in our area which we frequent and one thing that stands out is how creatively they use this bean in different dishes. From curries like saag-chole (greens cooked with garbanzo) to chats like Ragda patties, these beans take on a very key role. While I love them, I prefer my dry green peas in chats, they seem lighter than garbanzo beans.

I come from a state longitudinally opposite to Punjab and have been there only a couple of times as a visitor. So all my knowledge about Punjabi food is acquired. When a recipe is not something I have grown up with, I use my deductive tasting abilities to try and break down as many recipes as I can get my hands on and decide which one I like. Some of the recipes call for cooking garbanzo beans with tea bags to get that authentic color while some swear by making a potli (small bag made of muslin cloth) of spices and immersing it in beans as they cook to infuse flavor. Some recipes claim to be authentic pindi chole while some claim they are the best combos for Bhatura (deep fried, leavened bread made using flour & yeast). For a South Indian like me, this is all confusing and when it gets too much, I just stay away from the propaganda and let my own brain & heart (and ofcourse tongue) tell me what to do :-).
But the quest to get an authentic recipe never leaves my side. Authentic is defined as 'homely' in my dictionary and I pester folks to part with recipes from their private kitchen. I had seen this recipe on one of the foodie groups I happen to be a member of, while I make chole at home with my own spices and also using store bought powder, what drew me to this recipe was the title of the post which said, "mom's jagat famous chana masala". Like most of you, I am a sucker for something that comes from a mom's kitchen. So I had book marked this recipe for trying out and did that a couple months back. The flavor of the spice powder turned out far superior to any store bought masala I had used and it dished out a very authentic looking and authentic tasting chole when I cooked with it. I am completely hooked to this home made powder now and have already made it twice.

The first time I made the spice powder, I had a very fine anardana (pomegranate) powder in my pantry which kind of semi dissolved on heating and further liquified in my blender jar. The spice powder though lumpy (and totally un-photogenic) was extremely tasty :-). I had followed the proportions in the original recipe and had enough masala for 4 uses. When it got over recently, I went to the store to buy a better quality anadana powder (coarser) which stood strong to the heat. All is well and I have not only a good looking spice powder but totally delicious which makes taking pictures a pleasurable activity :-).
I will show you how to make a much simpler, tangy, tomatoey chole another day which has lot more gravy and is perfect with pooris or rice. I roast spices fresh and grind it along with onions & tomatoes in that recipe. But today, it is all about Punjabi chole from a Punjabi mom, so enjoy this succulent, spicy chole with your favorite roti or naan.

What do you need to make chole masala? 
Recipe source: http://www.foodfellas4you.com/chana-masala/
1/2 cup dhania seeds
8-10 dry red chilies
2 Tsp cloves
5 bay leaves (medium sized)
10 black cardamom (Badi elaichi)
10 pieces of 1 inch cinnamon
5 green cardamom
1/4 cup cumin seeds
1 Tbsp black pepper corns
1 cup anardana (pomogranate) powder
1/2 cup kasoori methi (dry fenugreek leaves)
How do you make chole masala? 
  • Heat a heavy bottom pan on medium heat and add the first 9 ingredients listed above. 
  • Roast until fragrant (takes about 5-7 minutes) stirring frequently for even distribution of heat. 
  • Once a heavy aroma of the spices fill the air, add anardana powder & kasoori methi, mix well and roast for 1 minute. 
  • Switch off and let the spices cool down in the pan. 
  • Once completely cool, grind to a fine powder, store in air tight jar until ready to use. 
What do you need to make chole? 
2 cups dry garbanzo beans or 2 can cooked garbanzo beans
1 Tsp kala namak or black salt
1 Tbsp salt (adjust to taste)
1/2 cup finely chopped onion
1 inch piece ginger - julienned
1 medium sized ripe tomato - chopped into chunks
2 Tbsp chole masala (adjust according to your spice tolerance)
1 Tbsp oil
pinch of asafoetida
pinch of turmeric powder
1/2 Tsp cumin
1/2 Tsp sugar 
1 Tbsp fresh cilantro - finely chopped
How do you make chole? 
  • If using dry beans, soak them in plenty of water overnight. 
  • Next morning, wash the soaked chole, cook it in pressure cooker along with 3 cups water, black salt and 1 tsp salt until soft. 
  • If using canned garbanzo, rinse them thoroughly under running water until the preservatives and the liquid runs off. 
  • Put the cleaned garbanzo in a bowl, add 1 Tsp salt and 1 tsp black salt, mix well and let it stand until you are ready to use (atleast 15 minutes marination is recommended)
  • Heat oil in a heavy bottom pan (kadai), add asafoetida, turmeric powder and cumin seeds
  • Once cumin starts to sizzle, add finely chopped onion and 1/2 Tsp salt. 
  • Cook until onion turns translucent. 
  • Add the tomato chunks and cook until it becomes a mush. 
  • Add the chole masala and mix well. 
  • Add the cooked garbanzo along with the water it is cooked in (if using canned, add a cup of water), mix everything together. 
  • Taste test, add more masala powder or salt to taste and adjust the consistency to your liking with water. 
  • Add chopped cilantro on top, sugar, cover and let it cook on low heat for atleast 30-40 minutes for the flavors to develop. If you have a slow cooker, take it out and use, you can dump the prepared chole in to it, switch it on low and let it come to a slow boil. 
  • Open cooking works too if you are using a heavy bottom pan and stir it once every 15 minutes or so. 
  • Serve hot chole with a wedge of lemon, sliced onions and oil roasted green chilies as a side dish to naan, roti or Batura. Perfect meal and a sure ticket to siesta :-)
Notes: 
  • I use anardana powder as I don't easily get the dry seeds here. Buy the coarse variety since the fine powder becomes sticky on heat and spoils the powder (lesson learnt by mishap :-))
  • Adding a bit of sugar brings a soft touch to the spices and enhances the taste, skip it if you like the spice flavors as they are. 
  • I don't personally like the bay leaves flavor to overpower so have mentioned medium sized leaves, original recipe specifies big sized leaves
  • The amount of ingredients makes about a cup & half of masala powder, store it in airtight container and use as needed. 
  • You can make this chole with gravy or almost dry depending on your preference - adjust water
  • If you make the drier version of chole, turn it into a yummy snack/chat by serving with a few roasted potatoes, chopped onions, tomatoes, topped with sev :-)

Wednesday, June 26, 2013

Kadala Curry or Chick peas gravy - of roasted coconut, curry leaves and fennel seeds

My Kerala experience is from the one house boat trip we went on a few years ago. I loved the place, its serene beauty, lush greenery, vast pockets of water, sudden showers from above and people crossing the waters on natively built rafters. Our chef on the boat treated us to many wonderful Kerala delicacies including the Puttu and Kadala curry and the lacy appams. I came back loaded with bags of fresh chips, wheat halwa and other goodies. Though it was a short trip,  the memories are etched forever.

My SIL is from Kerala and her mom is one of the greatest cooks I have come across. This aunty is very elaborate, follows the traditional methods of cooking to date and spends long hours in the kitchen dishing out one yummy dish after another. She has always humored me with recipes whenever I have asked her for some. I have tasted one of the best Puli inji in her kitchen. She tells me that a good avial is not only defined by what vegetables go into it but also by how they are cut as each different kind of vegetable has to be cut and cooked separately to reach the desired consistency. The sweet lady that she is, she hands me a packet of fresh home made jack fruit or banana chips for me to carry whenever I visit.

The other day, I was home waiting for a garage door repairman to come and fix something. It was a rainy day and the grey skies just made me miss home terribly and everything and everyone connected with home. I was really not in the mood to cook much as we had had a dinner party over the weekend and been eating off of left overs, I badly craved for something yummy in my tummy that would also soothe me down. I found some plump black chick peas and knew exactly what I would make for lunch. I just followed my instincts to recreate a magic I had a few years before.  I had a few hand written notes for this recipe, had a general idea of how it is cooked and had seen many versions flashing in the blogosphere but I have not followed any specific recipe here rather gone with the way my senses guided me. While I do not claim this to be the authentic Kerala Kadala curry (notice, I didn't call it Kerala Kadala curry :-)), it surely is a great tasting curry. For that matter, you may never find one authentic recipe of this dish since there are so many variations based on which pocket in Kerala it came from and who cooked it.


As I was finishing up cooking, my garage door guy finished up fixing the door and came in to collect his check. As soon as I opened the door, his first reaction was, "God, what is this awesome smell", so I asked him if he wanted to try some and shared a piece of puttu and the curry. He sat there spooning it down and told me stories of how his wife cooks a red curry and a green curry and how old his kids are, how the younger one is starting full day kindergarten in the Fall etc. And I gave him my 5 minute gyan on why there is no such thing as 'curry powder' and the name curry is a misnomer at best :-). Seeing him enjoy the curry made me feel totally gratified. Well, that story was just to prove a point and encourage you all to try this delicious curry in your own kitchens.

What gives the most flavor to the kadala curry is the roasted coconut - be patient and roast it over medium heat. Fennel seeds bring in the 'oh so heavenly' aroma to the dish, I have used this spice in a few other recipes and am totally in love with it. Fennel seeds have the right instinct of being all encompassing yet not overbearing and when used in the right amount, they wield the power to make you crave for more. I have seen recipes using garam masala and coriander powder but I skipped both and used a few fresh whole spices to create the magic. It was like walking into your lush green back yard (complete with a few coconut trees swaying and curry leaves on a tree exuding the fragrance), the only thing missing was the vast Vembannad lake and the sultry climate but my Seattle rains and the grey skies more than made up for its absence.

And once the curry was made, seeing that it turned out so good, I made some puttu with brown rice flour on an impulse. Now, I have made puttu before and keep a packet of puttu flour handy but had never paired it with the Kadala curry. They are a match made in heaven, what makes the marriage rock is a bowl of home made yogurt on the side and your gastronomic journey is totally blissful.
What do you need to make Kadala curry? 
1 cup dry black chickpeas
1 cup coconut
1 Tsp fennel
1/2 Tsp pepper
1/2 Tsp coriander seeds
4 dry red chilies (adjust to taste)
2 cloves
1 inch piece cinnamon
10-12 curry leaves
3 Tblsp oil (divided use)
1 Tsp salt (adjust to taste)
2 Tblsp roughly chopped onions
2 Tblsp roughly chopped tomatoes
2 Tblsp finely chopped onions
1 inch piece ginger grated or chopped fine
How do you make Kadala Curry? 
  • Soak chick peas in 4-5 cups of water overnight, they will plump up to double their size. 
  • Drain water and cook the peas in pressure cooker until soft (mine took 3 whistles) with 1/4 Tsp salt and 3 cups of water. 
  • Heat a kadai and roast grated coconut on medium heat for 8-10 minutes until the coconut turns light brown and gives out a wonderful nutty aroma. Keep aside.
  • Heat 1 Tsp oil in the same kadai, add the fennel, cloves, cinnamon, coriander and red chilies. Fry on medium heat for 2 minutes or until the spices are fragrant. Add the curry leaves and fry for 30 seconds. Keep aside. 
  • Heat 1 Tsp oil, add the roughly chopped onion and fry for 2 minutes, add the tomotoes and continue to fry for 4-5 minutes until onion and tomatoes wilt and turn limp. Keep aside. 
  • Once cool, Grind all the ingredients from step 3, 4 & 5 together into a smooth paste adding some water from the cooked chickpeas. 
  • Heat remaining oil in the same kadai, add the finely chopped onion fry for a minute, add the grated or chopped ginger, mix it in and let them cook for another minute or so until onion cooks and turns slightly crispy - The crunchy onions here take your dish to the next level popping up in unexpected bites, yumm :-)
  • Add the cooked chickpeas, ground up masala and salt. adjust the consistency with water (use the chick peas cooked water to start with) and let it come to a good boil. 
  • Add a few fresh curry leaves on top when it is boiling for added flavor. 
  • I served it with puttu but it goes equally well with rotis or plain rice. This is not a very spicy hot dish but extremely flavorful because of the ingredients.
Notes: 
  • Take time and roast the coconut on medium heat until it turns light brown and gives out a wonderful nutty aroma. 
  • You can add red chili powder and/or garam masala while boiling the curry to suit the taste but this dish was perfect as is and I didn't add anything. 
  • You can fry pieces of tomatoes before adding the boiled chickpeas instead of grinding them but I usually grind up tomatoes to avoid DD picking at tomatoes. 
  • Do not skimp on curry leaves, get fresh ones and load the curry with them. 
  • Use black or brown chickpeas (smaller than Garbanzo beans) in this recipe as they taste better. 
Since this protein rich curry is so loaded with legumes, I am sending this off to My Legume Love Affair 60 hosted by Nupur of One Hot Stove. This event is one of the longest running events in the blogosphere started by Susan, The Well Seasoned cook and now maintained at Lisa's Vegetarian kitchen. See you all there with your own creations.