Showing posts with label Dip. Show all posts

Tuesday, September 17, 2013

Tomato Tokku - when it rained tomatoes in the Northwest :-)

I haven't done a garden update here on the blog in quite some time, while we got a squash a day harvest for a while, the surprise of the season has been Tomatoes. Yes, these are big, juicy and incredibly tasty tomatoes and have made me turn my back permanently on the waxy, store bought excuses. I am worried about the soon to be here winter months when my garden will hibernate:-(. But until then, I am cooking up all sorts of Tomato deliciousness in my kitchen. 

It all started with 4 small saplings we planted in the middle of Spring, sun shine was abundant this summer (not sure where the gray, cloudy weather rumor spreads its wings:-)) and my tomato plants grew big and tall like the bean stalk in (well, what else but..) Jack and the bean stalk. I saw the plants bending and flexing on the ground with its own weight before BH & I could scurry around to build a support structure for them. We lifted them gently, placed them inside the support structures when we noticed small, yellow blooms which heralded the possibility of tomatoes some time in the future. So, we waited patiently and then forgot about them for a while with the Arangetram excitement and when we did remember to go back to the back yard and look, the plants were lugging huge tomatoes, some turning red but mostly green :-). I did and still have been making a whole lot of green tomato recipes (believe me they are all yummy and will be showcased here on the blog soon) and then started picking the red ones. I am not exaggerating when I say it really is raining tomatoes in my back yard and all of them looking so deliciously juicy and flavorful. 

We are a family of 'saaru' lovers, saaru is a staple in my home and is comparable to 'Rasam', it is either sipped as a appetizer or mixed with rice and enjoyed. There are many different kinds of saaru but then, this post is not about the 'saaru', right? It will suffice to say, I made many, many saaru with the freshly harvested ripe tomatoes before my saaru crazy family was deploring me to put the ripe tomatoes in another recipe :-). So, best way to use pounds of ripe tomatoes? Make this wonderful tasting tokku that has multiple uses. It will make you 'tomato happy' for life :-).

Tokku is a common word used to describe a pachadi or chutney in Kannada, the difference being Tokkus almost always stay fresh for long while regular chutneys are for quick consumption. This makes Tokkus preferred accompaniments during travel. In addition to topping the usual suspects such as bread, roti, idli, dosa or crackers with Tokku, Nammamma also mixed spoon fulls of tokku (usually mango tokku) with cooked rice, seasoned it with asafoetida, mustard, chana dal and peanuts to make a quick, ready to eat or lunch box friendly rice variety. Try it and you will be hooked. 

Tokku does not call for many or even exotic ingredients, one thing that helps is to make sure the star ingredient is fresh and tasty. Whether you are making mango tokku or tomato tokku, make sure you have good mangoes or tomatoes. The rest of the procedure is very simple but needs time and patience. After tokku is done, handling it is very similar to that of pickles - make sure you store it in a dry, airtight container, use only dry spoons to serve for the longevity of the tokku. 
What do you need to make Tomato Tokku? 
1 lb fresh, juicy tomatoes
2-2.5 Tblsp red chili powder (adjust based on spice tolerance)
1 Tblsp salt (adjust to taste)
1.5 Tsp fenugreek seeds
1/4 Tsp Asafoetida powder
1/2 cup oil
1 Tsp mustard
10-12 curry leaves
1-2 dry red chilies (optional)
1/2 Tsp crushed jaggery
How do you make Tomato Tokku? 
  • Wash, wipe and cut tomatoes in half. 
  • Remove the stalk end part and chop into small pieces. 
  • Heat oil in a heavy bottom, big pan (big enough to hold all tomatoes and let you stir them around easily).
  • Add mustard seeds and dry red chilies, let mustard pop. Add asafoetida and curry leaves, toast for 15 seconds before adding chopped tomatoes in. 
  • Mix it in, add salt and red chili powder. Let the tomatoes cook on medium flame stirring occasionally so it doesn't get burnt at the bottom. 
  • In the mean time, dry roast fenugreek seeds on low to medium heat stirring frequently (about 5-7 minutes) until they turn a deep brown without burning the seeds, let cool and powder in a spice grinder. 
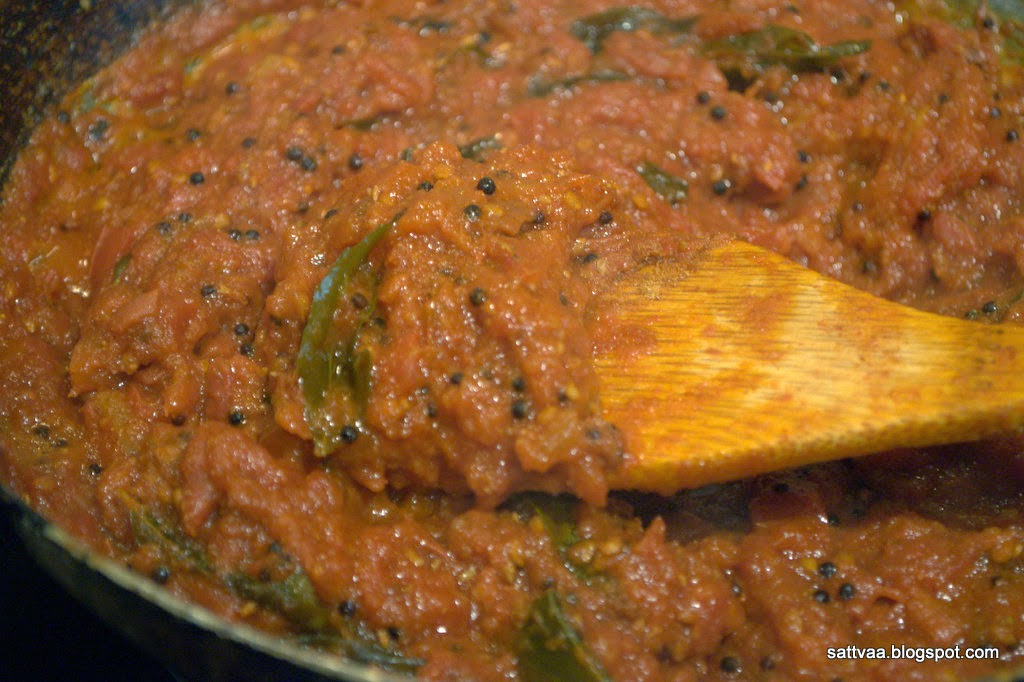
  • Tomatoes first break up and then turn mushy and most of the juice evaporates eventually, keep an eye on them and let them cook until oil starts to ooze from the sides of the vessel - takes about 2-2.5 hours depending on how juicy your tomatoes were to start with and the volume reduces by a third. 
  • Add the powdered fenugreek and jaggery, reduce heat and continue to cook for another 15-20 minutes. 
  • Switch off, let it cool completely before storing in dry, air tight containers. This tokku stays fresh for months if you make sure you keep it in a cool, dry place and also do not use any wet spoons or hands to serve. 
Notes: 
  • The tiny bot of jaggery helps bring out the tastes well, my recommendation is not to skip this ingredient. 
  • There is no baby sitting involved to make this tokku, though it takes time, you can set the timer to 15-20 minutes between stirrings and continue doing whatever else you need to be doing. 
  • Chopping tomatoes small will speed up the process. 
  • I do not peel the tomatoes for tokku as we like the texture it imparts, if you like grind and sieve tomatoes before you drop them in the seasoned oil. 
  • Tokku tastes best after some settling time as the tastes get time to mingle, let it cool down and stay put for half a day before you start to liberally use it as a spread or dip. 

Monday, April 1, 2013

7 layer bean dip - perfect to scoop with your chips

Growing up in India, our idea of snacks was defined by what was cooked at home. Though there was a range of sinfully delicious deep fried goodies, most days the snacks were simple items ranging from a churmuri or avalakki vaggarane to a roasted papad. When I left India, small packets of Lays potato chips were just entering the market and bakeries used to dangle these from a thick thread infront of the store. And there was not much of celebrity endorsement either to those chips yet. When I first came to the US, I was really shocked by super size chips bags in the grocery stores. To add to that there were umpteen varieties of chips to choose from sour cream & onion to barbeque flavors, kettle roasted to reduced fat, increasing the health quotient (!) with vegetables added and on and on. There was a period (like it happens to most people) when we fell into the allure of eating chips by the bags but then I am glad we found our footing very soon to stay away from that almost mindless snacking on the chips. Now it just bothers me to see people especially kids munching on chips like they were the most nutrient and healthiest of all food.

During one of those initial days, we had an office party and everyone was signing up bring stuff and I saw an entry that said chips & dip. Intriguing, to someone that had not eaten a lot of chips, the idea of eating chips dipped in something was totally new. I sat there waiting for the chips and dip to appear on the day of the pot luck but honestly was disappointed with that store bought dip as it was not appealing at all to me. Several exposures to chips and dip and I was still craving for a perfect dip that fit my imagination when I finally ate this layered bean dip at a friend's house. It was delicious.

So does this post have anything to do with chips? Not really. Infact the dip in this post is so delicious that you end up eating more of that than the chips which is what I look forward. Made with protein packed beans and nature's own butter avocado, this is a healthy dip for all ages. Give a plateful of the dip decorated with a few chips and I promise you won't hear anyone complaining.

There is no serious recipe here, it is essentially an assembly of layers. Although it is called 7 layer dip, I have eliminated one layer as we are not great fans of olives. Go ahead and add it by all means. I made a huge tray full of this dip last weekend for our Holi celebrations and needless to say that the tray was wiped clean. The heartening part was that the kids came back asking for more dip :-). Below is my take (spiced with Indian spices) on the traditional 7 layer dip but this versatile dip will allow you to play with the ingredients and personalize.

Traditional 7 layer dip uses the refried beans from cans but since most store bought refried beans contain meat, I prepare my own bean layer as this also gives me the freedom to jazz up the bean layer to suit my family & friends palate. I have used canned black beans (which are cooked and preserved in liquid). Go ahead and try this sure party pleaser for your next get together. This is one of those attested by mom, loved by kids recipe, so totally risk free.


How do you make the (7) 6 layer bean dip?
You will need a large enough plate or a dish to build the dip.
Layer 1:
2 cups cooked black beans (if using the store bought cans, drain and rinse a couple of times)
1/2 cup chopped onion
1/4 Tsp salt (adjust to taste, canned beans already has some salt)
1/2 Tsp roasted cumin powder
1/4 Tsp red chili powder
1 Tsp oil

Heat oil in a pan, add onions and fry until they sweat and turn light pink. Add the cooked beans and mash it in with a masher. The beans should become pulpy. Add salt, red chili powder, cumin powder and mix well. If the beans look very dry add a couple of spoons of water and mix it in.

Note: If cooked in a Southern kitchen, you will find this bean layer spiced with Taco mix but I prefer the flavor of roasted cumin and the heat from the chili powder.

Let the mixture cool for 5 minutes and spread it in your plate or dish as the first layer.
Layer 2:
1 cup sour cream (use fat free if you like) or 1 cup of thick home made yogurt

Pour the sour cream or yogurt on top of the bean layer and spread it out.
Layer 3:
1 cup guacamole, see recipe here

Spread the guacamole on top of the sour cream.
Layer 4:
1 cup finely chopped green onions

Layer 5:
1 cup chopped tomatoes.
If you want the dip to be spicy, here is your chance. Instead of layering plain chopped tomatoes on top, mix them with a few chopped green chilies, cilantro, salt and lemon juice and make a quick chunky salsa and then spread it in a layer.
Layer 6:
1/4 cup shredded cheese (increase or decrease the quantity to suit your taste)
Layer 7:
Traditionally this is where a few fresh chopped or whole olives are found but as I mentioned before, I skipped it.

Once you assemble the dip, press the top gently so the tomatoes and green onions get implanted in the layers below, cover the dish with a cling wrap so no air goes in and refrigerate for 30 minutes to an hour for the flavors to get together. The 7 layer dip is a Southern (US) Mexican dish and typically served with tortilla chips or corn chips. But you can eat this delicious, summery fresh dip with any kind of chips.
 
Notes:
  • You can make the layers as thick or as thin as you like.
  • I sometimes layer shredded lettuce or cabbage in this dip and it tastes wonderful too.
  • Replacing sour cream with yogurt is a personal choice and makes it healthier.
  • Add spices to the bean layer, make the guacamole spicier or salsa brighter and personalize this dip. I kept the embellishments to the basic as there were lot of kids at the party.
  • While you can make this dip ahead of time, be sure to wrap it tight and refrigerate it until ready to use. Once you open it, you will want to finish it at one go as the avacados turn a dirty green spoiling the look of the dip.
 

Monday, January 21, 2013

Hummus - a deliciously healthy Mediterranean dip

Travelling and staying away from the comfort zones of food one grew up with is a nice growing up experience. It expands your horizons and makes you try things you wouldn't normally have tried otherwise. As I look at my repertoire for food (both what I eat outside and what I make at home) I feel blessed to have had these experiences in life. When I first ventured out of home, I hardly ate anything and preferred biting into some non descript stale food over going into a restaurant I hadn't heard of. I am thankful to BH for slowly coaxing me into taking a small bite at a time and now I am confident of experimenting with unknown cuisines. Also I think my inhibition was mainly from being a staunch vegetarian, I was very wary that I wouldn't find veggie choices in most places. In all fairness, it was true to a large degree especially a decade or so back when we first moved out of India. I have had to explain what a vegetarian plate would not have (no meat, no chicken, no fish, no seafood) over what it should have. Things have changed and I notice that people are more aware of vegetarianism and it is becoming an accepted way of eating food after all.

I have also learnt over the years that vegetarian options are available in every cuisine of the world if you are only open to trying something that may not taste like the regular curry you are used to at home. I love Mediterranean food for the plethora of choices it offers, most of it is very healthy (try not to think baklava with layers of philo dough and oodles of butter :-)) and this cuisine has remained one of my favorite eat out options when we travel.

I made some Mediterranean meal at home over the weekend and as usual will share my joy of achieving this restaurant quality, home made dishes with you here.

Hummus is a very popular Mediterranean spread or dip (depending on how you use it) found in almost everyday meals in the region. Depending on the part of region, this versatile dish will have its variations in the ingredients used though the basic ingredient remains constant - cooked, mashed chickpeas. This very healthy, fiber and iron rich dish allows you to customize its taste depending on your pantry supplies and your taste buds. One of the other common names you will see in all Hummus recipes is 'Tahini' or sesame paste which is nothing but toasted sesame seeds ground to paste with olive oil.

If you are trying Hummus for the first time and not inclined to make large amounts of Tahini or are just making a small batch, go ahead and powder the roasted sesame seeds and add it into Hummus while grinding.
What do you need to make Hummus? 
2 cups cooked garbanzo beans/kabuli chana/white chick peas
1 Tblsp Tahini paste (see below for recipe)
1 Tsp salt (adjust to taste)
1 Tblsp lemon juice
1 clove garlic (see notes)
1 inch piece jalepeno/anaheim pepper - deseeded
2.5 Tblsp olive oil - divided use
1 Tblsp chopped parsley
1/8 Tsp baking soda (only if using dry chickpeas)
Tahini paste
  • Dry roast 2 Tblsp of white sesame seeds in a hot pan for 2-3 minutes until the sesame seeds start to glisten with the oil. Take out and let cool. 
  • Grind it into a paste with a Tblsp of olive oil. 
  • If you are making Tahini paste in big batches, you can also microwave the sesame seeds, spread in a single layer in a microwave safe bowl and microwave for 2-4 minutes with breaks after every 1 minute or so. 
How do you make Hummus? 
  • If you are going to soak the dry chick peas, follow the next 2 steps. If you are going to use the canned, boiled chick peas, skip the next 2 steps. 
  • Soak the chick peas (1 cup of dry chick peas will yield about 1.5 cups of soaked and cooked peas) overnight in plenty of water.
  • Drain the water, wash the soaked peas and pressure cook them until soft (3 whistles in my pressure cooker) with 1/8 Tsp baking soda.
  • If using canned chickpeas, pour out the preserving liquid and wash the peas thoroughly under running water. 
  • Take all the ingredients listed except for olive oil, lemon juice and parsley to a food processor or blender and pulse them until they turn crumbly. 
  • Add the lemon juice and about a Tblsp olive oil and blend it to get a nice soft and thick puree. 
  • At this stage the hummus can be refrigerated in an air tight box for about a week. 
  • To serve, scoop out spoonfuls of hummus into a bowl or plate and pour the remaining olive oil on top and garnish with chopped parsley. 
Notes: 
  • I find parsley to be much milder than cilantro (talk about my Indian seasoned tongue), so I sometimes cheat and garnish with chopped cilantro instead :-)
  • What I have above is a pretty basic version of Hummus and you can jazz it up by adding other herbs such as thyme, chive, mint, oregano or basil and also add other ingredients such as sun dried pepper, sun dried tomatoes, roasted onions etc. Make this dip your own by adapting it to suit your taste. 
  • As you can see from above, the amount of garlic I add is very low given my limited tolerance to garlic. Garlic lovers can bump up this ingredient to make it really garlicky. 
  • Adding a small piece of deseeded jalapeno enhances the flavor and also makes the hummus look pretty with small green flecks contrasting the pale yellow of the chickpeas. 
  • If you like a really smooth textured Hummus, peel the chickpeas and discard the outer covering before grinding them. We like the slightly grainy texture when using it as a dip which is what I did this weekend and hence didn't peel the skin off. 
  • The shelf life of Hummus can be extended by grinding it sans water, use the lemon juice and olive oil instead.
Serving suggestions: 
  • Traditionally Hummus is served with either fresh baked soft pita bread or the baked pita chips as a dip. 
  • Hummus is also used generously in Mediterranean wraps or sandwiches as a spread. 
  • You can serve this healthy dip with your chips or sliced vegetables as an appetizer.