Showing posts with label Toor Dal. Show all posts

Sunday, October 27, 2013

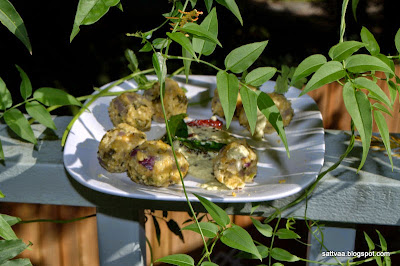
Nuchinunde with hasi majjige huli (steamed lentil balls with yogurt dip) - a Mysore special

2 weekends of training with a full work week sandwiched in between, I feel like a zombie. Brain is woozy and information seems to be floating all around. I feel the need for some quite time and then I will be ready to be up and run with another week. Yep that is the impact of professional development training on me :-). So, as you noticed, I went light on my blog posts, cooked a little less than usual, spent a lot less time with family than usual and missed talking to you all. I am done with training (not with studying though) today, caught up on some late afternoon blissful sleep while BH & DD very sweetly did their own thing and let me snooze, I am up and fresh and can't resist the urge to chat with all of you again, blogging is addictive -{sigh}-.

Sometimes I wonder why I started or am writing this blog, I like cooking, I like feeding people, I also like to talk and I like to write - all good reasons but is it worth the time I spend on it? After 200+ posts and 120+ likes, I am totally convinced that it is worth the time, hope you feel the same way my dear friends who drop in and make me feel special. It feels good when people visit and leave genuine comments or feedback, I also get flustered when I see the obviously spamming messages but have learnt to put them where they belong (right in to the trash can) and move on. I have made some friends who inquire after me offline and that I think is the highlight of this journey.
When I started writing, the only 'not-so-encouraging' thing BH said was that I should make sure I had enough recipes to post so I don't suddenly come to a screeching halt, ever the wise man. I finished my 200th blog post recently and don't feel like I have even scratched the bottom of the barrel with the recipe repertoire I have, and I am learning so many new dishes as part of my 'blog visits' with like minded bloggers here. But then, just sharing recipes was never the the focus of my blog, I wanted to capture what went on in familiar kitchens when those dishes were cooked, reaction of people to certain dishes, stories behind the traditional recipes, experiments and heart aches while learning new recipes and all so often about my thoughts, events in my life, something that just made me stop in my tracks and slow down a tiny bit. Most times, writing a blog post is free flowing especially when I hold a recipe close to my heart but there are times when I have had to struggle to personalize a really yummy dish and present it to you all.
I had this dish marked down for my 200th post as I wanted it to be something special, then Navaratri came, the quick made Rasmalai became a hit and I thought why not do the 200th with a sweet treat. Things change, that is why you make so many baselines (I couldn't resist that one, I had to share something from my training of the last 2 weekends with you guys :-)) and Rasmalai it was last week as we celebrated Navaratri. So my very humble and healthy Nuchinunde kind of stayed back in the draft mode.
Nuchinunde gyan - in Kannada (nuchu~broken tidbits, unde~balls), it means balls made of broken tidbits of dal. When almost everybody was a farmer and grew their own rice and lentils, as the lentils were harvested, cleaned, there always used to be some collateral broken lentils as a result of all the processing. Somebody smart found a great use to convert this 'not wholesome looking' dal into a delicious dish. But since it tastes so great, we now bring perfectly 'wholesome looking' dal from the store, break it into pieces and make the nuchinunde :-). Nammamma always made this with toor dal, I have tasted versions with a combination of toor and chana dal or only chana dal too. They all taste great and it is a matter of preference. It is a ground coarse paste of dal, mixed with herbs, onions and coconut, made into balls (or ovals as nammamma did and I make), steam cooked. Have it with a smear of ghee on top and a majjige huli, you will be cleaning that plate in a jiffy and asking for more.

This is not a dish you will find in restaurants and its appearance at home cooked meals is also becoming few and far. For me, it is one of those dishes that brings back memories of that childhood kitchen, where we would all be salivating as nammamma soaked the dal early in the morning, the quantity would be huge to serve the family and drop in visitors and it would very soon start sounding and smelling like a festival was in the air. As soon as they were cooked, amma would put a few in a plate, dab a smear of home made ghee on top of each, pour some deliciously spicy sour majjige huli on the side and set it infront of us. Dip the hot, steam effusing nuchinunde into the majjige huli and take a bite, you will not ever stop at one bite. A perfect balance of spices, deliciousness of onions and coconut - this is a very simple dish that gives you that protein boost with every small morsel.
Nammamma also served this with a Hasi majjige huli (no cooking needed) without vegetables as a dipping sauce, see below for recipe. You can also serve it with the ginger tambuli, or other yogurt based dips or chutneys.

What do you need to make nuchinunde? 
Makes about 15 undes
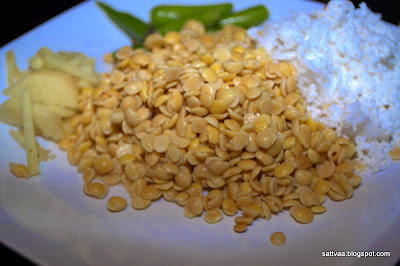
1 cup Toor dal
4-5 green chilies (adjust to taste)
1 inch piece of fresh ginger
1/4 cup chopped fresh cilantro
3/4 cup chopped onions
1/2 cup grated coconut (fresh or frozen)
1 Tblsp finely chopped coconut pieces (optional, gives a nice bite)
1 Tsp salt (adjust to taste)
pinch of baking soda (less than 1/8 Tsp)
How do you make nuchinunde? 
  • Wash, pick toor dal and soak it in water for 2-3 hours until it softens. 
  • Rinse and drain the water from the dal. 
  • Grind the soaked dal with green chilies and ginger into a coarse paste without using water. Tip: use the blender in pulse mode, make a paste of ginger and green chilies first and then add the dal. Moisture from the soaked dal helps in grinding. 
  • Take the ground paste into a bowl, add all the remaining ingredients and mix it well. The consistency should be such that you can press a fistful of mixture in the palm and it holds shape. 
  • You can make real round balls to stay true to the name or make longish ovals like I do, aesthetics here is a matter of personal choice. 
  • Arrange the balls in a lightly greased (1-2 drops of oil) vessel in a single layer, steam it for 20 minutes on medium heat or until the nuchinunde gets a nice shiny coat on top. 
  • I use my pressure cooker and steam them like idli (without the weight). 
  • Let the steam subside, take out the nuchinunde, serve them hot with a dab of ghee and the majjige huli. 
How to make Hasi majjige huli? 
  • Take 2 Tblsp kadle (roasted gram dal), 1/2 cup grated coconut, 1 Tsp cumin seeds, 2-3 green chilies, 1/2 Tsp salt to the blender and grind them to a smooth paste with 1 cup of sour yogurt. 
  • Adjust the consistency with more yogurt if you like.
  • Heat a Tsp of oil, add 1 Tsp mustard, 1/2 Tsp cumin, a few curry leaves, 1-2 pieces of dry red chilies and 1/8 Tsp asafoetida. Once the mustard pops, switch off and pour the seasoning over the ground paste. 
Notes: 
  • Baking soda helps make the nuchinunde lighter, coconut serves the same purpose also in addition to adding to the taste. If you do not feel like using the baking soda, skip it and increase the grated coconut by a Tblsp or so. 
  • Do a taste test before you steam them and make sure the spices are right for your taste, note that the undes will mellow down once steamed so you want to make them a little spicier on the tongue.
  • I add finely chopped dill leaves (sabsige soppu) or fresh fenugreek leaves (methi) to the paste along with onions and coconut for flavor sometimes. 
  • If your blender is not cooperating without addition of water, go ahead and add a few spoons of water and then add a Tblsp or so of besan/chick pea flour to get the right consistency to make the balls.
  • I like to break a day old nuchinunde and mix it with hot rice and a little bit of oil and relish it. It tastes really yummy. 
I am a self declared lentil lover and what better way to show it than entering this protein rich dish into one of the longest running events in the blogospehere? I am sending this to I am sending this off to My Legume Love Affair 64 hosted by Princy of Spicy Food. The event originally started by Susan, The Well Seasoned cook is now maintained at Lisa's Vegetarian kitchen. 

Sunday, July 15, 2012

Bassaaru & Palya with Dill leaves - a homely Karnataka experience

When me & younger brother were in elementary school, we lived in a rented house in Mysore that had a huge fenced up yard which was what i think most attracted my parents to take up that house. Over the years we spent in that house before moving away, we planted numerous flowering plants and fruit trees. That yard was where we had our summer drama clubs, climbed on trees to pick berries, put up impromptu and planned dance shows, painted our nails with color pencils and had all the fun with friends. The area was literally infested with kids my age and all of us going to the same school helped since we had the same vacations and holidays.

One drawback of the house according to nammamma (though we never cared) was that there was a wide, deep open drain meant for sewage running behind our house. It was dry for most part of the year except in the rainy season and never actually was used for the purpose it was built for. The mori as we called it in Kannada was deep and much lower than the street level and we kids had strict instructions not to go to the back side of our fenced wall and peep down into the activities that went on in the mori :-). As it was dry most days, it had become a play ground for traunt kids from a nearby neighborhood that never seemed to go to school. The kitchen window when opened overlooked a garden cum vegetable patch on the other side of the mori. When we first moved into that house, nammamma was very hesitant to even open that kitchen window but after some months she felt confident that the vegetables were grown in a healthy way and started getting her greens from there.

In the vegetable patch they mostly grew greens - all kinds of them, amarnath (dantina soppu), fenugreek (menthya soppu), Dill (Sabsige soppu), Coriander (kottambari soppu) and many others that I haven't seen in years and do not know the English names such as honagonne (a small leaved, slightly sweet and supposedly great for eyesight), keere soppu, chakkota soppu (though it had no relation to the similarly named citrus fruit) and so on. The patch looked like a green carpet from far and nammamma would know which was ready to be harvested by the height and density of the patch. I believe it was maintained by a family but we mostly saw two teenage boys tilling the patch, seeding it, hauling water from a dug up well, tending to the plants, harvesting and taking them off to the market for sale.

Although there was no scarcity of street hawkers frequenting our street starting at 6am in the morning with fresh picked vegetable baskets on their heads, nammamma preferred getting the greens from this extended backyard of ours. All she had to do was open the kitchen window and have a quick conversation with the guy in the patch as to what he was picking that day and what she wanted. He would keep some aside for her. After that one of us kids would be told to run around the house and the mori and get the freshly picked greens in a environment friendly basket called butti. The guy would come back later in the day to get his money and we never saw him as we would be at school. Fresh picked vegetables are the best kind and buying local  was a lesson in paying attention to what went into the plate and stomach every day.


Saaru in Kannada refers to the usual tangy appetizer also called rasam in many other languages that preps you up for a well made south Indian meal. Saaru is usually made with lentils and much thinner in consistency compared to the vegetable laden sambar or hulis. Every day saaru at home is made with toor dal & tomatoes/tamarind and then there are umpteen varieties of lentil free saarus made with the intention of drinking up as an appetizer. These are the comfort foods of every home cooked meal. Bassaaru is a popular variation of the saaru where in lentils and greens are cooked together and strained to get a very flavorful broth which is boiled with fresh roasted and ground spices. Since the saaru has to live up to its consistency, most of the cooked lentils and greens are transformed into a palya (curry) while the juicy broth is made into the saaru. The word bassaru can be broken up as 'basida (~strained)' + 'saaru(~rasam) which just explains the procedure of making this tasty saaru.  

While you can use all you want of the ready made rasam/saaru powders off the shelf for regular saarus, prepare bassaaru with freshly roasted and ground masala paste for best taste. The saaru is spicy with a blend of red chilies, tamarind and salt for taste while the palya is milder. The list of ingredients looks a little intimidating but they are all usually found in the Indian pantries, so go ahead and give it a try.
What do you need to make bassaaru & palya? 
4 cups cleaned, chopped dill leaves
1 cup toor dal/togari bele
2 Tsp salt divided (adjust to taste)
Small lime sized tamarind soaked in warm water for 20 minutes
1/2 cup grated coconut (fresh or frozen) - divided use
5-6 cups of water
1/4 Tsp turmeric powder/arishina pudi
Saaru masala: 
1 Tsp chana dal
1 Tsp coriander seeds
1/2 Tsp cumin seeds
1/2 Tsp poppy seeds/gasagase
4-5 dry red chilies (adjust to taste)
2 cinnamon sticks - 1 inch long each
2 black pepper corns
1 Tsp oil
2 Tblsp coarsely chopped onions - use red onions or shallots for best taste
For Palya seasoning/vaggarane:
1 Tsp oil
1 Tsp mustard seeds
1 Tsp chana dal
3/4 Tsp urad dal
1 or dry red chilies broken into 2 pieces each
3-4 curry leaves

How do you make bassaaru & palya?
  • Clean, remove thick stems and chop the dill leaves finely. 
  • Wash, pick toor dal, add chopped dill leaves, water and turmeric powder and cook it in pressure cooker until the lentil is cooked soft. 
  • Open the cooker after the steam is gone and pour the entire cooked mixture into a sieve to collect the water in a bowl. Reserve both the broth and the dal mixture separately. 
  • Heat 1 Tsp of oil in a pan, add all ingredients under saaru masala except onions and fry on medium heat until well roasted,  3-4 minutes.
  • When the roasted ingredients are cool, take them to the mixer/blender along with soaked tamarind, chopped onions and 1/4 cup of coconut and grind it to a smooth paste. 
  • Add salt and ground masala paste to the reserved broth and bring it to a slow boil. adjust salt, tamarind and water to taste if needed. 
  • Add 1 Tblsp of the dal and greens mixture on top before switching off. Consistency of the saaru should be slightly thick (like full fat milk). Bassaaru is ready to be served hot. 
  • Take another pan and heat a Tsp of oil and add the seasoning ingredients. When mustard pops and the dals turn light pink, add the reserved strained dal and greens mixture, salt and remaining coconut gratings and mix well. 
  • Keep this on the stove for a minute or two to bring it together and switch off. Palya is ready.
Notes: 
  • I used Byadagi variety of chilies which gives a bright red color to the saaru but is mild on heat. If you are using other spicy varieties of chilies, adjust the quantity
  • Do not add garlic to this saaru as it will overshadow the dill flavor.
  • If your cooked dal & greens mixture has less water or is devoid of water, add 2 cups of water, mix well and then run it through the sieve. You need to get the flavored broth for the saaru.
  • Bring the saaru to a slow boil as the onion needs to cook and let go of the raw smell.
  • The palya tends to get dryer and thicker as it cools because of the cooked dal in it. 

Coming up next on Sattvaa - Guess what we ate bassaaru with? It makes for a very nutritious meal and is a regular meal in the farming communities in Karnataka. I will be back soon with that recipe.

Sunday, July 1, 2012

Handvo - Love affair continues with Gujarati snacks

I have already professed my love for Gujarati snacks with recipes blogged here and here. I am more partial to their snacks than anything else. Handvo (or Handwa) is a Gujarati snack made with soaked rice and mixed lentils. There are as many variations of the dal mixture as there are dals :-). Having said that, typical Handvo consists of toor dal, chana dal and urad dal with an addition of moong or masoor dal. Can you already see that this is not protein deficient dish by any means? The traditional version is cooked with a lot of oil but baking this dish with oil used only for seasoning keeps it healthy. Baked handvo is cut into wedges(or any other shape you prefer) and served with a coriander/mint sweet-spicy chutney as a snack.

When I cook dishes that are not native to me (those that I didn't grow up eating), I always start with an analysis of similarities and differences between the new dish and something I am familiar with. If you think about it, Handvo has some resemblance to the South Indian Dosa/Dose or adai. After all, ingredients are similar (proportions though vastly different) and traditionally it is pan fried with an oil base which is the same concept of uttappa(m)s, right? I am glad someone in a Gujarati house hold figured out how to make a Handvo with rice and lentils while some one down South made a Dose because both are equally welcome in my kitchen :-). I will not go any farther on this though because if DD had her say, she would definitely do a 'Mom, stop comparing things weirdly', because according to her, I killed the fun of Harry Potter series by constantly quoting story lines from Indian epics such as Mahabharata and Bhagavata :-). For the record, I love the Harry Potter books. It is a different story that she is still hooked to HP and keeps reading the books over & over again. 

But I guess the point I was trying to make above is that cooking is more an art than measurements, there are techniques you need to be aware of but once you know the basic process, every cook can weave their individual magic wands and make the dish unique. BTW, that is the excuse I use every time one of my preparations falls short against nammamma's :-)

If you are entertaining friends or family, think about Handvo as one of the starters since the batter can be prepped ahead of time. All you need to do before the party starts is to pour the batter into the pans and bake it. I have seen the Handvo flour in Indian grocery stores here but have never tried it myself. I prefer my old fashioned way of grinding the batter at home.
What do you need to make Handvo? 
Makes 2 - 8 inch pans
1 cup rice - any long grained rice will work, I typically use Sona masoori variety.
1/4 cup toor/tuvar dal or togari bele
1/4 cup chana dal or kadle bele
1/4 cup masoor dal or moong dal - I used masoor dal this time
2 Tblsp urad dal or black gram
3 cups tightly packed grated bottle gourd
5 green chilies - adjust to taste
1/4 cup sour yogurt - a day old works best
1 inch long piece ginger root
1 Tblsp grated coconut - fresh or frozen - optional
1 Tsp sugar
1 Tsp salt
For seasoning:
1 Tblsp oil
1 Tsp mustard
1/4 Tsp asafoetida
4-5 finely chopped curry leaves
1 Tsp red chili powder - optional
For garnish:
1 Tsp white sesame seeds

Optional - chopped cabbage, chopped cilantro, grated carrot - I haven't used any of these this time though I usually load up my Handvo with finely chopped cabbage or grated carrots.

How do you make Handvo?
  • Wash and soak rice and the dals together in water for about 6 hours. 
  • Rinse, drain the rice and dals and grind it with green chilies and ginger to a coarse paste with as little as 2 Tblsp of water. 
  • Wash, peel and grate bottle gourd (thick grates is preferred here) - see notes for additional vegetables
  • Add the bottle gourd grating along with yogurt, salt and sugar into the ground mixture, set it for fermenting over night or atleast 6-8 hours. - see notes for fermentation tips
  • The batter would have thinned down a little with the yogurt and bottle gourd juice and will look fluffy and porous with fermentation, mix grated coconut into the batter. It is important to use as little water as needed while grinding.
  • Heat the oil, add mustard, chopped curry leaves and asafoetida. Let mustard sizzle & pop, switch off the stove, add the red chili powder, mix it well into the oil. Pour everything into the batter and mix well. 
  • At this time, taste the batter to check and adjust sugar, salt, red chili powder per taste. you can add more green chili-ginger paste at this time if you like. 
  • Spray 2 - 8 inch pans with cooking spray, pour the batter to 1/2-3/4 inch thickness and sprinkle sesame seeds all over. 
  • Pre heat the oven to 350F, bake the Handvo for 30 minutes. a toothpick or knife pushed in the center of the pan should come out clean. 
  • A more traditional way of making this is to pour the batter into a thick cast iron pan (about 1inch thickness), drizzle oil around the sides, cover and cook on low heat until the bottom side gets the crispiness of your liking, gently turn it over and continue cooking on  the other side without covering the pan until both surfaces are roasted well and a toothpick comes out clean when pushed through the center.
  • the stove top method needs a little bit more attention than baking and results in a deep roasted texture if you prefer. i love to use my cast iron pan for this.
  • Switch the oven to broil (high) and broil for 3 minutes to get a nice brown coating on top. Keep an eye on the Handvo during broil as oven settings differ and it can burn the dish in a matter of minutes.
  • Let the Handvo stand for a couple of minutes, cut wedges and serve it with coriander or mint chutney or ketchup as a tea time snack. 
Notes: 
  • If you are adding additional vegetables, make sure all of them together make 3 packed cups. Keep bottle gourd to atleast 2 cups so you get the right consistency of batter. You can squashes or cucumbers for a different flavor. 
  • The Handvo batter needs to be fermented well, if you are in a hurry and do not have overnight waiting time, go ahead and add 1/2 Tsp of cooking soda into the batter and leave it for about 30 minutes before baking. 
  • Addition of coconut makes the Handvo lighter, but this is a personal preference. skip it if you don't want to use it. 
  • Broiling the Handvo at the end is important to get the crispy layer on top, but keep a close watch during the broil cycle. 
  • The batter should not be ground very smooth, the texture should be a little grainy. 
  • Do not pour the batter thinner than 1/2 inch as it changes the texture of the finished product and makes it chewy. 
  • Reheat Handvo pieces in the conventional or toaster oven to get it to taste as good as new.

Monday, March 12, 2012

Summer tastes - Maavidikaya pappu a.k.a Mango Dal

What does Summer mean to you? For me (even after all these years), summer is synonymous with school vacation, new hobby for the 2 months and mangoes. Yes summer is as much mangoes as winter is avarekayi for me. I love mangoes, period. Growing up in a city like Mysore, we didn't have mango trees in the back yard but come season, there would be no dearth of fresh mangoes in all shapes, sizes and colors. We used to have basketful of mangoes at home but formally restricted to eating them within limits. Me & my younger brother would fight for the juiciest, ripest raspuri mangoes (my favorite kind) and along with the ones chosen for nammamma, anna, and older siblings will put them in a bucket of cool water in the evening. We used to mark the fruit with a signature, a line drawn with nail, pencil anything to identify that it was mine come dessert time. The first one to finish dinner would run to the bucket and get the cooled, washed mangoes to distribute around. After the last morsel of curd rice vanished from the plate and the plates licked clean (yes, we did that), we would start enjoying the delicious fruit peel by peel, Hmmm..

But much before the fruits started appearing at dinner time, there would be a parade of green mango dishes such as mango chitranna (varieties of it), chutneys, tokkus, gojjus, rasam and of course the pickle. Nammamma never brought home the first mango until it was the New Year's day or Ugadi, the first mango had to be cut on that day and a delicious chitranna would be on the lunch menu, after that it was mango everyday in some form or the other. I have no such scruples (read weak will power) since I don't get raw mangoes all the time, I jump at them whenever I find them in my local  grocery store.

We are still ways away from summer where we live, I am yet to find Spring in the air :-) but imagine my happiness when I found the local grocery store carrying fresh green mangoes the other day. It is difficult to decide which dish to prepare since we love everything with mango, but finally after much serious thought, family voted on the Mango pappu - very simple recipe for a flavorful, comforting dal I learned from Amma. This is how we make the mango pappu at home.
What do you need to make Mango pappu? 
1 medium sized firm green mango - washed, peeled and cut into bite sized pieces
1 cup toor dal/kandi pappu
2-3 greeen chilies, slit lengthwise
1/2 Tsp turmeric/pasupu
1 Tblsp salt (adjust to taste)
2 cups of water to cook
For popu/seasoning:
1 Tsp cooking oil
1 Tsp mustard seeds/aavaalu
1 Tsp cumin seeds/jeelakara
1/2 Tsp fenugreek seeds/menthilu
A generous pinch of asafoetida
2-3 curry leaves
2 dry red chilies - broken into half

How do you make Mango pappu? 

  • Wash the dal, add the mango pieces, slit green chilies  and  turmeric, cook it in your pressure cooker until the dal is soft.
  • Once the steam is off, open the pressure cooker, add salt and mash the dal lightly with a spoon.
  • Heat oil in a small pan - add the asafoetida, mustard, cumin, fenugreek seeds along with the red chilies. Let the seeds splutter.
  • Add curry leaves just before switching off.
  • Pour the sizzling popu in to the cooked dal, give it a good mix. 
  • Serve it with hot rice and ghee and dig in. 
Variations: 
  • Use garlic in seasoning if you favor the garlic flavor. 
  • On our recent trip to India, BH's cousin's wife served us with a delicious mango pappu with tomatoes added in, it tasted great too. 
  • I sometimes use moong dal/pesara pappu instead of toor dal. 
Tips: 
  • Get fresh green mangoes that are firm and tart for best taste. 
  • Adjust amount of mangoes based on how tart you like your dal, the mangoes I had were slightly sour and I used 2 of them.