Showing posts with label palya. Show all posts

Sunday, February 14, 2016

Hagalakayi (bitter gourd) palya - An unusual love affair

Happy Valentine's day everyone! Hope you all had a good celebration of the precious love in your lives and I hope it continues to get stronger through the rest of the year and life.

We had a good Sunday, got up late, cooked a storm in the kitchen and had a great brunch. Nothing typical of what you would expect on a Valentine's day lunch plate :-) but everything me & my valentine love in food was there. Other than that it was any normal Sunday.
Since the blogosphere is bursting with overdose of sugar for the Valentine's day, I thought I will step in and save the world from the risk of mass diabetes and deviate from the theme a wee (more than a wee) bit with my post. We were talking to parents in India on Friday and amma reminded me to make some payasa on Saturday as it was Ratha Saptami. Dutiful DIL that I am (and since we were both craving for something sweet and yummy :-)), I immediately followed up on it and made a delicious anna-payasa or rice kheer which after an hour on the stove became creamy and irresistible. I had every intention of making just a cup of it but with the rice and jaggery and milk, I ended up with substantial quantity that extended into Sunday too :-). Once cold in the fridge, it was so delicious. Thus our Valentine's day started with a ready to eat sweet item. And I didn't have to specially make anything sweet for the Valentine's day.

Somehow the concept of Valentine's day didn't grow on me, we used to make cards and cookies when DD was in grade school so she could take it to all her classmates and teachers but she outgrew that too. The innocence of bulk valentine day cards gave way to adolescent "yew, who gives cards and heart candies to boys" soon. Today I message her in the morning and wish Happy Valentine's day and she writes back a hurried 'Mwah, mwah". I am an insistent mom and ask her, "what is special for Valentine's day"? and get a "what Valentine's day? Mom, I have assignments upto my nose and am studying for my psych exam next week, stop being silly". I know some day it will change again :-) and I am not in any hurry for her to get there either. For me personally, celebrating love on a specific day feels restrictive, being in love is eternal, is a life long thing for me :-). Not that I don't appreciate flowers and gifts on the day but I prefer to take the pressure off of us of having to do something cute on this day to stay cool. More than anything else, it is also a great excuse for not having to come up with creative ideas to celebrate Feb 14th which suits the lazy me very well :-)
So on this Valentine's day I have a to make a confession of my our love to this vegetable. Not many people love it and it doesn't make the main stay in meals but I have openly talked about my feelings for this vegetable here, here, here, and here on the blog. If that is not sufficient proof of the intensity of this love affair, what is? We love to eat bitter gourd any form or shape though there are a few 'favoriter' recipes that have an edge over others. And then I keep adding to my repertoire of bitter gourd recipes as I come across them. Some make a mark and stay on and some just breeze in and out of my kitchen with a single occurrence. I first found this in a cookery book, the source mentioned it as a Gujarati dish, then I also saw it on an online Telugu cookery show. I combined the best of both worlds, made a few changes to suit my palate and viola, created a keeper recipe I have made multiple times.

The Gujarati version called it bitter gourd dry chutney and the Telugu version called Kaakarakaya chutney podi :-). Gujarati version was low on chili powder but added lot of crushed peanuts while the Telugu version skipped peanuts and poured red chili powder to the delight of a hard core spice lover. I chose to tread the middle path and combined ingredients from both. My version is not as dry as a spice powder and I don't think it fits a 'chutney' label, so I am kind of undecided on the category. I am ok calling it palya (stir fry) or subzi for now. No matter what you call it, it tastes delicious and if bitter gourd is one of your valentines (that is an overloaded statement right there, we will get back to that later :-)), give it a try and I am sure you will fall in love all over. The flavors are intense from the gourd, peanut powder and the sesame. Pair it with a mild yogurt based curry like majjige huli and enjoy.
Disclaimer: For those of you who are not bitter gourd fans, don't try to judge me for posting a recipe with this vegetable for Valentine's day, "har prem kahhani anoukhi hoti hai, jaroori nahin ki sub log use samjhe" (every love story is unique, not that others always understand it) :-). Each to his or her own taste.

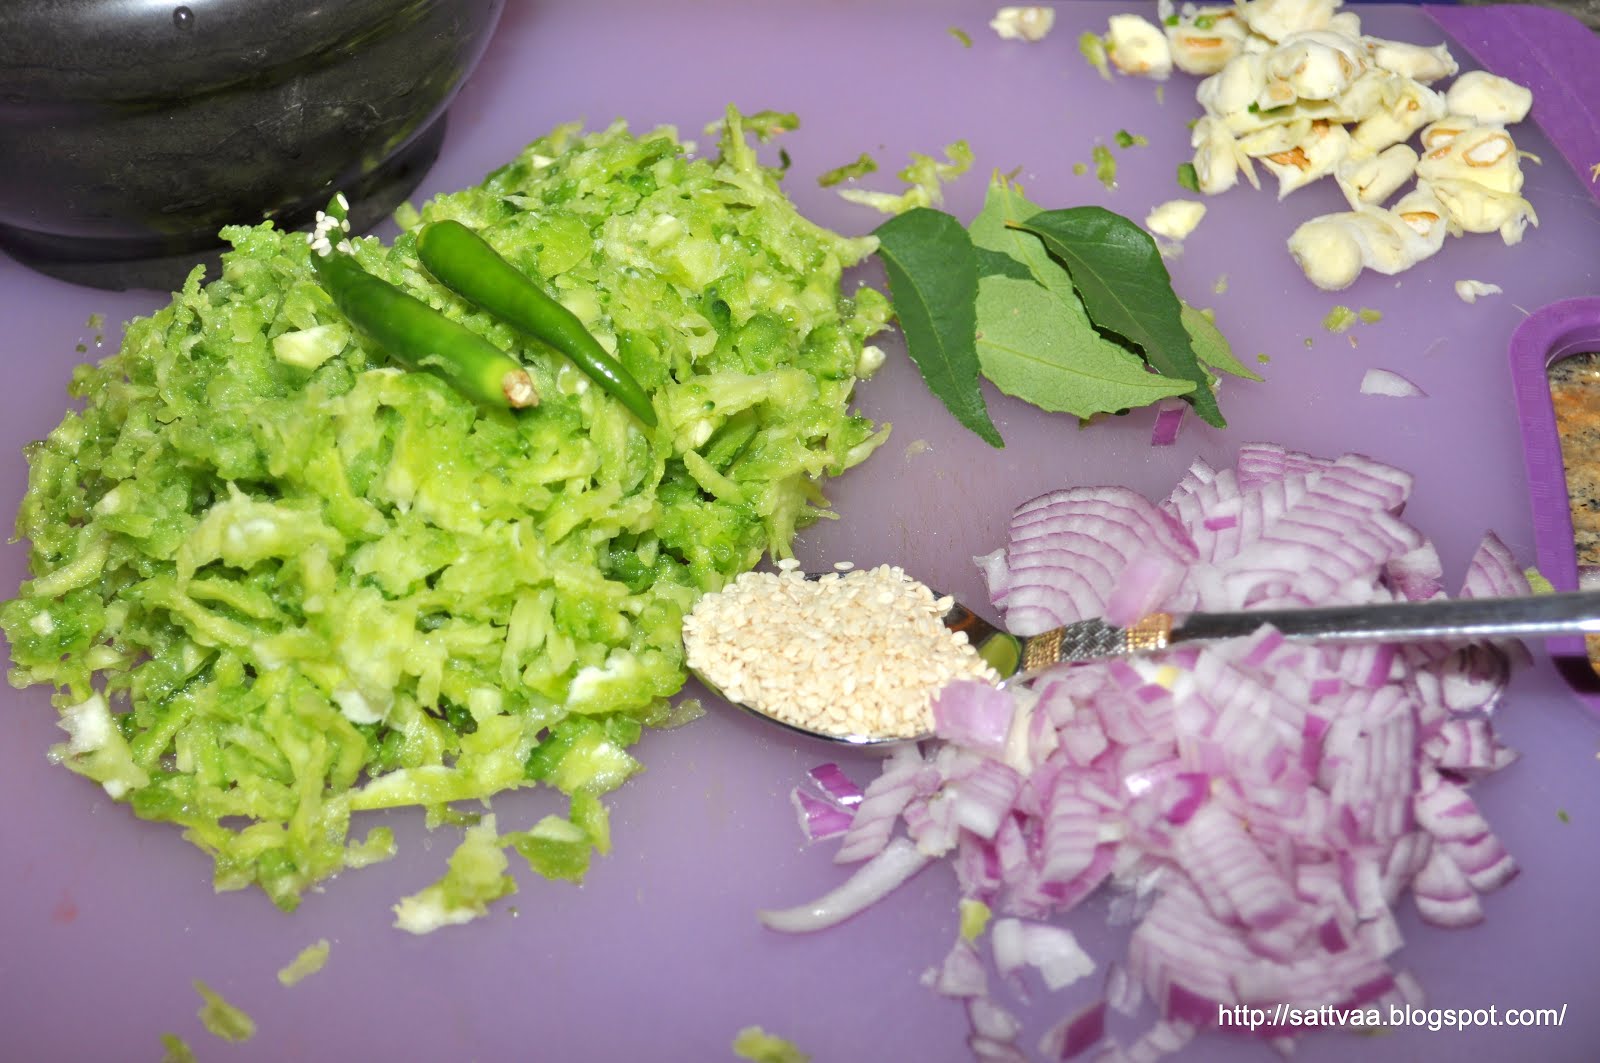
What do you need to make bitter gourd palya? 
3 medium sized bitter gourd
1 Tbsp sesame seeds
1/4 Tsp tamarind paste
2 Tbsp oil
1/2 Tsp red chili powder
3/4 Tsp salt
2 Tbsp finely chopped onion
1 Tbsp peanut powder or coarsely crushed peanuts
1/2 Tsp mustard
2 green chilies - chopped
6-8 curry leaves - chopped
1 Tsp crushed jaggery/brown sugar
1 Tsp chopped cilantro
pinch of turmeric powder
1/8 Tsp asafoetida
How do you make bitter gourd palya? 
  • Wash, cut the ends and scrape the outer skin on bitter gourd lightly. 
  • Slit them vertically into halves and remove the seeds. 
  • Reserve about a Tbsp of tender seeds for later use and discard the remaining. 
  • Grate the bitter gourds on the big hole side of a grate or process them in a food processor or chop them finely. Idea is to get really tiny pieces without making a paste. 
  • If you want to reduce the bitterness, add a pinch of salt and turmeric to the grated gourd, set aside for about 20 minutes, squeeze out all the juice that is generated. Wash the bitter gourd under running water and squeeze out the vegetable. While this removes the bitterness, it also removes a lot of nutrients.
  • I like to retain the natural bitterness and go to the next step directly. 
  • Heat 1.5 tbsp oil in a pan, add mustard and let it pop. 
  • Add sesame seeds, chopped green chilies and curry leaves and let roast for 30 secs.
  • Chop up the tender seeds reserved and add them to the pan, let them roast for a minute. 
  • Add chopped onion followed by salt, asafoetida and turmeric powder and let the onion sweat and soften up. 
  • Add the tamarind paste and jaggery.
  • Add the grated bitter gourd and spread it in the pan in a thin layer - this helps to roast quickly and lose moisture. 
  • Cook on low flame, stirring frequently to avoid burning. Use the remaining 1/2 Tbsp of oil as needed.
  • Once the extra moisture is gone and the bitter gourd is soft, continue cooking until it reaches your desired dryness and crispiness. Mine took about 25 minutes for the quantity above. 
  • Add red chili powder and the peanut powder at this stage along with chopped cilantro, mix well. 
  • Let cook for just a minute, switch off and serve. It tastes great as an accompaniment for roti/chapatis and also mixed with steamed rice. 
My lunch box with Majjige huli, anna with bitter gourd subzi
  • You can store this in a dry container in the fridge for a week. 
Notes: 
  • Use tender and firm bitter gourd for this recipe
  • I prefer a non stick pan if I am making a large batch so I can use less oil and still fry it without getting sticky at the bottom. 
  • I used my home made peanut powder for this recipe, you can also just add coarsely crushed peanuts for crunch. 
  • The seeds used give a nice crunch and the tender ones are usually not bitter at all. If you do not like them, skip this from the recipe. 

Sunday, July 26, 2015

Halasina kaayi (Tender green jackfruit) Palya (Dry curry) - some 'home alone' ramblings

My pantry doesn't seem to be shrinking at all, I am on a voyage (read my last post) to clean up my pantry and refrigerator and until then I have promised myself I am not going grocery or produce shopping. The refrigerator is pretty much bare (used up most stuff and threw out some) and it is no longer easy to just stick your hand in the dark inside the refrigerator and come up with something edible and yummy :-). The progress on the pantry has been really slow for various reasons primarily that my family has decided to or having to go on out of town trips while I am the only one at home. While DD is still getting pampered in India, BH is travelling this week on business which leaves me all by myself at home except when I am at work. Well, I did caution you in the title of the post itself that today it is all about me being home alone, I will try and make this sound less 'whiny' and 'clingy' than it feels to me :-). Let us move onto other things in life..
I didn't cook much this past week, whatever I made on Sunday night before BH took off was enough to give me company until almost Wednesday and I ate salads for a day. Even large doses of boring things on netflix, didn't motivate me to get up and cook something during the evenings. Friday was a work from home day and as I was contemplating on what to put together for lunch, I discovered this can of tender jackfruit in the pantry shelf. I must have got it on one of my trips to the store and never found an opportunity to cook with it.

What is a vegetable that is called fruit? Tender jackfruit :-). Yep, that is how rusty my stand up comedian skills have become with no one home to target or practice on :-). But when I say that jackfruit is one of the most delicious fruits in this creation and jackfruit also makes an equally delicious vegetable when it is young, tender & green, I am not exaggerating. I am sandwiched between 2 jackfruit crazed ladies - nammamma and dear DD, they both can eat this fruit anytime, anywhere. While I am not that big a fan of the ripe fruit (Mainly because I don't even stand a chance with even one of them around cut jackfruit), I love the tender green ones used as vegetables even more.  This is a big part of coastal Karnataka & Malnad region recipes - everything from papads to curries to dosa to idli to snacks are made using both the tender and the ripe ones. Unfortunately for me no-one in the family appreciates this vegetable like I do. BH feigns allergic to halasina kaayi or all matters related to jackfruit and I don't feel good about cooking it around him. So with both BH & DD being away, I decided to treat myself to the simple deliciousness of this stir fry and after making sure the expiration date was still long ways away(it is a critical precaution to take especially when you pull out things from the back of the pantry :-)), I set about making the dish.
One of akka's friends in Mysore had this tree in their backyard that yielded deliciously sweet fruit when ripe. The fruits are gigantic and they would normally get distributed among friends but the tender ones were more sought after since they would cut when small in size. While the friend's mom generously shared atleast part of one fruit every season, the tender ones rarely made their way to us :-). If it was my friend, I probably would have come up with some sneaky barter to get hold of the unripe ones but akka never bothered. On the bright side though, the vegetable markets would be flooded with this fruit and vegetable during the season in Mysore. Nammamma made a Huli (sambar) from the vegetable with some black chickpeas thrown in and this simple stir fry as a side dish and I loved both. Making it from a tender jackfruit is labor intensive and I took the easy way out with my store bought can of tender jackfruit and totally avoided all the sticky glue, oiled knives experience :-)
Andhra weddings typically serve a side dish with tender jackfruit. I had never eaten the dish in my long married life but had heard enough from various family members on different occasions about 'Aava pettina panasa pottu koora' (I know it is a mouthful, so let me break it out, aava - mustard, panasu - jackfruit, essentially indicating the ground raw mustard mixed in with chopped jackfruit). I went to a niece's wedding couple years back drooling just by the thought of eating this during the wedding but was majorly disappointed with what was served :-), It had pieces of jackfruit floating in a gravy which was not very tasty and completely masked off the jackfruit taste, personally a 'no-no' for me. It seemed like someone's desperate attempt to serve a non vegetarian dish in a pure vegetarian fare. So instead of attempting the curry with gravy, I made this simple sauteed version from nammamma's kitchen, it turned out so delicious and I had a bowl of the palya with a glass of buttermilk for lunch and repeated the dose for dinner too :-).
The little heat from the red chilies, slight tang from tamarind, hint of sweetness from jaggery perfectly complement the inherent taste of jackfruit.

Note: Sorry for the sub standard pictures today. I never thought of blogging about this dish when I started making it and so no intermediate steps either. After tasting a spoonful, I felt so happy and wanted to share this deliciousness with all of you, grabbed the camera and shot as well as I could at the time. Sorry about it and don't let the pictures dampen your enthusiasm to make this dish at home. It is delicious. 

What do you need to make Halasina palya? 
2 cups chopped tender jackfruit
1/2 cup grated coconut
1/4 cup thinly sliced onion
2 Tbsp oil
1 Tsp mustard
1 Tbsp coriander seeds
1 Tsp cumin seeds
1/8 Tsp fenugreek seeds
1/8 Tsp asafoetida
1/4 Tsp turmeric powder
4-6 curry leaves
1 Tsp salt (adjust to taste, note canned ones have some sodium already)
3-5 dry red chilies (adjust to taste)
small piece of tamarind
1/2 Tsp jaggery/brown sugar
How do you make Halasina Palya? 
  • I am going to assume you have cleaned jackfruit pieces to start with :-)
  • If using canned ones, pour out all the preservative brine, wash thoroughly under running water atleast a couple of times. 
  • Cut the pieces into bite sized chunks unless you want to chop them up small and end up with a spaghetti squash consistency :-). 
  • Add coriander seeds, fenugreek seeds, cumin and red chilies along with a couple of drops of oil in a pan. 
  • Roast for a minute and half or until the seeds sizzle slightly and give out a whiff of aroma. 
  • Add asafoetida and mix. 
  • Take them out into a blender jar, add coconut, tamarind piece and jaggery and blend them to a coarse mix. Do not add water if you don't have to. 
  • Heat the remaining oil in the pan, add mustard, curry leaves and let mustard pop. 
  • Add sliced onion and let it sweat a bit for 1-2 minutes. 
  • Add the jackfruit pieces, turmeric powder, salt and the blended spices and give a good mix. 
  • Lower heat, cover the pan and let it cook for 20-25 minutes (stir once every 8 minutes or so to avoid burning) and have the flavors mingle well. 
  • Check to see if the jackfruit pieces are tender and absorbed the flavors, switch off and serve hot or warm. 
Notes: 
  • Skip onion if you do not like but it enhances the taste delightfully. 
  • Do not go overboard with coriander, cumin as they tend to take over the flavors. Keep in mind you want to taste jackfruit more than the spices. 
  • Add extra red chili powder if the spice mix is not hot enough. 
  • Cutting the pieces too small makes them break apart, I like the bite a little bit and hence made them bigger pieces. 

Monday, October 6, 2014

Baalekayi Palya - smokey & spicy green banana dish, turning a leaf (page) from a favorite book

Another season of Dasara/Navaratri is over and we are already looking towards the fast approaching Deepavali and then the Holiday season starting with Thanksgiving. Where did 2014 go already? Summer cooled down into Autumn and I have started to see leaves change colors around me, I am already an old timer at my new job (honeymoon period over, start delivering :-)) and DD is busy with her senior year of school. Yes, my baby is getting ready to fly the nest come next September :-(. Ah, well I can either whine about next year or enjoy the togetherness until then and I choose the second one.

After all the sweets and other delicacies I made at home and also had to eat at friend's places in the name of Dasara, we are trying to get back to something simple and appetizing this week. I actually wanted to stay away from lentils and oil for a couple of days as we had our filling of both these heavy ingredients with all the usali and sabudana vada among other things :-). I made a lip smacking ginger chutney and steamed some oats masala idlis which seemed to help the lost taste on the tongue majorly. Back to eating vegetables with a side of some spicy chutney helps get back to normalcy.
Over the years, I have acquired a bunch of cookery books, not counting the ones I borrow from time to time from the public library. Some of these books are bought based on extensive research and recommendation while some are purchased as an impulse buy. Some of these books have many dog ears as I go back to them again & again while some of them sit in their pristine, new form as I don't touch them often enough until some day I get rid of donate them as part of a clean up :-). One of the books I love flipping through is Dakshin by Chandra Padmanabhan, I haven't tried a whole lot of recipes (not yet) from this book but I like it for the rich photos it has. One of the recipes that caught my attention on a random flipping is this green banana crumble as she calls it.

It is a simple enough recipe, I have made it a few times enhancing the spice powder to suit our palate and here is the 'modified from original' version of the green banana crumble or palya as I call it :-). If you have a charcoal grill, it is time to bring it out. Bananas roasted directly over flame have that wonderfully smokey flavor in this recipe. If you really don't care for it or are not inclined to spoil your gas stove by directly roasting them on the flame (I do understand this, I totally do), then go for the boil or steam method described below. The dry powder enhances the taste and makes the bland vegetable come alive with the spices. The best part about this dish is it can be eaten just like that and enjoyed as a snack too :-)
Baalekayi or plantain (green banana) is a commonly used vegetable in India. They stand cooking very well since they are firm and have an absolutely delicious taste albeit a little bland. The variety used as vegetable is never eaten ripe as a fruit. We grew bananas at home in Mysore and they were the small, yellow bananas which we ate when ripe but used to get the green variety for cooking. Nammamma's favorite recipe was the kootu or gojju with this vegetable. Amma makes crispy, dry fry(vepudu in Telugu) or an onion flavored soft cooked side dish. I love all of them, here is another side dish (or a main dish depending on how you eat it) made with green bananas that is a perfectly homely accompaniment to a rice-centric meal.

What do you need to make baalekayi palya? 
2 firm green bananas (I use the non-Kerala variety)
1 Tsp salt (adjust to taste)
1 Tbsp shredded coconut
Spice powder: 
2 Tbsp chana dal
1 Tbsp urad dal
1 Tsp coriander seeds
1/2 Tsp cumin
1/8 Tsp fenugreek seeds
4-6 dry red chilies
pinch of asafoetida
Seasoning: 
1 Tbsp oil
1 Tsp mustard
1 Tsp chana dal
1/2 Tsp urad dal
1 dry red chili broken
1 green chili (optional)
few curry leaves

How do you make baalekayi palya? 
  • Wash, pat dry the skin of green bananas and remove the ends on both sides. 
  • Make a few slits using a knife (don't cut the bananas into pieces though) and smear a drop of oil all over the skin. 
  • Roast on a flame turning the vegetable all around until the skin turns black and becomes charred. Keep the flame on medium so the banana cooks to become soft but not mushy. 
  • In the meantime, dry roast all the ingredients listed under 'spice powder' except for asafoetida until the lentils turn pink in color. 
  • Cool and make it into a powder along with asafoetida, keep aside until ready to use. 
  • Once the bananas are cool, peel the skin off. hold the skin from a knife marking and it will peel off easily.
 
  • Remove any charred particles by washing it in water. 
  • Grate the cooked bananas (use the largest possible gratings, smaller ones tend to make the dish mushy and pulpy). 
  • Heat oil in a wide pan, add mustard and the dals listed under seasoning, let mustard pop and dals turn pink before adding the chilies and curry leaves. 
  • Add the grated banana, salt, coconut and the spice powder and give it a gently mix. 
  • Cover and lower the heat and let cook for about 2 minutes until the flavors come together. 
  • Switch off and serve warm with rice, roti and just by itself. We ate with a yummy spinach pachadi and rice. 
Notes: 
  • If you do not want to roast the bananas, alternatively, you can boil them in a pot of water until they turn soft, about 15 minutes or cut them into halves and steam them in a cooker. Take care not to let them become mushy.
  • Increase or decrease the chilies depending on your heat tolerance
  • Garnish with chopped cilantro and a dash of lemon juice if you like. 
  • Once roasted, dunk the bananas in a pot of cold water for 10 minutes and the skin peels off easily. 

Thursday, June 13, 2013

Hasiru Palya - An accidental recipe from Nammamma's kitchen

Most of our morning breakfast while growing up used to be a fortified left over. Dosas or idlis saved the day if there was dough or it would be a quickly converted fried rice from left over rice or an adhoc huli+anna heated and jazzed up with some seasoning and ghee, that would also go into the lunch dabba or on extremely rushed days it would be mosaranna with uppinakayi. While we all left at different times starting a little before 7 and came back for lunch or a little later, my father left later, didn't come for lunch nor take dabba from home. So he ate his lunch before leaving home in the morning, a proper rice-saaru/huli/gojju kind of meal. Having 4 kids with different demands on time, nammamma just wanted to get us all out with something sumptuous and healthy and then make meals for the remainder of the day.

We had this concept of tiffin in the afternoon and that is when we had all the yummy things mostly made for breakfast in other homes such as Avalakki, dosa, idli, etc. This was our weekday routine but Sundays used to be different starting with a lazy breakfast in the morning followed by a lazier lunch and then a tiffin and dinner, you get the idea, looks like we didn't do much other than eating :-). We did loads of other stuff and ate too, the best part about the weekend food was that everyone will be around and amma mostly served stuff hot off the stove. All this changed once dad retired and my parents became empty nesters. They morphed into a light breakfast, late lunch and light dinner routine unless any of the kids were home. I loved amma's chapatis (plain paranthas), try as I might I will never get those soft layers, uniform thickness, geometrically perfect triangles and the faintly crunchy top of the chapatis. Though all the side dishes she made for chapatis were yummy, my favorite to this day is this Hasiru Palya literally translated as 'Green palya/curry' because of the tender green color of the finished dish.

When I was talking to nammamma a few years ago as I started cooking on my own and mentioned this palya she smiled and said that it was a poor man's saagu. You see Saagu is a very popular side dish served with set dosas and pooris in restaurants in Karnataka and has many vegetables. You will find potatoes, cauliflower, beans, carrots and other veggies in a saagu. This slightly spicy dish that makes you go 'ha' in the back of your tongue is a perfect accompaniment for plain or slightly sweet tasting dosas, pooris or plain rotis.  But amma explained that one day when she didn't have all the vegetables in her kitchen basket, she just put some cabbage (which is something that was always found in there because it was available year round and also cheap) and some fresh green peas, used similar spices as saagu and called it Hasiru palya. Everyone at home ate it, licked there fingers, let out a satisfied burp and the rest was history as the recipe attained an official status with a humble name :-).

Many people don't seem to like cabbage but I do and so does BH. A quick stir fry of crunchy cabbages and grated carrots is a satisfying dinner for us many times. I make cabbage bhath, cabbage huli and other recipes regularly. I just avoid packing cooked cabbage in any form in a lunch box, don't do this unless you have a colleague that you want running out of office :-). While I bring a cabbage head home from my grocery shopping, it usually goes and waits patiently in a far corner of the vegetable crisper until I polish off all the delicate (use me today or else I die on you) kind of vegetables and reach out purposefully for that lone head of cabbage. Recently I have been on a conscious effort to clear up my refrigerator and pantry before going out and overstocking them again and all I had was this cabbage and a bag of frozen peas along with some other random vegetables. It had been so long since I made this Hasiru palya at home that I had almost forgotten. So remembering what amma said, I picked up the cabbage smiling and set off to make the delicious Hasiru palya.

If you are familiar with the Karnataka saagu, you will notice similarities in taste - the aroma of cinnamon and the tongue ticking heat of clove but the combination of cabbage and peas brings its own soothing uniqueness to the dish. You can make this with some gravy or cook it until the consistency is more like a dry side dish, the choice is yours to make depending on what you serve it with. So next time, when you are racking your brain for a quick and delicious side dish for your rotis, you don't have to look beyond that sattvik head of cabbage.

What do you need to make Hasiru Palya? 
3 cups shredded (or chopped) cabbage
1 cup fresh/frozen green peas
1 Tsp salt (adjust to taste)
To Grind:
1/4 cup grated coconut (fresh/frozen)
4-5 green chilies (adjust to taste)
1/2 Tsp poppy seeds
2 - 1 inch piece of cinnamon
2 cloves
1 Tblsp chopped onion
1/2-3/4 cup chopped cilantro

How do you make Hasiru Palya? 
  • Take shredded cabbage & peas in a pan, add salt and a couple of Tblsp water. Cover and cook until the vegetable softens (do not over cook)
  • Grind all the ingredients listed under 'to Grind' to a smooth paste adding 1/4 cup water.
  • Add the ground masala to the cooked cabbage and let it continue to cook for another 4-5 minutes or until the masala gets completely incorporated and the mixture looks uniform. 
  • You can make this dish with a little gravy or keep it on the stove until the water evaporates. It tastes great either way. 
  • This palya is best eaten with chapatis/rotis.
Notes:
  • If using fresh green peas, cook it separately until tender and add it to cabbage as it takes a little longer to cook than frozen variety
  • The palya becomes sweeter as it settles with cabbage and peas, if you like spicy stuff make sure you have enough green chilies to cover you :-)
  • Don't skimp on cilantro, it gives the curry a nice green hue. 
  • There is no turmeric or tamarind in this recipe.

Sunday, December 2, 2012

Tondekayi (Ivy gourd) Idigayi - tiny miracles in the kitchen

After spending the last 6 months together, amma, nana left yesterday to go back to Bengaluru. We dropped them at the airport, didn't want to come back home, so went on a very unplanned shopping trip as a time pass and reached home only in the evening. The house seems empty and Flora is trying to make sense of the new scene at home, missing amma who very promptly fed her twice a day, missing the ever running warmth of the room heater in the down stairs room, waiting for one of us to get up and pet her. I guess it is more difficult for her without understanding completely or not being able to talk about it. I got up this morning and the dishes that used to be miraculously arranged in their places were still in the dish washer, there was no coffee in the coffee maker announcing that today is different from yesterday. I miss having them around in the house with amma asking 'what is for lunch today?' soon after she returned home from her daily morning walk. We will mope around a little bit, wait to hear their voices after they land in Bengaluru & safely reach home and then a new routine sets in from tomorrow with school and work, we will march ahead like brave soldiers but that tiny painful nagging inside keeps reminding us that we are again a small nuclear family staying far away from rest of the family..I made this Tondekayi Idigayi last Friday when we all had our lunch together.

Nammamma was not enthusiastic about certain vegetables and Tondekayi/Dondakaaya/ivy gourd was one of them. I don't remember eating this vegetable much at all. One of my cousins got married when I was in my +2 and they had made the Tondekayi+cashew nuts palya with loads of shredded coconut in his wedding and as I was the only representative from my family for that wedding, I came home raving about it to nammamma. But she didn't catch on easily to this vegetable and it remained one of those vegetables that I would see in the market but not necessarily pick up every time.

Post my wedding, Amma taught me how a simple stir fry with tender dondakaaya could make a nice side dish, she would sometimes cut thin roundels or chop them vertically, fry it in an extra dose of oil, finish it off with some salt and a spice powder making an excellent side dish for a rice based lunch or dinner. One day, she made a stuffed dondakaaya which was unbelievably tasty, just the fact that the vegetables were not chopped up but stuffed with the masala made so much of a difference that a bowl full of stuffed dondakaya was gone just like that within minutes. Looking at the finger long ivy gourd, you wouldn't imagine that something like that could be stuffed, right? Also, it doesn't have a crown like a brinjal and so there is the question of how and where do you stuff the masala? Believe me if you haven't seen this before, the stuffing may take a little extra dose of patience and some time but transforms this watery, bland vegetable into some sort of a miracle.

But then again since everyone is rushing through life, sitting down to prepare a whole bunch of (remember what I said about the taste, making a small quantity of this dish will brand you as a very lousy cook in the eyes of your family, so think large quantities) of these can put quite a dent in the precious time. So when I saw this recipe on a TV recipe show, which was the best of both worlds, I was in. The masala had almost the same ingredients as amma's spice powder and didn't make you actually stuff it into the vegetables, what a time saver :-). I made a few changes to the original recipe, added grated coconut along with the other ingredients and ground into a powder, reduced the oil a little bit and actually followed amma's way of cutting the Tondekayi.

I agree with nammamma that the vegetable itself is bland and doesn't homogeneously blend into all recipes but cooked right, this can make some very appetizing dishes.

Back to the name of the dish, idigayi refers to the whole vegetable (iDi ~ whole) and you don't chop the vegetable in this recipe but prepare it in such a way that it absorbs the juices from the masala nicely and cooks to be a delicious curry. Note that this is a dry palya that can be mixed with rice but because of the amount of masala available also goes well with your roti or chapati.
What do you need to make Tondekayi Idigayi?
1 lb fresh, tender Tondekayi - about 3 cups
2 Tblsp of tamarind juice or 1/2 tsp tamarind concentrate diluted with water
1 Tsp crushed jaggery/brown sugar
1 Tblsp salt (adjust to taste)
2 Tblsp oil
1/8 Tsp turmeric powder
For the masala: 
3 Tblsp kadle bele/chana dal
1 Tblsp uddina bele/urad dal
1 Tblsp coriander seeds
1 Tsp cumin
1 Tsp mustard
3/4 Tsp fenugreek seeds
2 pieces of 1 inch long cinnamon
2 cloves
4-5 black pepper corns (adjust to taste)
5-6 dry red chilies (adjust to taste)
2 Tblsp grated coconut
For seasoning:
1 Tsp mustard
3-4 curry leaves
1/8 Tsp asafoetida
1 dry red chili broken into pieces (optional)

How do you make Tondekayi idigayi? 
  • Wash, pat dry and chop the ends of Tondekayis. 
  • Make a vertical slit from one end to the middle of the vegetable, flip it over and make another slit from the other end to the middle. The trick is to make the two slits at a 90 degree to each other so that they don't meet in the middle and actually cut the vegetable open. If you do this right, the Tondekayi will still stay together but will have opening for the masala to seep into. 
  • Heat a thick pan, add all the masala ingredients except for coconut and dry roast until you get a nice aroma and the dals turn pink. Add the grated coconut and roast for a couple of minutes before switching off. Let cool. 
  • Heat the oil in a wide pan, add asafoetida, mustard, curry leaves and red chili pieces (if using), let mustard pop, add the prepared Tondekayis to the pan along with salt. 
  • Mix it in, cover and cook for 3-4 minutes on medium heat. 
  • Open the cover, add the tamarind juice or diluted concentrate, jaggery and turmeric powder. Put the lid on and cook for  another 3-4 minutes until the vegetables look soft. 
  • Meanwhile take the cooled masala ingredients and make a powder in your blender.
  • Add the masala powder to the par cooked tondekayi, mix it well, turn the heat to low, cover and cook for 10-15 minutes with one or two stirrings to make sure nothing is getting stuck to the bottom of the pan. 
  • Taste a Tondekayi at this time to make sure it is cooked through and the masala flavors are in the vegetable, switch off. 
  • Serve warm with rice or roti. 
Notes:
  • Select tender tondekayi, if it feels slimy while cutting or the vegetable is mushy do not attempt this dish. The vegetable should feel firm to touch and have a white inside. if the inside is pick or red, it is almost too old to be cooked. 
  • Initial cooking with the tamarind juice and jaggery helps prepare the vegetable to accept other flavors, covered cooking also makes the Tondekayi cook faster. 
  • You can soak a small key lime sized tamarind in warm water for about 20 minutes and extract juice by squeezing the tamarind or use the store bought concentrate. Dilute the concentrate in 2 Tblsp of water and add it to the vegetables.
  • You can make large quantities of the powder and refrigerate it. I would skip coconut if storing for long or use dry coconut instead. 
  • The idigayi should have ample masala powder in it, the quantities above are good for the amount of vegetable used, don't skimp on it.
  • Amma uses almost double the quantity of oil and so did the TV show lady but since I reduced the oil, I cover and cook in its own moisture until the vegetable is soft.

Wednesday, November 28, 2012

Yard long beans palya with moongdal - a simple homely side dish

Is there such a thing as blogger's block? How does one overcome it? I am trying to write my post for the last 2 days and it is not going anywhere. I have pictures in my draft but not happy with the way my words come together. I like to write about a recipe, the story behind it, who made it and why it is dear to me before I post it and I am struggling to put words to my expressions. Not sure if it is because I am exhausted  by the time I sit down to write or I am just bringing work home and not able to focus on the blog post, I sure hope this is a temporary thing...

So I will hold on to some of my special recipes until I can make a come back and will write about a very simple everyday palya - most common fare in any Kannadiga household. There are equivalents in all other Indian regional cuisine I am sure. Though common and simple, there are umpteen varieties of palyas, some are stir fried, some sauteed and some pressure cooked. Some of them are just put together with a simple seasoning or vaggarane while some are made with palyada pudi or spice powder. Palya is typically a dryer curry eaten as an accompaniment to either rice or roti  while the main entree is a saaru (rasam) or Huli (sambar). Nammamma puts a garnish of grated coconut in almost every palya and makes it delectable :-).

Palya made with a combination of moong dal & vegetable is one of my favorites as it combines proteins and vitamins into one dish. Yard long beans are tender beans that are used before the seeds plump up. These beans have tougher skill than the regular green beans and take a tad bit longer to cook. Tender yard long beans chopped up, cooked with moong dal and seasoned with coconut and a dash of lime will set you up for a fulfilling and healthy meal.

What do you need to make yard long beans palya? 
12-15 tender yard long beans (alasande kaayi)
1 cup moong dal/hesaru bele
1 Tblsp grated coconut
2 Tbslp finely chopped onion (optional)
1 Tsp lemon juice
1 Tsp salt (adjust to taste)
For seasoning:
1 Tblsp oil
1 Tsp mustard
1 Tsp urad dal/uddina bele
1 Tsp chana dal/kadle bele
4-5 curry leaves
2 dry red chilies
1/4 Tsp asafortida
How do you make yard long beans palya? 
  • Wash the moong dal and bring it to boil with 1 cup of water and salt.
  • Wash, cut the ends of the yard long beans and chop them into small pieces.
  • Add the chopped beans to the moong dal, reduce heat to low-medium and let cook and until moong dal is soft but holds shape. Will take about 8-10 minutes. 
  • Heat oil in a pan, add the seasoning ingredients and let cook until mustard pops and the dals turn light pink. 
  • Add the chopped onions (if using) and fry until it turns pink.
  • Add the seasoning to the cooked moong dal & beans along with grated coconut and lemon juice. Mix well. 
  • Serve warm with rice or roti, we had ours with the makki roti last week. 
Notes:
  • You need to control the amount of water in the palya as it should stay dry. Start with 3/4 cup of water and add small quantities to help cook the moong dal. 
  • Do not over cook moong dal as the texture and taste differs vastly when overdone. 
  • Onions are optional and I make this palya with and without them, both taste good. 
  • I usually use equal volumes of moong dal and chopped beans, you can increase or decrease to suit your preference. 

Sunday, September 30, 2012

Patholi - Dal & vegetables dry curry

I went for my annual health check last week and came back a bit more confused :-). Good thing is that there is nothing wrong with my numbers and I am as healthy as can be. Talking to my health coach (fancy, huh) I was reminded that quinoa is not all proteins though has high protein content per serving compared to anything else I might be eating in my vegetarian diet. She reiterated the fact that every edible thing has carbs and you just find ways to reduce its intake and start burning extra calories.

I came back home and did my research on 1 cup cooked white rice Vs brown rice Vs quinoa and after a wonderful knowledge session aided by the power of google, concluded that my forefathers were the smartest people to eat fresh food, as close to the source as possible without getting into processing them. Bottom line is the more you process and refine the food, the further away it tends to go from the healthy range. I am not here to lecture everyone on how they should stop eating processed foods, it is essential and convenient in the age we are in but try to make sure majority of your food is un(or under) processed, keep things in moderation, do not obsess about it much, exercise and enjoy life :-).

One thing that always comes back without change is that the main source of protein for a vegetarian like me comes from lentils and I love my lentils. I use quite a bit of sprouts, whole legumes in addition to the regular dal to boost the nutrition quotient. Dal is a regular at home and we do eat it in some form or shape every day. Having said that it can be quite boring to eat the same saaru/huli (Rasam/Sambar) every day and our cuisine offers every conceivable variation to suit every conceivable palate.

Patholi is a dry curry made with lentils and vegetables - each serving brings you both proteins and vitamins. Nammamma didn't make this very often as Karnataka has a special called nuchinunde (I will post it later sometime) which is steamed and delicious. Patholi is my mother in law's recipe and she usually adds Gorikayi (Guvar beans also called cluster beans) or makes it with just sauteed onions. Both taste great. You can add regular green beans instead of the cluster beans.
What do you need to make Patholi? 
2 cups chana dal/kadle bele
2 cups finely chopped gorikayi/cluster beans
1 cup thinly sliced onions
1.5 Tsp salt (adjust to taste)
2 Tblsp oil
1/4 Tsp asafoetida
1 Tsp mustard seeds
1 Tsp (8-10) black pepper corns
4-5 curry leaves
1 dry red chili broken into pieces (optional)
1X1 inch piece ginger root
4-5 green chilies (adjust to suit your spice level)

How do you make Patholi?
  • Soak chana dal in water for about an hour.
  • Wash and drain the water from the dal and grind it with green chilies and ginger pieces into a coarse paste. Try not to add water while grinding and run the blender in pulse mode to get the right consistency. 
  • Cook the cluster beans in 1.5 cups of water until they are soft but not mushy, strain the water and keep the cooked beans aside.
  • Heat a Tblsp of oil, add the asafoetida, mustard and pepper corns. Let the mustard crackle. Add the curry leaves, dry red chilies and fry for about 30 seconds. 
  • Add the thinly slices onions and saute until onion turns light pink.
  • Add the ground dal mixture and spoon the remaining oil around the inside edge of the pan, cover and cook for 6-8 minutes on medium heat.
  • Mix it once, add salt and continue to cook for another 4-5 minutes stirring frequently to avoid burning until the dal turns a shade darker in color and the raw smell is gone. 
  • Add the cooked cluster beans and mix it well. Cook for another 2-3 minutes and switch off. 
Notes: 
  • Use a non stick pan to reduce the oil intake in this recipe. 
  • For a lower calorie version, steam the ground dal mixture in your cooker (same procedure as making idli) and once it is cool, fluff up the cooked dal and saute it with fried onions and cooked beans. This version takes much less oil compared to directly frying the dal. 
  • Take care to grind the dal into a coarse paste - every dal should be broken up into tiny pieces but should not become a paste. 
  • If you blender needs water to run while grinding, go ahead and add it and take the course of steaming the dal before sauteing it. The steaming also absorbs the water and gives you fluffy cooked dal.
  • Wash the cluster beans, remove both ends by snapping them off with your fingers and also removing any strings that may be part of the beans before chopping them.
  • Covering the pan and letting the dal cook in the steam that develops helps reduce oil. 
  • You can use the water used to cook the beans as a broth in any of your curries for an added flavor.

Monday, September 24, 2012

Beet root palya/thoran and a trip to God's own country

A few years back we took a vacation and went on a house boat trip on the Vembannad lake in Kerala which is the longest lake in India and the largest fresh water lake in Kerala. It was a beautiful experience and as we sailed in a small houseboat on the calm waters, we were treated to some of the most delicious food over the course of 2 lunches, a dinner, a breakfast and a few snacks in between including the famous Kerala appam. One of the dishes that caught my fancy is the simple beetroot thoran or palya as we call in Kannada. It was very close to the palya nammamma makes with a few variations and the coconut lover that I am, I fell in love with the thoran that had almost the same quantity of grated coconut as the beetroot pieces - Hehehe.

Palya in Karnataka is typically steamed or sauteed vegetables with seasoning. These do not have a lot of masala ingredients and amma didn't use onions unless it was the potato-onion palya. The masala palyas are made for different purposes such as mixing it with rice to convert into a Bhaath. Gojju, chutney and other condiments bring the spicy accompaniment in Karnataka meals. I liked the house boat version as it had finely chopped onions which gave a distinct flavor to the palya. Nammamma typically cooks the vegetables and then pours over the seasoning on top but for this dish I follow my houseboat cook's method of cooking the vegetables in the seasoning. Amma uses chana dal & urad dal in the seasoning and they stay crunchy since they are poured on top.

Let us get ready to cook up a simple beetroot palya. With flavoring agents added in to this palya, I can just eat up a bowlful like salad. You can serve it as a side dish. Either way, treat yourself to a rich in antioxidants, heart healthy palya.
What do you need to make Beetroot Palya? 
2 medium sized beetroots
2 Tblsp finely chopped shallots or red onions
1 Tblsp grated coconut (fresh/frozen)
1 Tsp oil
1 Tsp mustard
1/2 Tsp cumin
1/8 Tsp asafoetida
2 dry red chilies broken into pieces
5-6 curry leaves
1 Tsp salt (adjust to taste)
1/2 Tsp sugar
How do you make Beetroot palya? 
  • Wash, peel and chop beetroots into really small pieces. 
  • Heat oil in a pan, add asafortida, mustard and cumin. Let the mustard crackle.
  • Add the chili pieces and curry leaves followed by chopped onions. 
  • Let the onions sweat for a minute, add the beetroot, grated coconut, salt and sugar.
  • Cover and cook on medium heat for 6-8 minutes, the pieces cook in the juices released.
  • Stir it once, cover and cook for another 4-5 minutes or until the pieces become soft. 
  • Switch off, serve hot or warm. I can eat this palya by itself like a salad. 
Notes: 
  • Choose fresh, juicy beetroots for this recipe for best taste.
  • Choose onions that are milder in flavor (shallots work best followed by the regular red onions)
  • I like finely chopped beetroot which actually cooks faster too, alternatively, you can grate them on the bigger side of the grater for a similar effect.
  • If you are worried about the beetroot getting burnt, add a Tblsp of water.
  • Addition of sugar helps retains the rich color of beetroot and also brings out the natural sweetness of beetroots.