Sunday, December 29, 2013

Akki Tari (Rice rava) Uppittu - an old classic rejuvenated with fragrant herbs

Staying home during Holidays is fun and exhausting, fun because of all the stuff we get to do together as a family in a relaxed manner and exhausting because that is when I start opening closets and cupboards for a deep cleaning :-). We enjoyed the mundane things such as a lazy breakfast as the pace was so much slower compared to a week day rush. Actually, I have been cooking sporadically this past week, did minimal cooking when it was the three of us at home, skipped cooking altogether on some days and had sandwiches on the go and then went back to the kitchen with a vengeance to cook elaborate meals on the days I had guests. No pictures taken so will get to the new recipes next time I make them. I baked 3 different cakes within a span of a week, starting off with the fruit cake, followed by the muffins (not a cake exactly, but..) and finished it off with a carrot cake for the dinner on Friday. All three cakes were shared with different groups of people and devoured. After all the baking, I am a little caked out and baked out for now :-). I tried a few variations in my carrot cake recipe this time and it turned out as delicious as the previous version, I have updated the post, so if you haven't tried this recipe yet go ahead and make it your dessert next time. Served with a scoop of ice cream, it reminded us of the carrot halwa+ice cream combo.
The past week has been a mixture of sweet and sad events as we try to bid farewell to 2013 and welcome the new year. First of all, I don't even know how the entire year consisting of 12 months with an average of 30 days went by so fast, I look back and still remember the beginning of the year, I like to think this is because we had fun doing what we did and had a good year overall. Last week, I heard the news of one of my favorite Kannada poets passing on. Dr. G.S. Shivarudrappa whose poems made such wonderful Bhavageethegalu (light music genre) was someone I had the privilege of personally meeting at his home. While he became a household name with the music his songs made, he wrote much poignant pieces outside the genre too. The writer is gone but the writing lingers in the hearts of many and the legacy lives on.., here is a wonderful piece of poetry sung beautifully by 2 of Karnataka's greatest light music singers - for those of you who do not understand Kannada, the song is from the perspective of a singer, how he/she derives happiness just by the act of singing and does not sing for the listeners or the accolades.

Click here to listen - Yede Tumbi Haaduvenu

Two days back came the news of Farooque Sheikh's sudden death from a cardiac arrest. If you enjoy old Bollywood movies, go watch this natural actor in movies like "Chasme Baddoor" and "Kissi se na kehna" for a light comedy or "Umrao Jaan" and "Katha" for a more serious fare. Handsome, sincere and charismatic, he was one of the heroes I enjoyed watching movies of.

2 exits that act as a reminder of life so transient, and the weather is not helping much either. I am actually looking forward to starting work tomorrow and keep the brain engaged a little more rigorously elsewhere.
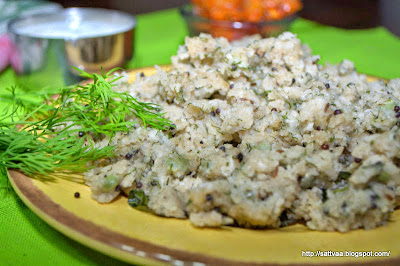
Before we end the year, here is a very homely and simple uppittu/upma made with a different ingredient than the usual upma rava. In our house, it featured on special days during the winter season when avarekalu abounded the market. Nammamma always made this with avarekalu (papdi lilva). After that one year of making a rare finding of this bean in my local grocery store, I haven't been lucky again. I resort to the frozen packs to satisfy my cravings when they hit bad. Since I didn't have the avarekalu this time, I used the frozen green Toor beans (these are whole beans and are available in frozen bags at most Indian groceries).

If you are used to avarekalu, you will be familiar with their unmistakable aroma which makes this uppittu very special, since I didn't have it, I used some fresh Dill leaves to make up for the missing aroma and the result was a delicious uppittu. This upma tastes very different from the regular upma and is a refreshing change. It is a saatvik uppittu usually made without onions.

What do you need to make Akki Tari Uppittu?
2 cups akki tari/rice rave - See below to make recipe at home
2 cups water
2 Tblsp grated coconut
3/4 cup frozen green Toor or avarekalu (papdi lilva)
1 cup chopped dill leaves
2 Tblsp oil
1 Tsp mustard
1 Tsp cumin
2 green chilies
1/2 Tsp black pepper coarsely crushed
few curry leaves
1 Tsp salt (adjust to taste)

How do you make Akki Tari at home?
  • I used brown rice for a richer fiber alternative.
  • Wash rice twice in running water and drain all the water from it.
  • Spread a cheese cloth or kitchen napkin in a dry spot on your counter and spread the washed rice evenly in a thin layer.
  • Let it dry overnight or for 6-8 hours until the dampness is gone completely.
  • Powder in your mixer/grinder to a coarse rava consistency.
  • A cup of brown rice yields about a cup of rice rava.
  • This can be preserved for a few weeks stored in a dry container with lid. Make sure rice is devoid of any moisture before you powder it. I have learnt this lesson the hard way as damp rice results in distasteful growth in the powder and makes it inedible.
How do you make Akki(Rice) Tari(Rava) uppittu?
  • Remove stems and cut green chilies into 2 or 3 pieces.
  • Clean and chop Dill leaves finely.
  • Cook Toor or avarekalu with a pinch of salt in 1 cup of water until soft.
  • Measure 2 cups of rice rava, heat a skillet on medium heat and roast the rice rava stirring frequently for 5-7 minutes or until it warms up. It doesn't need to be browned but just heated through.
  • Take the rice rave onto a plate and keep aside.
  • Heat oil in the same pan, add mustard, cumin and green chilies. Let mustard pop.
  • Add coarsely crushed black pepper and curry leaves.
  • Add the chopped Dill leaves and sauté for 2-3 minutes until the leaves wilt and you get the aroma of the leaves.
  • Drain and reserve the water used to cook Toor (or Avarekalu) and add the cooked beans to the seasoning along with remaining salt.
  • Add the roasted rice rava and grated coconut and give a good mix.
  • Measure 3 cups of water (use the water from the cooked beans) and add it to the rava mixture slowly while stirring the mixture with a spatula to avoid lumps.
  • Cover, reduce heat to low and let it cook for 8-10 minutes until the rava fluffs up and becomes soft.
  • Serve with a drop of ghee and a side of pickle and yogurt.
Notes:
  • You can make rice rava with white rice (Sona masoori), follow the same process above.
  • If you are pressed for time, a quick alternative is to use store bought idli rava. This is a decent replacement if you do not want to make the rice rava at home. Use the coarser variety.

Monday, December 23, 2013

Apple-Pear-Granola muffin, yep it is all about fruits and granola in a moist muffin

Holidays are here and we have a few days off this week. Staying home, cleaning the house (long over due), catching up on some (forever postponed) errands and entertaining guests as we go along the week. It has been fun so far. BH has a childhood friend visiting from India and is so elated to spend time with him after many years. We went out to do some shopping yesterday but today I let the boys hang out together and have some manly fun :-). Weather wise, this week has been awesome, we had a teeny bit of snow earlier on last Friday and as expected, schools shut down and the Christmas break began a day earlier for the kids. The snow was not more than 1/2 inch on the ground but given the slopes and turns this region is known for, life usually comes to a stand still with a little bit of the white fluffy stuff. Since then, temperatures have improved a little and mornings are bright and sunny. I love white Christmas but I have started to enjoy the 'not so cold' Decembers also :-)
Recently I discovered a vegetables (and some more artisan baked stuff) home delivery service in our place. What piqued my interest is that these are mostly locally grown and many organic choices. While I am not an organic convert, I sit on the fence on this topic since organic makes sense to me with certain things and I feel it is overrated with certain other ingredients. I don't go out of the way to buy organic but locally grown interests me. For one, it recognizes the local farmers and ensures food doesn't get stale in transport. If my vegetables do not have beeswax coated over them to keep them looking fresh as they make their way from far off countries, if my fruits are not treated to help them sustain their long journey, I feel my food gets so much tastier and flavorful. So, I started to get a box of vegetables delivered from Full circle a month or so ago, best part of this delivery is the order is customizable every week, so I can check their list and choose what I need, this also means I get to plan my meals a little ahead of time. But I do miss going to the store, touch and feel the vegetables and randomly pick up stuff that appeals to me :-). There has to be some compromise and in any case, my new delivery service does not carry all the herbs and chilies and other stuff that I regularly use in my cooking, so I end up visiting my local store to pick up the essentials and some more. So far, the veggies and fruits I have got from full circle have been very satisfactory and taste delicious and I am planning to continue for a while before deciding whether to make it long term or not, if you are in Washington, Oregon or Californina, check out their website and see if you would like to order too.
As I was baking my fruit cake last week, DD came in and smelled the air and asked if she could take some to her dance class. The fruit cake as I mentioned in my post earlier is best tasting after it has rested for a good 24 hours, I didn't want to send a warm fruit cake :-). Since the oven was anyway hot, I thought of baking something else that gets ready in the next hour or so and could be eaten immediately. I had a big bunch of bananas and some apples and pears in the fruit basket. My first thought was to make my banana nut muffin but then I had sent a batch of them a few weeks earlier and didn't feel like doing an encore. I had seen a recipe for apple-granola muffin in a magazine recently and kept it aside since it called for a ready mix flour such as Bisquick. I just took the idea and made my own muffin recipe, used the apple and pear I had and the result turned out to be a delightfully moist on the inside with sweet tasting apples and slightly crunchy on the outside with the granola, yummy tasting muffins that also got some good reviews. Go ahead, make some for yourself, enjoy the Holidays with these baked goodies full of fruity goodness.
What do you need to make apple-pear-granola muffins?
Makes 15 medium sized muffins
Dry ingredients:
1.5 cups AP flour
1 Tsp baking soda
1 Tsp baking powder
1/8 Tsp salt
2 Tblsp granola
Wet ingredients:
1/3 cup oil
3/4 cup brown sugar
1 big sweet apple
1 medium ripe pear
1 Tsp vanilla essence
How do you make apple-pear-granola muffins?
  • Pre heat over to 375F.
  • Wash apple & pear, peel and deseed them.
  • Cut the pear and half of the apple into bite sized chunks and puree them in the mixer.
  • Add the brown sugar, oil and vanilla essence to the mixer and blend them together once.
  • Chop the remaining half apple into tiny, long pieces and keep aside.
  • Sieve all purpose flour, baking soda, baking powder and salt together in to a large bowl. Repeat the sieving twice to distribute the leavening agents(soda and baking powder) evenly without lumps.
  • Pour the puree on top of the flour and mix gently with a spoon or fork until it is incorporated.
  • Add the chopped apple pieces and 1 Tblsp granola in to the batter and mix it.
  • Line the muffin tray, scoop out the batter into the individual dips. Top with a sprinkle of granola and bake it for 25-28 minutes or until a tooth pick comes out clean.
  • Take it out from the oven, let cool on the rack for 5 minutes before serving.
Notes:
  • Use ripe pears as they puree easily and smoothly.
  • You can use a combination of whole wheat and AP flour (use 3/4 cup each) for a slightly healthier option.
  • I used my home made granola bars and crumbled them to make the spoon measure. If you do not have granola on hand, you can use quick cooking oats and dry fruits as a replacement or you can skip it entirely.
  • Both apple & pear do not have any over powering flavors and are mild, the muffins tasted delicious with this combination.

Thursday, December 19, 2013

Christmas Fruit cake - an alcohol and egg free cake to indulge in some Holiday Gluttony

We went to attend an essay presentation night at DD's school 2 evenings earlier. These are all high school kids and have to prepare an essay on a topic of choice (approved by a faculty member/advisor) and work on it over 2 semesters. We were only able to attend may be 1/8th of the presentations as we sat in the room that DD was in along with 11 other classmates. The topics were as diverse as - patterns and uses of mathematical group - why moving Boeing manufacturing (or part of the facility) out of state is not beneficial - how Jhumpa Lahiri uses food in her short stories to convey something and a whole gamut of other topics. A very enjoyable evening. What does this have to do with today's post, you ask? Well, it is a prelude to what is to follow :-).
One of the presentations was about striking unity in diversity and how India manages to do that generation after generation. The presenter talked about her parents telling her stories of growing up in a diverse neighborhood in India where all festivals were given equal measure of importance and indulgence. That is true, in all the years I was growing up in our small city of Mysore, we never experienced any disharmony with our neighbors from different religious backgrounds. I personally think the religious tolerance in India is very high as we respect and live happily among a multitude of different practices, the key being 'Live & let live'.
 
I studied in a convent, went to the chapel to pray before heading to many an inter school competition :-), put up nativity displays and organized Christmas plays every year in addition to eating the cakes that the nuns gave us and those that many friends brought from home. Though Nammamma never baked anything in her kitchen, we had our share of yummy baked goodies from the neighborhood Iyengar bakeries or from friends. While we didn't do anything specifically for Christmas at home, there was enough festivities around to suck us into the joy of the season and celebrate it with our friends.
After coming here, Christmas has been so much part of our lives. Initially it felt like a wonderland outside especially in the snow clad Eastern states we have lived in. The novelty wore off slowly, however I never tire of walking through artfully lighted streets and neighborhoods. We started placing our tree in the house for the little girl who had that innocent, childhood faith in the fact that the big man in red suit would come in on Christmas eve even in the apartments we lived that didn't have a chimney :-). As she grew older and the secret Santa was identified to be the doting mom & dad, lists & letters to Santa turned into subtle pre-Christmas hints to the parents. While many things changed, tradition of decorating the tree continued. This season can get pretty lonely (ironic given that everyone is celebrating) and I ache for my family that are not here with me.  We have been fortunate to have somebody at home - cousins, grand parents, aunts, uncles or friends when we actually decorate the tree every year, it is our small Christmas miracle. Last year, looking at all the majestic pine trees we are surrounded with, we decided to get a small live tree instead of the plastic one we had been using. After New year, we transplanted the plant into a bigger pot not expecting much but it grew a few inches taller over the summer and we have a cute, little live tree that we don't have to cut. We brought it inside last weekend and a young cousin who has recently moved to town showed up for brunch and we had a great time putting some trinkets and dressing up the small tree after a heavy lunch. We thought it looked pretty without lights, didn't have the heart to wrap warm strings of lights around a living, breathing tree :-)
Tiny little decked up tree inside the window talking to the giant aunts/uncles outside
With our little tree up in the corner and lights on the windows, I wanted to bake something special for the Holiday season. I have heard much bad rap about fruit cakes but they never seem to go out of fashion when it is the end of the year :-). Once when I was in India, a friend of my FIL from Kerala brought a big home made fruit cake to share with us. I had never had the dark kind of cake before, so greedily grabbed a big piece and settled down on the sofa next to amma. Both of us bit into the slices in hand when I asked the lady for the recipe. She promptly started with flour and Rum :-). Now the only time alcohol has knowingly entered our bodies is via a cold/cough medication and we both have a 'thing' about it, so we put the cake pieces down into our respective plates hoping that our generous friend would not notice the dip in enthusiasm. Needless to say that BH all of a sudden seemed to grow a lot of interest in the discarded piece of cake :-). But that conversation made me wiser to the fact that typical fruit cakes had Rum or brandy and good ones were actually ripened over months with a steady feed of alcohol resembling the drip irrigation.
 
I have wanted to make a fruit cake for a long time and kept looking for an alcohol free recipe, found some, book marked them and never got to making one. Now that I feel much more confident about baking and have learnt the use of replacement ingredients, this year I decided to make a fruit cake and make it without both Rum or eggs. Here is the recipe mine is loosely based on but I have made modifications to replace the 2 ingredients. It doesn't have the 'caramelizing' process usually done in Indian fruit cakes so no elaborate cooking needed. The verdict at home was, 'it is simply superb', wish I could send a slice to each of my readers, but here is one for all of you virtually.
The cake doesn't look very dark as I used light brown sugar and didn't have the molasses but the juice soaked fruit bites and the cake itself are irresistible. In my quest of a perfect fruit cake recipe which has gone on for a couple of years atleast, I have gathered some 'fruit cake baking wisdom', look for the tips at the bottom of this post. I found them very helpful as I baked mine. Do give this a try, you have some time before 25th and can still make it if you are getting ready. Drop in and let me know how you liked it.
What do you need to make fruit cake?
1/2 cup (1 stick US measure) butter
3/4 packed cup brows sugar (use dark brown sugar if you are particular about the color)
1 cup unsweetened apple sauce (or 4 eggs)
1 & 3/4 cup AP flour
1 Tsp freshly grated nutmeg
1/2 Tsp freshly powdered cloves (about 6 cloves)
2 Tsp lemon juice
1 Tsp baking powder
1 cup ground almond
3 cups chopped dry fruits - any combination of dark raisins, golden raisins, cranberries, blue berries, apricot, dates, pinneapple etc.
1 cup orange juice - I took 2 big oranges and squeezed fresh juice, the flavor was undoubtedly stronger and better than store bought orange juice
1 cup candied orange peels
1.5 cups chopped nuts - any combination of walnuts, pecans, pistachio etc
How do you make fruit cake?
  • Chop all the dry fruits into small pieces and soak them for atleast 48 hours in the orange juice. Use a big container with lid, put it in the refrigerator and shake them every few hours to make sure all the pieces come in contact with orange juice.
  • I made the orange peels at home following this recipe, original source here as I couldn't find them anywhere in the stores near me even after a much hilarious wild goose chase, story for another day. They turned out so good that we ended up eating half of them just like that :-)
  • On the day you make the cake - Chop the candied orange peels and nuts into small bits, keep it ready.
  • Powder almonds into a fine consistency and keep it ready.
  • Mix softened butter (keep it out of the refrigerator a few hours earlier) and brown sugar in a big bowl, beat them with a whisk to a creamy consistency. I used my stand mixer which made the task a no-brainer :-)
  • Add 1/4 of the apple sauce, beat it in until homogeneous, add 1/4 of the flour and mix it till well incorporated.
  • Continue this process 3 more times until all the apple sauce and flour have been used.
  • Add powdered nutmeg, cloves and lemon juice and mix them well. Add the baking powder and give a good mix.
  • If you are using the stand mixer, switch it off and fold in the remaining ingredients gently - start with powdered almonds, soaked dry fruits along with any remaining orange juice, chopped nuts and candied orange peels.
  • Prepare a loaf pan by laying a parchment sheet to cover the bottom and the sides leaving about an inch or so hanging out from the sides. Lightly grease the parchment paper with butter or cooking spray.
  • Preheat the oven to 325F,  keep a wide baking tray half filled with water on the top shelf.
  • Pour the prepared cake batter into the pan, smoothen the top with a flat spatula.
  • Place the loaf pan in the middle of the water tray and bake it for 135 minutes (2 & 1/4 hour) to 150 minutes (2 & 1/2 hours) until a tooth pick inserted in the middle of the cake comes out clean.
  • Let the loaf pan stand on a cooling rack for 15 minutes before you pull the cake out holding the hanging parchment sheets and let the cake cool completely over night - DO NOT slice atleast for the next 10 hours. This cake develops flavors slowly.
  • I rolled the cake in a cling wrap after about 6 hours to keep the cake moist and let it continue to cool for the next 4-5 hours.
  • Make thick slices of the cake and enjoy with family and friends.
Notes:
  • The cake has a good weight you can feel in your hands but is not dense when you eat it.
  • The dry fruits soaked in orange juice tasted wonderful in every bite, if you want it to be milder use apple juice or a combination of orange and apple juice.
  • Fruit cake baking wisdom 1 - Put the loaf pan inside a preheated pan containing water, this helps prevent an early browning of the cake as it is in the hot oven for a long duration.
  • Fruit cake baking wisdom 2 - Putting parchment paper in the pan not only helps develop the color slowly but also makes it easy to lift this cake out once baked.
  • Fruit cake baking wisdom 3 - Soak fruits in juice overnight or as long as 2 days for them to soak up the liquid and soften.
  • Even if you have big bottles of store bought nutmeg & spice powder in your pantry, do yourself a favor and powder them freshly. It makes the cake come alive with fragrance.

Monday, December 16, 2013

Ragi Idli - brown beauties for a healthy breakfast

Food blogging and gray skies do not go hand in hand. My blog posts have dwindled in number this past week and if you really insist on knowing the reason, just follow my finger that points to the cloudy, dark outdoors. To top the cream with cherry (that is pretty good for a saying, don't you think?), the investment made generously by the ever supportive BH in the form of a camera flash decided to die on me. I had to hide my face as BH found some tell tale remnants of cooked lentils and a few strands of cilantro sticking right next to the battery case. The man thinks that I have blocked the electrical connection with a non conducting dal or such material. I am officially on the 'Hall of Shame' list at home currently. I may have been a tad negligent, but in my defense, things like these are bound to happen when the kitchen counter doubles as food blogger's direct feed to the channel :-).

All is not lost yet, a pact has been made and BH has been all pacified with promises of delicious food (that is an easy endeavor always, I mean the pacifying part not the bribe :-)) and has agreed to work on the 'cleaning of the flash and bringing it back to life' activity as soon as he can get some time from the seemingly unending meetings and work he has been involved in. In the mean time, I pray fervently that his diagnosis is right on and also ask for a few minutes of sunshine and brightness to coincide exactly with the time I am done with my cooking and ready to take pictures so I can invite you all to try my recipes with cheerful looking pictures that do justice to the deliciousness of the dishes :-). Too many specifications in my prayers, let us see how things turn out. I will keep you all posted.
Until such time, I am going to depend on my ever dependable stash of dishes in my drafts. You have to accept that there is definitely a strong evidence of intelligence in my brain given the fact that I have quite a few yummy creations in my drafts ready to go at a moments notice. Some days, I go on a cooking spree and make multiple dishes and take hundreds of pictures of them all. But by the time I get to them, the mood would have passed and I stare blankly at the pictures and beyond as I cant seem to feel any stories connecting me with those pictures. Sometimes I flutter away to find another set of pictures that make me write reams and reams of stuff about it, and I put the original set back in the draft folder and move on, the draft gets forgotten, well almost or until now..

A month or so ago, I had written a post about diabetic friendly recipes for the Diabetic awareness day and while working on that post, I had made more than one diabetic friendly recipes. While all of them were very close contenders on the taste scale, I had to choose one and I went with Barley upma as that seemed to be a not so common dish. At the same time, my ragi idli got pushed into the draft. This very unassuming idli is a perfect breakfast or dinner when eaten with a spicy chutney or sambar. I have two variations of the same recipe, they change the texture of the idli a little bit, so choose whichever one you prefer.

If you haven't done already, Ragi or finger millet is something you want to incorporate in your regular diet, it has low fat content, good amount of fiber content and high calcium content . If you are not used to the color it imparts to the dishes, it may be a put off initially but don't let that deter you from experiencing a very earthy and fulfilling taste. We relish Ragi mudde, Ragi rotti and Ragi dosa on a regular basis at home.
What do you need to make Ragi idlis?
Makes about 20 idlis
1/2 cup urad dal
1 Tblsp avalakki/poha/rice flakes
1/4 Tsp fenugreek seeds
1/2 Tsp salt
Variation 1:
1 & 1/4 cup ragi flour
Variation 2:
3/4 cup ragi flour
3/4 cup idli rava

How do you make Ragi Idli?
  • Soak Urad dal with poha & fenugreek seeds for 3-4 hours.
  • Drain the water, scrub and wash the soaked dal once and grind it to a very smooth batter using water.
  • Variation 1:
  • Once the urad dal is soft (I grind it for about 25-30 minutes in wet grinder), add the ragi flour slowly and give it a couple of pulses so it mixes well with the urad dal paste.
  • Alternatively, you can take the urad dal paste to a big bowl, mix the ragi flour until it is homogeneous and lump free.
  • Variation 2:
  • Rinse idli rava in water and keep aside for an hour. Squeeze out the extra water and add it to the ground urad dal batter along with the ragi flour.
  • Follow the below steps for both variations:
  • Add salt and mix together. Adjust the consistency of the batter using water as you are using dry flours here. It should be easily pourable but not flowing thin.
  • Cover and set it in a warm place to ferment, takes about 8-10 hours. See notes for help on fermenting.
  • Grease the idli plates with a drop or two of oil and pour a spoon full of batter. Steam like regular idli for 15-20 minutes or until they are cooked completely.
  • Let the idlis stand in the plate for a couple of minutes after you switch off the stove, remove gently using a butter knife. We had it with carrot chutney.
 
Notes:
  • I usually switch the oven light on and keep the batter inside the oven, this ferments the batter well overnight. You can heat the oven to the lowest temp setting on Bake, switch it off and put the batter inside for fermenting. If you live in a warm climate, a corner on the counter top will do the trick.
  • I added some grated carrots to top the batter when I poured them to the idli moulds. This adds a little bit of color making it appetizing to the consumers and gives extra nutrients.
  • Since store bought ragi flour is very fine in texture, these idlis are not grainy like the regular idlis, variation 2 gives you that texture as you use half of rice rava/idli rava.
  • These idlis do not plump up like regular rice idlis and remain the same size after cooked , make sure you steam them long enough to cook them through.
 

Friday, December 13, 2013

Menthya saasve - one of the forgotten curries from Malnad region

Been a while since I as here last, thank you to all those who checked in after me. Things are ok and I am doing well. Had to take a forced break as work got intense and I had voluntarily added something to my list to be completed by year end. Target complete and here I am with a couple of alphabets to add to the end of my name on my professional signature :-). It was mentally exhausting and physically difficult to go back to some serious school age studying (which obviously I had not done in a long time) but gratifying at the same time. DD has been equally busy the last week as she is going through a series of exams before her winter vacations start and then will have to get ready for the exams after the vacations :-(. I was completely drained last evening and dozing off at 6.30 in the evening while she was still chirping away and working on her homework. I asked her how she does it and she looks me in the face and quips, "Amma, do you realize you are old?", cheek of the kid to call her own mom old, I never said anything like that to my parents, EVER :-). Well, I promise I wont bore you with too much non foody stuff. Here I am back and rearing to go with my blogging.
A couple of days ago Srikanta Datta Wodeyar passed away, for those of you unfamiliar with who he was, this can't be more than another piece of news. He was the last of the Wodeyar dynasty which ruled Mysore province for generations. For me, he is part & parcel of my Mysore Dasara celebrations. Though he never was a maharaja (king) in the true sense of the word as post Independent India did away with kings & royalties, he represented a bygone era. Government had made provisions for this crown-less, throne-less king to live in the Mysore palace and also kick start the traditional Dasara procession with a pooja. Now, he becomes only a memory and a tiny bit of history that enriched the region.

For me, food blogging has been all about memories, remembering not just the taste of the food but the people who made them, served them, company you enjoyed with and incidences they were part of. This means that I talk about my family and personal life many times on this blog. Hope you enjoy reading them as much as I do writing them. I have a very homely recipe today that you will not find in any restaurants ever, sometimes simplest of the things make the most sense, bring absolute joy and contentment in life.

When you reach the western ghats in Karnataka and stop at someone's home in a place such as Chikmagaluru or Shimoga or further interior at Balehonnuru, the food takes on a completely different shape, flavor and taste. I believe the taste is enhanced because it is made with ingredients locally grown or available and not tainted by long journeys packaged and shipped from a different part of the World. While it limits the ingredients available to you, your chef's ingenuity shines bright as you come up with so many variations unrecognizable from the previous one. This region is known for its Tambulis (yogurt based cooling gravy), chutneys (abundant use of ingredients such as banana stem, banana flower etc), or the very unique saasve which is generally a gravy either with or without vegetables but definitely with ground raw mustard.
Nammamma made many of the Malnad region cuisine at home as part of our daily food but her repertoire was limited compared to those of my two Doddammas (aunts) who lived in the heart of Malnad for most of their lives. For us city bred Mysoreans, a visit to doddamma would be a gastronomical experience in the enchanting world of Saasve, gojju, paladya, mosaru bajji, tambuli along with an array of happala (papads) and sandige (I still can't translate this to anything justifiable :-)). I have followed this doddamma in all the small village-y places she has lived around Mysore most of my school breaks. Small, low ceilinged kitchens with a small window that served no actual purpose of bringing in light or air but was mainly installed as a formality where you squat infront of a stove placed on the floor (kitchen platforms or shelves were too fancy for these old houses) while Doddamma roasted a spicy horsegram papad or a sweet jack fruit papad directly on the flame or charcoal and gave it to us. The banana leaf spread infront on the floor would already be steaming with hot rice, ghee and saaru (not Rasam but close enough, I will reserve my saaaru Vs Rasam discussion for another day). On one corner of the banana leaf would be either a palya (stir fried vegetable), paladya/bajji (yogurt based gravy) or a saasve (if vocabulary challenged, you can call this chutney but the flavor is very distinct and different). The meal plan was simple, had to have some protein source (saaru with lentils fit the bill perfectly) and then you would have a vegetable or two. And you end the meal with buttermilk. You had to have extreme mind control not to eat those banana leaves too :-)
One of my friends is from malnadu and married into a family in the deepest part of the region, so all her strings to Malnad food are intact. On one of my India visits, she made this saasve which was out of the world and brought back memories of having tasted it in my Doddamma's kitchen once. So I went right after her for the recipe and recreated it at home and here is a much loved menthya saasve for all of you to enjoy. It makes a great side dish for rotis also but you can go ahead and create your own Malnad experience by spreading a green banana leaf and serving it with hot white rice. Mix it in with a drop of ghee and enjoy. Come back and let me know if you were able to stop licking your fingers anytime or even smelling the fingers after you had washed them :).

Saasve (or saasive) means mustard in Kannada. Keeping the ground masala same, there are umpteen varieties of this saasve as you can use different vegetables in place of fenugreek seeds. The one I have today is bisi(hot) saasve as the masala is boiled after it is ground. There are hasi (raw) saasve varieties where you just add the ground masala to a vegetable (raw such as cucumbers or radish) or to a cooked vegetable (such as fried okra) along with a ladle full of yogurt. May be I will post one of those some other time. I haven't used any vegetables today and the surprise ingredient is fenugreek seeds, no I didn't make a mistake when I said 2 Tblsp of fenugreek but I will tell you this - you wont bite into any bitterness here, the seeds lose their bitterness in this dish, instead lend a wonderful aroma and taste to the dish and makes it very delicious. Remember to keep the salt, spices and sourness in balance and to your liking. Enjoy!
What do you need to make Menthya saasive?
2 Tblsp fenugreek seeds
1/2 Tsp mustard seeds
1 Tblsp oil
4-6 curry leaves
pinch of asafetida
To grind:
Key lime size tamarind
2 Tblsp grated coconut
1 Tsp mustard
3-4 green chilies (adjust to taste)
1/8 Tsp turmeric powder
3-4 sprigs of cilantro
1 Tsp brown sugar or grated jiggery
1/2 Tsp salt (adjust to taste)
How do you make Menthya saasive?
  • Heat oil in a pan, add mustard and fenugreek seeds. Keep the heat on medium to low and fry the seeds stirring frequently until mustard pops and fenugreek turns deep brown. Take care not to burn either of them.
  • Add the curry leaves and stir it in.
  • Mean while prepare masala - grind all ingredients under 'To grind' with 1/2 cup of water into a very smooth paste.
  • Add the ground paste to the roasted fenugreek, add water to make a thin gravy consistency and let it boil on low heat for 10 minutes or until fenugreek seeds drink up the masala and plump up.
  • Switch off, let it stand for about 20 minutes before serving with rice or rotis.
Notes:
  • It is important to roast the fenugreek on low-medium heat so the seeds get roasted through.
  • Taste the ground masala and adjust green chilies, salt or tamarind as needed. This is yummy by itself as a chutney.
  • You can use dry red chilies in place of green chilies to make a 'kempu saasve'(red gravy) as we called it.
  • The gravy is a blend of sweet, sour, spice and saltiness. Adjust them to suit your palate.
  • It is important to let the roasted fenugreek boil in the masala and soften before you eat them, this process allows them to soak up the gravy, become soft and lose the bitterness. It is no fun biting into crisp, bitter fenugreek seeds.

Tuesday, December 3, 2013

Palak Rice - a post Holiday quick eat

Hey everyone, hope you all had a good Thanksgiving break if you reside in the US or a great weekend otherwise. We had a wonderful time, enjoyed our vacation and came back yesterday early morning. Everything about the tropical heaven from swaying coconut trees to the fragrant jasmines reminded me of home the entire time. We did some hitherto not done activities as a family and liked it very much. Have loads of pictures to sort through, I will post some on the blog or on the Facebook page, look for them in the coming weeks. Until then, here is a quick preview of some of the tropical beauty.
Before we left for vacation last week, I made sure I had emptied the refrigerator except for a few things that either was not going to go bad or I couldn't get to despite my best intentions. While it felt great to not waste any produce, it also meant I had to go shopping as soon as I came back. So when our travel got a little sticky and we ended up reaching home the next morning instead of the prvious late night, I just couldn't get to the stores and had to make do with whatever I got from scraping the bottom of my refrigerator tubs. All I had left was about a quarter bag of spinach, some green chilies, cilantro and ginger. As there was much to catch up on the work front, I made a quick palak rice that fits snugly with a lunch box menu or a hot plate serving.
We love our greens especially Spinach. There used to be a time when I didn't accept a non sticky spinach when I initially came here. Spinach symbolized a slightly okra-like sliminess in India and also the bunches we got home from the greens patch next door always had loads of soil sticking to it :-). Nammamma kept them in a bucket of cold water the previous evening to wash away the dirt before she picked the leaves and separated the stems for cooking. When I got the first bag of baby spinach here which also had a label  'triple washed, ready to use', I was one of the doubters. It took a while to get adjusted to the new Spinach but I have grown to love them over the years especially the reduced part of cleaning and chopping (if you are one of those super pressed for time, go ahead and get the chopped frozen ones to make life easier :-)). For me convenience plays a big role but as long as there is no compromise on the taste or nutrition.

Back to the Palak rice, this is a very flavorful rice, perfect for when you have little time and still craving for home cooked deliciousness. It is a one pot meal with minimal frills attached to the cooking, while the really basic version (like I have below) is perfectly suited for a thread bare refrigerator supplies, you can definitely jazz up this rice with additional veggies or spices if you are so inclined. I have some variations in the last section if you are interested. Try this and let me know how you liked it.
What do you need to make Palak rice?
2 cups rice (basmati or other long grained rice soaked in water for 30 mins)
4 packed cups of cleaned palak/spinach
2 Tblsp oil
1 cup thinly sliced onion
1 Tblsp salt (adjust to taste)
handful of cooked chickpeas/garbanzo beans
Whole spices:
2 pieces of 1 inch long cinnamon
1 green cardamom
4 black peppers
3 cloves
To grind:
1/4 cup cilantro
4 green chilies
piece of ginger
1 Tblsp grated coconut
How do you make Palak rice?
  • Blanch palak for 2 minutes in boiling water, strain the water and reserve it.
  • Puree the palak once it cools down.
  • Dry roast the spices for a minute until they are warm, take it aside into a blender jar.
  • Add green chilies, ginger, coconut and cilantro to the blender and make a coarse paste. Use a couple of table spoons of water you have reserved.
  • Heat oil in a heavy bottom pan or pressure cooker, add sliced onions and salt and cook on medium heat until onions first turn limp and then start to brown up.
  • Add the blended mixture of spices, pureed palak and mix well. Taste and adjust salt or spices to your liking.
  • Wash the soaked rice and drain it. Add the rice to the pan, measure 3.5 cups of reserved water and add it. Add the chickpeas if using.
  • At this stage you can transfer all the contents to a pressure cooker or rice cooker or continue to cook in the same vessel with a tight fitting lid. Cook until rice is done and fluffy.
Notes:
  • You can add a handful of mint while making the paste but I prefer the mild taste of palak in this rice and not necessarily turn it into a pulav. Choice is yours.
  • If you have a ripe tomato on hand, either slice and sauté them with onions or grind them with the masala. This adds a little tartness to the rice and enhances the taste.
  • Skip the chickpeas if you don't have them (I usually keep some boiled beans in the refrigerator or a ready to use can in the pantry), instead you can garnish this rice once done with ghee roasted cashews or paneer/tofu cubes - yummmm. Or add a handful of green peas or other beans of choice.
  • Do not throw away the palak blanched water, use it wherever you need liquid/stock as it is full of nutrients.
  • If you are using the open vessel method, bring the heat down to low and also ensure the bottom of your vessel is heavy and thick.
  • Soaking rice for 30 minutes helps reduce the cook time, this can be done while you are prepping the rest of the things.
  • Blanching palak removes the raw smell of the leaves. As soon as you switch off the stove after boiling the leaves, take them out of the water and run cold water on them to retain the rich green color of the leaves.