Showing posts with label Bottle gourd. Show all posts

Monday, May 6, 2013

Lauki kofta curry - a delicious side dish and some idle talk

We went to a restaurant in town recently as some of our friends recommended the food. It had a refreshingly different ambience than the usual Indian restaurants you find. The decor was very minimal and the seating looked comfy though not anything fancy. It was a Saturday afternoon, a little past usual lunch time and there were 2 other groups having lunch. We stepped in thinking it would be a buffet as in most Indian restaurants especially on a weekday. When we didn't see any buffet laid out, we hesitated a little bit at the front desk. A young lady told us that we could choose dishes from the menu and pay for it upfront and get an order #. They would call us when it was ready. Sounded a little different from other places. We did place an order as we had a famished teenager with us coming from her dance lessons, got into one of the booths and sat there waiting. The tables were literally bare, no water glasses, cutlery, napkins nothing. BH noticed a water dispenser in the corner and got 3 disposable glasses filled with water.

Our order # was called and when we went to pick them up, we realized that everything was served in disposable containers and the side dish came in different sized boxes, with a lid, ready to take home if you didn't finish it. For a minute, I actually started to appreciate how efficient all this disposable world looked, think about it - there is no cleaning required of the plates, water usage is reduced and as a business owner you save on employing another person and buying machines to do the job. But then every coin has two sides, right? However recyclable the disposable containers are, we all know that trees don't grow at the same rate we cut them down :-(. So I am still debating whether using those recyclable dishes and conserving water made up for the fact that there was still a huge eco-unfriendly act to start with because of all those disposable containers(some were bio degradable but the curry boxes had plastic lids).

In all fairness, restaurants are businesses and they have different philosophies to cater to their clientele and this place didn't invite me for my opinion at any rate :-). This is not a criticism of that particular place, obviously this is not the only place that uses disposable plates and cups, it is just me pondering over something that bothers me. We went and had some really yummy Baskin Robbins' ice cream sundaes next door after lunch where the edible waffle cones were served inside a disposable cup :-).  I know it is not practical to grow banana plants in the backyard and serve food on top of them, although it would be really lovely and unique if someone did that :-).

While reuse, recycle are seemingly becoming the new trend words, when I look back at my childhood,  it was a way of life and there were no second thoughts, wastage was unacceptable and less was more. How much are we adding to the land fill with this 'disposable' way of life? What do you think?

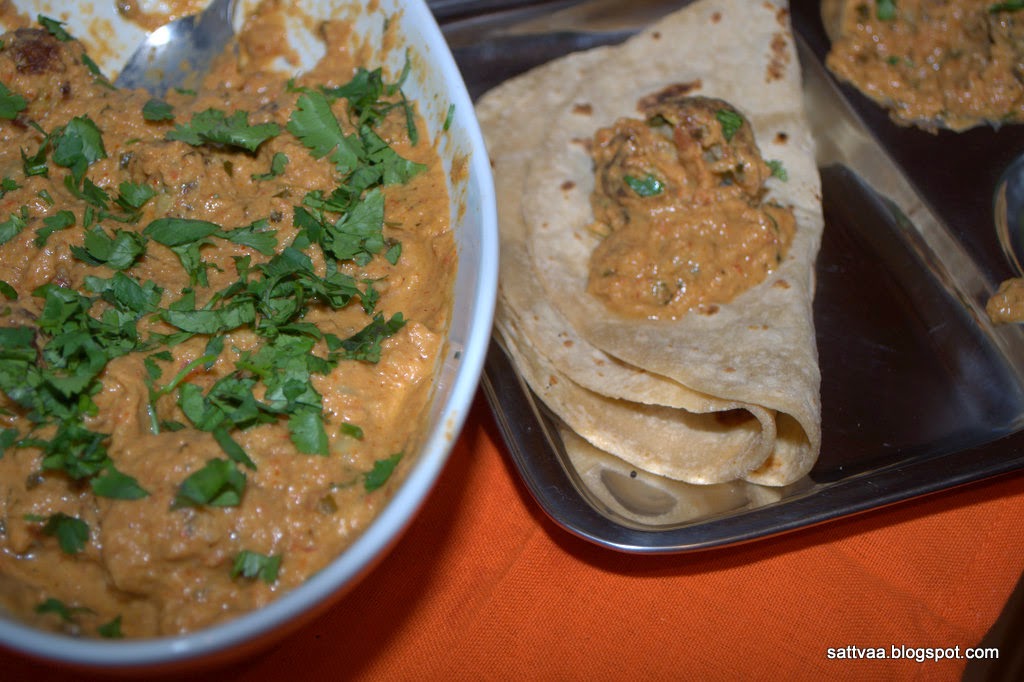
So here is something you will not typically find in a restaurant but can make at home and eat it from your own reusable silverware :-). I don't normally deep fry my koftas in kofta curries since I discovered the multi faceted uses of my aebleskiever pan, also I almost never use cream in my kofta curries but instead add a thick paste of some healthy nuts and give a shot of either yogurt or milk. I would suggest planning on making extra koftas as these are delicious by themselves and I tend to eat them as they come off cooked like pakoras. Try this creamy, delicious kofta curry made from bottle gourd a.k.a lauki with rice or roti.
What do you need to make Lauki kofta curry? 
Kofta ingredients
Makes 20 golf ball sized koftas
3 cups grated lauki/bottlegourd
1 Tblsp crushed peanuts - optional, highly recommended
1 Tblsp finely chopped onions
1 Tblsp chopped cilantro
2 green chilies minced
2 Tblsp besan
1/2 Tsp Red chili powder (adjust to taste)
1/2 Tsp garam masala
1/2 Tsp Amchoor powder (optional)
3/4 Tsp salt (adjust to taste)
2 Tsp oil to cook the koftas
Gravy ingredients
2 medium onions minced (3/4 cup)
3 ripe tomatoes pureed (~ 3 cups)
8-10 almonds soaked in warm water for 30 minutes
1 inch piece of ginger
2 cloves garlic
1/2 Tsp cumin seeds
1 big or 2 small bay leaves
1 Tsp Garam masala
1 Tsp Red chili powder (adjust to taste)
1/2 Tsp Amchoor
1 Tblsp chopped cilantro
1 cup yogurt/cream/milk
1/8 Tsp turmeric powder
3/4 Tsp kasoori methi
1 Tblsp oil

How do you make Lauki kofta curry? 
Kofta making
  • Wash and peel the bottle gourd. Cut into quarters to expose seeds. 
  • If the seeds are hard, cut them out and discard. 
  • Grate the bottle gourd pieces, add salt to grated lauki, keep aside for 15 minutes.
  • Squeeze the soaked lauki, remove all excess water and take the gratings into a bowl. Reserve the water for use in the gravy. 
  • Add all the remaining ingredients under Kofta except for besan and mix it in. 
  • Add besan slowly to bind the ingredients and form them into golf ball size koftas. 
  • You can deep fry these balls until golden brown in oil or bake them by spreading them in a single layer on a baking sheet (350F for 40-50 minutes and then broil for 2-3 minutes to get a crisper crust) or fry them in aebleskiever pan or paddu pans. 
  • 2 Tsp of oil listed is enough to bake or pan fry the koftas but you will need more oil if you plan to deep fry them.
  • I usually use my paddu pans, place the balls in the grooves, drizzle oil on top, cover and cook on medium heat for 4-5 minutes or until the bottom turns golden brown, turn them over gently and cook the other side. You may need to turn the koftas a couple of times to ensure it gets a nice golden crust all over. 
  • Keep the cooked koftas in a plate lined with a paper towel until ready to use. 
Gravy making
  • Wash, peel and crush ginger into a paste. 
  • Make a paste of garlic.
  • Chop onion very fine or mince them in a food processor. 
  • Puree tomatoes and keep it ready. 
  • Soak almonds for 30-45 minutes in warm water (or couple of hours in cool water), peel the skin off and grind it into a very smooth paste. 
  • Heat oil in a pan, add cumin and bay leaves. Let cumin sizzle.
  • Add minced onion and let cook for 5-7 mins with frequent stirring until the raw smell is gone.
  • Add crushed ginger and garlic and fry for a minute. 
  • Add tomato puree and cook until the raw smell is gone, color of the sauce darken and the sauce becomes thicker. 
  • Add the almond paste, continue to cook for another 3-4 minutes on low heat.
  • Add the dry spice powders, salt and turmeric, mix it in. 
  • Add the yogurt/milk/cream and reserved water from the lauki. Bring it to a boil.
  • Let the gravy turn thicker and creamier. 
  • Crush kasoori methi in your fingers, sprinkle on the gravy and switch off the stove. 
  • You can add koftas to the gravy once gravy is switched off. Let them stand soaking for a few minutes before serving. 
  • You can arrange koftas in a bowl and pour hot gravy on top, let them stand for a few minutes before serving. 
  • Garnish with chopped cilantro and serve warm.
Notes:
  • Amount of besan you use in the koftas depends on how watery your bottle gourd is, the koftas do not need to become dry but jsut have to hold their shape. Use as little besan as possible. 
  • Mincing onions and pureeing tomatoes helps make the texture of the gravy smooth and silky. 
  • Creamy texture of kofta curries are achieved by using cashew nuts which are richers and higher calories than almonds. You can substitute almonds with cashew nuts but I find grinding almonds to a very smooth paste brings the texture very close to the cashew nut based gravy. My motto is eat tasty and healthy. 
  • If you are using the paddu pan for making the koftas, keep the heat on medium as all the ingredients are raw and need to be cooked well. 
  • Deep frying the koftas is the traditional way but either of the other two methods give you good competition for the deep frying method. Choose whichever suits your preference. 
  • Blanching tomatoes in hot water helps cook the curry faster, also cover and cook when you add the puree until the water reduces to avoid splattering.
  • I usually pick up and remove the bay leaves from the gravy before adding yogurt/cream step. This is enough time for the gravy to absorb the bay leaves flavor without turning bitter. 
  • To reheat, be gentle with the koftas. Microwave heating is best since you don't have to worry about it getting burnt. If doing stove top, use the mixing spoon gently so not to break the koftas.


Friday, July 6, 2012

Bottle gourd pachadi - continuing the pachadi series

I know I talked about the pachadis we make regularly at home and kind of went silent after a couple. The reason is that I have just not found the time to take pictures every time we make the pachadis (almost every day now) and hence have been stalling on the blog posts. But here I am with an extremely delicious chutney.

When we went to India last February to attend a cousin's wedding, we also took one day whirlwind tour to visit family in one of the cities. We reached Hyderabad early morning and starting at 7am made 6 stops, the last one being at 11.30 pm on our way to the airport. It was tiring but very well worth the effort as we got to see lot of the relatives after a gap of almost 6 years.

One of our cousins is a home maker turned entrepreneur, I am so impressed with her idea, actual execution of the idea and the way she conducts her business. She runs a fresh fruits and juice business in one of the schools and employs mainly young girls. They go to the school around the lunch time, cut fresh fruits and serve different combinations of seasonal fruits in cups. She has expanded it to fruit juices now which is made right there on order. I saw a lot of kids and parents who came to take the younger ones home stand there and enjoy the fresh fruits and juice. With the weather being what it is in Hyderabad, this is a very welcome thing for the parents as they are happy to see kids eating fruits instead of junk food. Syamala, our cousin has her own 2 kids going to the same school, so she gets to see them during the day which is an added bonus not available to many working mothers.

In addition to running this business, Syamala is a very good cook and just like her mother in law who is our defacto pachadi queen in the family, she makes delicious pachadis and other traditional Andhra dishes. She made this bottle gourd pachadi when we had lunch at her place that day and I fell for it totally. I asked her for the recipe and since we were rushing through, I just remembered the ingredients and the taste. Since coming back I have tried it many times and last time I made it, I thought I nailed the recipe and hence wanted to share it with all of you. This is also one of the stone grinder recipes adapted for the mixer/blender and usually mixed with rice and eaten as a side with rice and other dishes. It is generally strong with spices.

I have been referring to this as bottle gourd pachadi, amma makes a different version with only the peels of the gourd and that has coriander seeds and tastes very different from this one. I will post that another time.
What do you need to make bottle gourd pachadi?
1 small bottle gourd
1 flat Tblsp mustard seeds
1 flat Tsp fenugreek seeds
1 Tsp urad dal/uddina bele/uddi pappu
5-6 dry red chilies (adjust the amount to your spice tolerance)
1 or 2 green chilies broken in half
1 inch piece of tamarind or 3/4 Tsp tamarind concentrate
1/4 tsp asafoetida powder
1/4 Tsp turmeric powder
1 Tsp salt (adjust to taste)
4-5 twigs of fresh cilantro
2 Tblsp cooking oil
How do you make bottle gourd pachadi? 
  • Wash, trim the ends and peel the bottle gourd, save the peels and chop them into small pieces.
  • Chop the bottle gourd into small pieces, use the core if the seeds are tender (see picture to get an idea), discard if the seeds are hard. 
  • Heat 1 Tblsp oil in a pan, add urad dal and fry for 30 seconds. Add mustard, fenugreek, chilies and asafoetida and fry it until your kitchen is filled with a nice roasted aroma. Watch for mustard to crackle and urad dal to turn golden brown.
  • Take all the roasted ingredients and keep aside. 
  • Heat the remaining oil, add the chopped peels, bottle gourd pieces, salt and turmeric powder and mix well.
  • Cover and fry this on medium heat, stirring it occasionally for 10-12 minutes or until the bottle gourd pieces cook well and become soft to touch. 
  • Once all the ingredients are completely cool, take it to your blender/mixer along with tamarind and cilantro and make it into a paste. Start with pulse mode to break the ingredients first and then grind it. Avoid using water in this recipe for best taste. The oil used for frying is sufficient to blend the mixture. 
  • Enjoy the delicious pachadi made flavorful with fenugreek and mustard with hot rice and some ghee. 
Thanks Syamala for sharing a family recipe
Notes: 
  • Choose bottle gourd that is tender and has light green skin. When you pick up the bottle gourd, it should feel heavy and not hollow.
  • It is important to fry the mustard, urad and fenugreek on medium heat and until well roasted. Urad dal gives a raw taste and changes the consistency if not fried completely.
  • Mixture of dry red and green chilies gives a nice taste to this pachadi, adjust the amount based on your spice tolerance.

Sunday, July 1, 2012

Handvo - Love affair continues with Gujarati snacks

I have already professed my love for Gujarati snacks with recipes blogged here and here. I am more partial to their snacks than anything else. Handvo (or Handwa) is a Gujarati snack made with soaked rice and mixed lentils. There are as many variations of the dal mixture as there are dals :-). Having said that, typical Handvo consists of toor dal, chana dal and urad dal with an addition of moong or masoor dal. Can you already see that this is not protein deficient dish by any means? The traditional version is cooked with a lot of oil but baking this dish with oil used only for seasoning keeps it healthy. Baked handvo is cut into wedges(or any other shape you prefer) and served with a coriander/mint sweet-spicy chutney as a snack.

When I cook dishes that are not native to me (those that I didn't grow up eating), I always start with an analysis of similarities and differences between the new dish and something I am familiar with. If you think about it, Handvo has some resemblance to the South Indian Dosa/Dose or adai. After all, ingredients are similar (proportions though vastly different) and traditionally it is pan fried with an oil base which is the same concept of uttappa(m)s, right? I am glad someone in a Gujarati house hold figured out how to make a Handvo with rice and lentils while some one down South made a Dose because both are equally welcome in my kitchen :-). I will not go any farther on this though because if DD had her say, she would definitely do a 'Mom, stop comparing things weirdly', because according to her, I killed the fun of Harry Potter series by constantly quoting story lines from Indian epics such as Mahabharata and Bhagavata :-). For the record, I love the Harry Potter books. It is a different story that she is still hooked to HP and keeps reading the books over & over again. 

But I guess the point I was trying to make above is that cooking is more an art than measurements, there are techniques you need to be aware of but once you know the basic process, every cook can weave their individual magic wands and make the dish unique. BTW, that is the excuse I use every time one of my preparations falls short against nammamma's :-)

If you are entertaining friends or family, think about Handvo as one of the starters since the batter can be prepped ahead of time. All you need to do before the party starts is to pour the batter into the pans and bake it. I have seen the Handvo flour in Indian grocery stores here but have never tried it myself. I prefer my old fashioned way of grinding the batter at home.
What do you need to make Handvo? 
Makes 2 - 8 inch pans
1 cup rice - any long grained rice will work, I typically use Sona masoori variety.
1/4 cup toor/tuvar dal or togari bele
1/4 cup chana dal or kadle bele
1/4 cup masoor dal or moong dal - I used masoor dal this time
2 Tblsp urad dal or black gram
3 cups tightly packed grated bottle gourd
5 green chilies - adjust to taste
1/4 cup sour yogurt - a day old works best
1 inch long piece ginger root
1 Tblsp grated coconut - fresh or frozen - optional
1 Tsp sugar
1 Tsp salt
For seasoning:
1 Tblsp oil
1 Tsp mustard
1/4 Tsp asafoetida
4-5 finely chopped curry leaves
1 Tsp red chili powder - optional
For garnish:
1 Tsp white sesame seeds

Optional - chopped cabbage, chopped cilantro, grated carrot - I haven't used any of these this time though I usually load up my Handvo with finely chopped cabbage or grated carrots.

How do you make Handvo?
  • Wash and soak rice and the dals together in water for about 6 hours. 
  • Rinse, drain the rice and dals and grind it with green chilies and ginger to a coarse paste with as little as 2 Tblsp of water. 
  • Wash, peel and grate bottle gourd (thick grates is preferred here) - see notes for additional vegetables
  • Add the bottle gourd grating along with yogurt, salt and sugar into the ground mixture, set it for fermenting over night or atleast 6-8 hours. - see notes for fermentation tips
  • The batter would have thinned down a little with the yogurt and bottle gourd juice and will look fluffy and porous with fermentation, mix grated coconut into the batter. It is important to use as little water as needed while grinding.
  • Heat the oil, add mustard, chopped curry leaves and asafoetida. Let mustard sizzle & pop, switch off the stove, add the red chili powder, mix it well into the oil. Pour everything into the batter and mix well. 
  • At this time, taste the batter to check and adjust sugar, salt, red chili powder per taste. you can add more green chili-ginger paste at this time if you like. 
  • Spray 2 - 8 inch pans with cooking spray, pour the batter to 1/2-3/4 inch thickness and sprinkle sesame seeds all over. 
  • Pre heat the oven to 350F, bake the Handvo for 30 minutes. a toothpick or knife pushed in the center of the pan should come out clean. 
  • A more traditional way of making this is to pour the batter into a thick cast iron pan (about 1inch thickness), drizzle oil around the sides, cover and cook on low heat until the bottom side gets the crispiness of your liking, gently turn it over and continue cooking on  the other side without covering the pan until both surfaces are roasted well and a toothpick comes out clean when pushed through the center.
  • the stove top method needs a little bit more attention than baking and results in a deep roasted texture if you prefer. i love to use my cast iron pan for this.
  • Switch the oven to broil (high) and broil for 3 minutes to get a nice brown coating on top. Keep an eye on the Handvo during broil as oven settings differ and it can burn the dish in a matter of minutes.
  • Let the Handvo stand for a couple of minutes, cut wedges and serve it with coriander or mint chutney or ketchup as a tea time snack. 
Notes: 
  • If you are adding additional vegetables, make sure all of them together make 3 packed cups. Keep bottle gourd to atleast 2 cups so you get the right consistency of batter. You can squashes or cucumbers for a different flavor. 
  • The Handvo batter needs to be fermented well, if you are in a hurry and do not have overnight waiting time, go ahead and add 1/2 Tsp of cooking soda into the batter and leave it for about 30 minutes before baking. 
  • Addition of coconut makes the Handvo lighter, but this is a personal preference. skip it if you don't want to use it. 
  • Broiling the Handvo at the end is important to get the crispy layer on top, but keep a close watch during the broil cycle. 
  • The batter should not be ground very smooth, the texture should be a little grainy. 
  • Do not pour the batter thinner than 1/2 inch as it changes the texture of the finished product and makes it chewy. 
  • Reheat Handvo pieces in the conventional or toaster oven to get it to taste as good as new.

Friday, February 10, 2012

Methi Muthia - snack from Gujarat

I love Gujarati food, the first time I ever tasted a Gujarati meal was at this restaurant near Edison in NJ called Jhupdi which my brother & SIL took me to. It has been years and I still remember how I fell in love with their Undhiyu, I can feel the taste of it on my tongue even now :-), well you know what I mean.. There is a small family run eatery in Fremont, CA called Krishna and they serve you a Gujarati Thali just like one you might get if you visited someone's home. The phulkas are soft, fresh and directly from the tawa. I relish everything in a Gujarati thali except for the rasam which is too sweet for my taste.

A few years back, one of my colleagues S got married, he is from Ahmadabad and his wife was a sweet, young girl who was just out of college. When we had a pot luck at work, she had made sheera (sweet sooji pudding) and doodhi/bottlegourd muthias and sent it with S. They were both gone in such a hurry that people really wanted to meet the cook behind the delicious dishes. The moment I see/taste a new dish, I go after the recipe and asked S to get the recipe and to my surprise next day when I went to work, he handed me this very meticulously typed instructions from dear E to make the yummy muthias. I still have that print out in my collection of recipes but don't need to refer to it anymore as I have made it so many times and know it by heart. Thanks E for the delicious muthias and generous sharing of a family recipe.

I have made changes to E's original recipe to suit the way we like it and I experiment with the vegetables since I am confident now of the basic recipe. I know this is a traditional recipe and here is my way of making the delicious Methi muthias as I love methi to bits :-).
What do you need to make Methi muthias?
1 cup wheat flour
1 cup basan/chick pea flour/gram flour/kadle hittu
1/2 cup fine sooji/chiroti rava
1 cup chopped fresh methi leaves/fenugreek leaves
11/2 cups grated bottle gourd
2 Tblsp fresh ginger+green chilies paste (I used about 5 green chilies and an inch of ginger root and pounded them together in mortar-pestle)
1 Tblsp salt
2 Tblsp cooking oil
1 Tsp baking soda
1 Tsp sugar

For Tadka/vaggarane:
1 Tblsp cooking oil
1 Tsp mustard seeds
1 Tsp white sesame seeds
3-4 curry leaves

How do you make Methi Muthias?
  • Mix the grated bottle gourd, methi and salt in a wide bowl and set aside for 10 minutes.
  • Squeeze out the vegetables and keep the water aside, this is very nutritious and you can use it in any of your soups, gravies etc.
  • Mix ginger-green chilies paste, sugar, baking soda and oil with the vegetables.
  • Add the wheat flour, basan and chiroti rava into the bowl and mix it to get a soft mass. 
  • Your exact amount of dry flours depend on the water content from the bottle gourd, so adjust them - I keep the wheat flour and basan equal and sooji at half the other two as we like the taste better with this proportion. 
  • Squeeze out big tennis ball size of the mixed dough and roll them into thick logs. 
  • Arrange them in your pressure cooker vessel and steam (no weight) for 30 minutes on medium heat. 
  • Let the cooked logs cool down before cutting them into 1/2 inch thick discs.
  • Heat oil in a wide pan and add mustard, sesame seeds and curry leaves into it. 
  • Once the mustard and sesame seeds splutter, add the cut muthia discs into it. 
  • Keep the heat on medium and stirring occasionally roast the muthias until they turn light brown. 
  • Serve it with your choice of chutney/dip. 

Variations: 
  • Add palak/spinach instead of or in addition to methi leaves. 
  • Change the proportion of the flours - wheat flour makes muthias dense, rava turns them crisper and basan is for the taste, adjust to suit your taste.
  • You can use grated carrots, finely chopped onion in muthias. 
Tips: 
  • Squeeze the water content as much as you can out of the bottle gourd and keep it aside, I prefer to add the water later if needed than having to end up with an liquidy paste that will consume lot of dry flours and leave you with large portions of bland muthias :-)