Showing posts with label Pindi Vantalu. Show all posts

Tuesday, October 2, 2012

Lemon Rice - very basic, very delicious

Lemon rice has been one of my favorite lunch box recipes for ages. There is something about recipes that makes them click as lunch box recipes and I know what I am talking about since I have been carrying lunch box from my high school days. I love single pot rice items including the humble, every day staple like yogurt rice, I take variations with poha, quinoa. BH is on to salads or oats with vegetables and chickpeas. Our lunch boxes get dressed up with ildis or chapathis/paranthas but never with Dosa :-).

When I got married, amma not only cooked for all of us office goers at home but since she heard that I was used to lunch boxes from nammamma, she started making lunch for me specially. The son never was in the habit of carrying lunch from home so it was a new experience for her making lunch. She went out and bought a 3 tier lunch box (the steel tiffin carriers you see in India) which I never had before and started packing me lunch. I was, to say the least very uncomfortable with this arrangement for one I could never finish all that was stuffed into those boxes and secondly I felt extremely guilty for not only leaving home without any daughter-in-law chores done but also making my MIL prepare lunch for me.

Being the new DIL, I didn't have the heart or guts to tell her not to take the trouble of getting my lunch ready. However I told her that I would carry the breakfast for lunch too with some mosaranna (yogurt rice) to fill that 3rd box. She had made Dosa one morning and packed dosa and chutney with the usual mosaranna. BH & I, while on our way to work, decided on a whim to take a day off and go on a picnic. We packed some naan and curry from a dhabha, called home to let them know and went away. At lunch time, I opened my lunch box also and the dosa had become a cardboard and was in stark contrast to the buttery curry and melt in the mouth hot naans. I always said no to lunch boxes on the days we had dosa breakfast from then on :-).

Back to the lemon rice, this is a very humble (see the ingredients list and you will know what I am talking about) and standard item in most South Indian homes with regional variations. This is called 'Chitranna' in Kannada. Once you have the basic recipe, you can play around with this lemon rice to either dress it up or down depending on your preference and the occasion. Look for some ideas at the end of this post. I made this lemon rice for the Ganesha habba recently and the post has been in my draft ever since.
What do you need to make Lemon rice? 
1 cup rice (preferably Sona masoori variety)
1/4 cup fresh squeezed lemon juice (more or less based on tartness you prefer)
1 Tblsp grated coconut (fresh or frozen)
1/4 Tsp turmeric powder
1 Tsp salt (adjust to taste)
For seasoning:
2 Tblsp oil
1 Tsp mustard
1 Tsp Urad dal
1 Tsp chana dal
1 Tblsp peanuts
1 Tblsp cashew nuts (optional)
6-8 curry leaves
3-4 green chilies - chopped into small pieces
1/2 Tsp asafoetida

How do you make Lemon rice? 
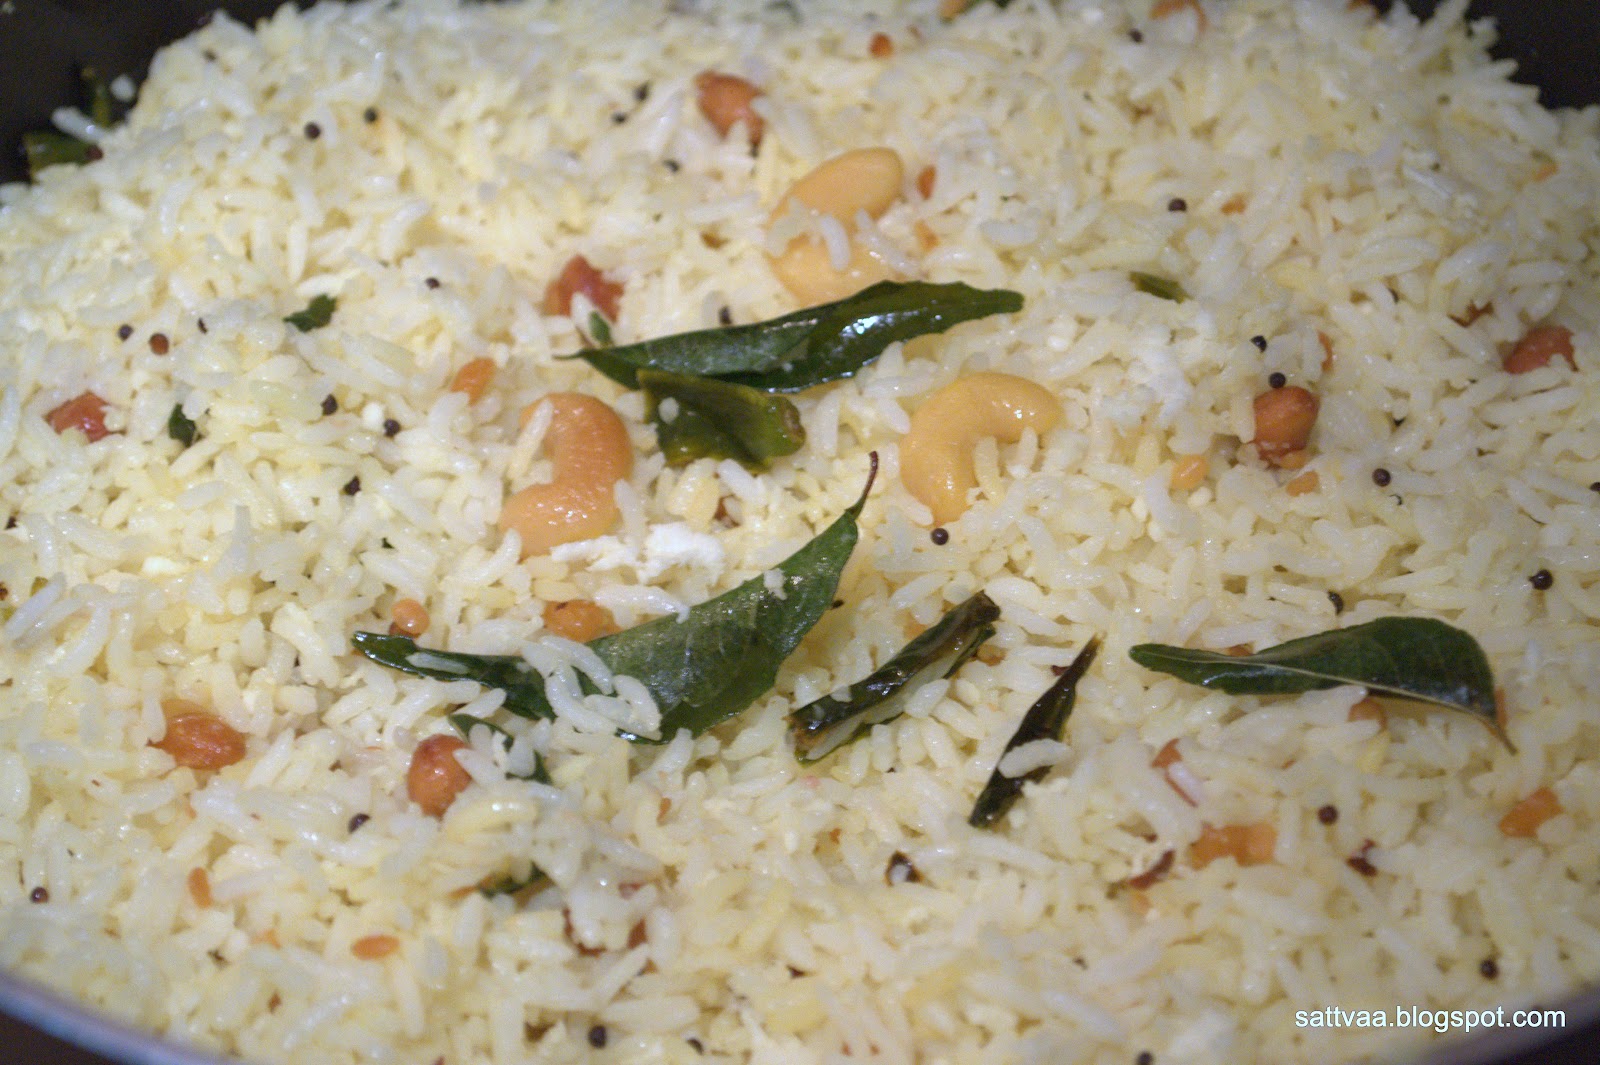
  • Cook rice (rice cooker, open vessel or pressure cooker) so the grains are completely cooked but separate. 
  • Spread the rice in a wide plate, add salt and let it cool.
  • Heat the oil in a pan, add the mustard, dals, peanuts and cashew nuts (if using) and fry until mustard starts to sizzle. 
  • Add the chopped green chilies, asafoetida, turmeric and curry leaves and continue to fry until green chilies form small blisters, switch off and pour it over the rice. 
  • Add the grated coconut, lemon juice and mix everything together gently so the rice doesn't get mushy. 
Notes: 
  • Use fresh lemons for the lemon juice if you can, the taste is different when you use bottled or preserved lemon juice. 
  • Make fresh rice for this simple recipe to taste truly delicious. 
  • You can skip coconut but I would strongly recommend using it.
  • When you cook rice, add a few drops of oil to get a fluffy texture. The rice should be cooked well, else the lemon rice turns dry.
  • Add turmeric towards the end to the seasoning to avoid burning. 
  • Add the lemon juice to the mixture only when the rice has cooled down.
  • If you are using frozen coconut, thaw it and bring it to room temperature before using.
  • Use longer pieces of green chili to make it easier for little hands to pick them out. I slit them vertically before cutting them into pieces to increase the chili heat.
  • Increase the amount of turmeric powder upto a 1/2 Tsp for a brighter yellow color, I like it mildly off white. Too much of turmeric brings a faint bitter taste.
Variations: 
  • Add cubed, par boiled and shallow fried potatoes for a carb rich lemon rice. 
  • I add cooked green peas to the rice for some proteins. You can use frozen peas, just thaw them to room temperature and add them in the seasoning with the green chilies.
  • Garnish with finely chopped cilantro or coriander leaves for added flavor.

Thursday, September 20, 2012

Gowri Ganesh Festival series 3 - Undrallu

Here I am with my concluding part of the Gowri-Ganesha festival series. I will post my other naivedya dishes over time as I want to take a break from the heavy festival food and go back to regular food for a while :-).

Continuing from where we left off in the last post, after the afternoon visits to see Ganesha idols, evenings used to be reserved for going with Amma to those homes that had actually invited us. The attraction and the difference with this one was guaranteed goodies at the end of the visit J, this was the time amma also completed any remaining ‘baagina’ work with her friends. Coming back home had us do another round of pooje, prepare Ganesha for the immersion (the same night or later) and eat dinner(if one could really force anything at all after all the constant eating throughout the day) and go to bed. 

The celebrations come to an end with the traditional immersion which is a big part of the Ganesha send off. Since we had the silver Ganesha, we never did the immersion which was cause enough to feel left out in the friend's group :-). Amma's small turmeric paste Ganesha would be dunked in a vessel of clean water and once it dissolved in water, the water went to her Tulsi(holy basil) plant. I think it was one of the most environmentally friendly ways looking at all the painted and non clay Ganesha idols that pollute our waters now. But as kids we felt like we missed out a lot of the festival by not going to the water with our Ganesha idol and so would be very thrilled to jump out at the first opportunity to tag along with a friend and family.

The Ganesha idols will be carried in procession, bigger the idol, larger the procession and louder the noise and immersed in designated ponds or lakes around Mysore. There used to be a lot of singing and dancing marking an end to the festivities (until Mysore woke up brightly to the Dasara celebrations in a month or so)

If only I could have held those years in my fist..It felt good to relive those memories on paper (Err.. on blog) and feel it in the present. I do a very abbreviated Gowri-Ganesha habba now and remember the old times fondly every year. Like any other Indian festival, these were made colorful with new clothes, good food, lot of visiting and sharing goodies. Last year, this was the first festival we celebrated in our new home. 

I have really enjoyed writing about my Gowri-Ganesh habba series. I am aware that this is by no means any new information to many of you as far as the festivals are concerned but it felt good to just reminisce about those childhood days. Thank you all for your comments and support. 

Here is a delicious, easy to make Ganesha favorite as we conclude this year's celebrations. This is a healthy, no oil savory recipe which I make quite often at home for breakfast. After two Kannadiga recipes, here is a typical Telugu dish made for the Ganesha festival. You can use regular store bought idli rava in this recipe but I recommend making it at home for better taste.
What do you need to make Undrallu?
Makes about 35 golf ball sized Undrallu 
2.5 cups rice rava(I use regular sona masoori)
5 cups water
1/2 cup chanadal
1 Tsp mustard
1/2 Tsp cumin
1-2 dry red chilies - broken into small pieces
2 Tblsp grated coconut (fresh or frozen)
3-4 curry leaves - chopped small
1 Tsp salt (adjust to taste)
1 Tsp ghee/clarified butter

Preparing Rice Rava at home: 
  • Wash and soak rice in water for 20-30 minutes.
  • Spread it on paper napkins or thin towels and let it dry inside the room until the moisture is gone (about 2 hours)
  • Pulse it in the mixer to get a coarse rava (Upma rava consistency).
  • Store in airtight containers for later use.
  • 2 cups of rice yields 2.5 cups of rice rava.
How do you make Undrallu? 
  • Roast the rice rava on medium heat for 3-4 minutes, stirring frequently. 
  • Soak chana dal in water for an hour or until the dal plumps up. 
  • Heat ghee in a pan, add mustard, cumin and let it sizzle. 
  • Add red chilies, curry leaves, grated coconut and chana dal and fry for a minute. 
  • Add the 5 cups of water, salt and let the water come to a gentle boil. 
  • Pour the rice rava in to the boiling water while constantly stirring the mixture to avoid lump formation.
  • Let it cook on low heat for 2-3 minutes. Switch off. 
  • As soon as the mixture is cool enough to handle, dip you hands in a bowl of cold water and make golf ball sized balls from it. 
  • Arrange in a steamer or a cooker pan, steam it for 10 minutes. 
  • Enjoy hot Undrallu with any spicy chutney or pickle of your choice. 
Notes: 
  • The mixture should not be left to become cold before the steaming, this makes the Undrallu chewy to bite. 
  • Adding coconut makes them tastier and lighter. 
  • You can use regular cooking oil instead of the ghee for a lower calorie recipe. 
  • I usually add Byadagi chili pieces so they are not very spicy. 
  • Rice rava to water ratio is 1:2 but feel free to use a little less or more based on the quality of the rava. The cooked mixture should be like a soft Upma, neither dry nor watery.

Wednesday, September 19, 2012

Gowri-Ganesha festival series 2 - Karigadubu

Hope you all had a good Ganesha habba celebration earlier today or yesterday depending on where you live. We did our pooja in the morning before starting work.

So continuing from last post on Gowri-Ganesha festivals, as kids we liked it when Gowri-Ganesha habba were on 2 different days. If they coincided, for one, you had to get up earlier so the Gowri pooje could finish earlier and the ladies could go home to do their Ganesha pooje. Secondly, all festival eating was crammed into that single day which meant we didn't have the extended second day habbada oota(festival food). Lastly but most importantly, it would mean one day off from school when the festivals merged which was a big bummer :-), this became a non issue when I went off to a convent school later.

Families that brought the clay Ganesha for the worship used to start their market visits a couple of days before. I just can't forget those crowded streets and the festival smell in the air. I get the same feeling shopping around Christmas time here :-). Our family didn't bring a clay Ganesha as our silver idols were kept for the pooja. This had a down side as it meant there was no immersion at the end of the festival for us :-(. Nammamma made a small Ganesha with turmeric paste to keep next to the silver idols.

The locality where we lived in Mysore during my school days, had a big community Ganesha right next to our house. There was a bunch of college students that would assemble together months before and start asking for donations. The organization grew in size and pomp every year and they kept extending the number of days of festivities. A day before the festival, they would stand up a temporary structure complete with a stage and an altar for the idols right in the middle of road, called 'Pandals' in colloquial languages. All traffic would be redirected. Blaring loud speakers touted the presence of a Ganesha Pandal at every road corner and go on 24 hours a day until the festivities came to an end 3/5/7 days later depending on the funds collected. On the day of the festival, the loud speakers would start with a devotional song on Ganesha and play some more for the first hour or so. Then for the rest of the day, we were entertained non stop with popular numbers from movies :-)  much to the dismay of elders. I still remember many of those songs in bits and pieces though I have absolutely no idea which movie it belonged to.  I still haven't figured out the relation between Ganesha habba and the movie songs.

For us kids, the best part of the festival was (apart from the food ofcourse) the Ganesha visit around the neighborhood. After the pooje and lunch at home, we used to set out in the hot afternoon with a group of like minded kids to visit as many Ganesha altars as we could with 101 being the magic number. You could find groups of kids on such mission all over the neighborhood. It used to be so much fun and exercise walking in the afternoons with friends trying to get people to open their doors for us. Most houses left the door open for the kids while some grouchy(I now feel it was genuinely a nuisance for older people trying to catch a wink of their afternoon siesta) old people would shout out from inside that we were not welcome. Nothing daunted us kids from our target of visiting 101 Ganesha altars :-), Oh the simple pleasures of childhood.

Once invited, we would go in, put some of the akshate(rice mixed with turmeric or kumkuma - used in Pooja) on top of the altar and do our prostration. Our quest for 101 Ganesha usually took us out of the familiar, immediate neighborhood into people's homes we didn't even know but there is strength in numbers and so noone was unduly scared. I don't think I can send my daughter off on such an expedition now :-(. I have been to houses that strictly forbade us from putting any akshate as it would spill all over the room, house owners that told us to be totally noiseless if there is such a thing involved when there are a bunch of giggling kids, houses that refused entry to us saying they didn't have a separate altar and houses that were actually nice and welcoming and saw us off with a piece of sweet or fruit.

And for people that wanted to see 101 Ganesha idols but didn't want to go from house to house in the hot Sun, Mysore had a short cut. There was a huge circle in the heart of the city which had 101 Ganesha idols during the festival. All you had to do was go there and do your prostrations.

Here is a funny anecdote from one of my Ganesha visits, my family has heard me narrate this incident many times as I repeat it every Ganesha habba. But I have promised them that I won't repeat from now on and if they ever miss my telling the story (I strongly doubt that), they can always open up the blog and read it. I had an elementary school classmate who was terrified of dogs and typically we would knock on the outside gate and ask "Nimma maneli Ganesha koorsiddeera?"(Do you have Ganesha altar set up in your house?) as a way of asking permission to come in and visit. This girl in her mortal fear of dogs and an honest slip of the tongue once asked "Nimma maneli naayi koorsiddeera?" (Do you have dog on your altar) and had the offended house owner chase us down the street :-). I have lost touch with her and always think if she still has that dog fear.

I made the traditional Karigadubu (The word comes from karida or deep fried kadubu) which is believed to be the Lord's favorite. Nammamma and the other ladies in my family always made this with a filling of dry coconut and sugar called 'Kobbari-sakkare'. There are many other variations of this dish where the filling could be made with some dal & jaggery combination. I love the kobbari-sakkare filling as it keeps the kadubu crisp and crunchy. DD took one bite of it today and declared 'No wonder Ganesha has such a big stomach, he can't stop eating this' :-)

I have made 2 different shapes here, one is the traditional kadubu and the other is called 'Lakkote holige' because of its shape resembling an envelope. The ingredients are exactly same, just a different shape. I have some step by step pictures for both shapes. If you make the lakkote holige, you will additionally use a clove to hold the shape together.
Our Ganesha Naivedya - kadle kalu usali, undrallu, pulihora and Karigadubu
What do you need to make Karigadubu?
Makes about 12 karigadubu
For filling: 
1 cup grated kobbari (this is the naturally dried coconut available in Indian stores)
1 cup sugar
1 Tsp poppy seeds (optional)
4-5 cardamom pods
For the outer covering: 
1 cup maida/all purpose flour
1/2 cup chiroti rava (super fine rava)
pinch of salt
1 Tsp ghee/clarified butter
1/4 cup water
Others: 
Oil to deep fry
1 Tsp maida/all purpose flour for dusting

How do you make Karigadubu?
Making the filling(Hoorana):
  • Dry roast the grated kobbari for a couple of minutes until it starts to give out a nice aroma, keep aside. 
  • Roast the poppy seeds for 2 minutes until it starts to pop, keep aside. 
  • Pulse sugar in your mixer till it is powdery. Add the roasted kobbari & poppy seeds and run the blender once to mix them in. 
  • Peel and pound the cardamom seeds into a fine powder and add it in. 
Outer covering(Kanaka): 
  • Mix all the ingredients listed under 'outer covering' into a slightly stiff dough. 
  • Knead for a good 5 minutes, wrap it in a wet cloth/paper napkin and set aside for atleast 30 minutes. 
  • Knead the dough for another 5 minutes, take out small lime sized portions of the dough and shape them into smooth balls. 
  • Keep them covered until you are ready to use. 
Making the Karigadubu: 
  • Heat the oil in a wide pan. 
  • Take a ball of the kanaka, dip lightly in the all purpose flour and roll into an oval shape roti with the lengthy side being about 4 inches.
  • Dip your fingers in water and coat the edge of the roti with it.
  • Take a spoon of the filling and put it in the center of the oval shape, pull one side over the other and press the edges together with fingers to seal them. 
  • Repeat for the remaining dough. 
  • When the oil is ready, drop the filled kadubu gently into the oil and let it cook until it puffs up and the outer cover looks light golden brown, 
  • Take them onto a paper lined plate. 
Karigadubu making sequence: 
Lakkote holige making sequence:
Notes: 
  • The thinner you roll the outer cover, the crisper your karigadubu will be. You need to strike a balance between having a thin cover Vs tearing it apart. 
  • Do not overfill the kadubu and ensure the edges are sealed to prevent it from opening up in the oil. 
  • Adding ghee to the cover makes the kadubu light and crispy. 
  • Kneading the dough twice is very essential to get a light, crispy kadubu as this process makes the dough soft.
  • If you plan on keeping the karigadubu for longer, I suggest double frying. After you remove the kadubus from the oil, let it sit for 5 minutes, dunk them in the hot oil once again and fry just for a minute or so. 

Tuesday, September 18, 2012

Gowri Ganesha Festival series 1 - Home made urad dal Chakli

As I said, I am here with a short series on Gowri-Ganesha festivals. I am sure a lot of you have similar experiences to share, I would love to hear about them. Do drop in a line when you visit.

Gowri-Ganesha habba(festival) was a big deal growing up for many reasons. Unlike many other festivals we celebrate, this one had the definite aura of being a community celebration. Ganesha habba is celebrated outside the confines of home in most states in India. This set of festivals (sometimes on the same day and sometimes on consecutive days based on the Hindu calendar) would be kicked off days before with the preparations.

At nammamma's, we do the Swarna Gowri Vrata which is an extended version of the festival. Not all families do the vrata and so lot of amma's lady friends would come to our house for that part of the festival. My father was the unofficial purohit/priest who led all the ladies through the elaborate pooja. During these days, the professional priests are extremely busy, if you had a priest come in to do the pooja, it meant you had to adjust your schedule according to the time they gave you, your cooking should be done by a specific time, all of you had to be ready before the priest showed up etc which was a hassle. My father made one swell of a purohit and everyone was happy with the arrangement.

The preparations for the festival used to start atleast a month or so before. For me the essence of Gowri habba is in the special 'Morada baagina'. Gowri vrata is performed by ladies/girls praying to the Goddess of Shakthi for her blessings. On this day, it is customary to prepare 'baagina' which is comparable at some level to a gift hamper with a bunch of things put in and is exchanged among the ladies. So the traditional 'mora' or 'winnow'(imagine a wide 3 edged cup made from thin strips of bamboo), this is used to separate grains from chaffe in Indian homes will be bought new, washed, sun dried, applied with turmeric powder and decorated (if you are one of those artistic people). An array of things went into the baagina based on whether it was a married woman or a young girl giving it to her contemporaries.

Small plastic bags of Wheat, Chana dal, Toor dal, Urad dal, Moong dal, salt, rice, jaggery had to be prepared along with a bunch of mangala dravya/auspicious things such as a small mirror, new comb, kumkuma-arishina, a small bunch of black beads, bangles, blouse piece for every set of baagina. Everything was arranged in one of the decorated winnows while the other was put on top as a cover. At that age, finding a nice pair of glass bangles to add to my collection made my day. I kept aside the shiny new comb and the bangles after the festival while the grains and other stuff went back to Amma :-). On the day of the festival, amma added some sweets and savories before the baagina exchange. In addition to her regular number, she used to have one or two extra sets to tide over if there were unexpected guests on that day. Things have changed and the mora is replaced by cute looking plastic containers but I think it was more fun in the 'mora' era :-).

Other than the baagina and the food, Gowri habba was special due to the decorations we did on the altar. Most homes set up a separate place in their living room specially to build a mantapa/altar.This is a festival where we had lot of visitors and everyone worked hard at making their altar look beautiful. The artsy kind of people were in great demand. Anna was incharge of the mantapa while akka would take over dressing up the idols for pooja. In our family I am the most 'uncraftsy' person, my creative best stops at counted cross stitches while my akka could come up with ideas and also make them from everyday materials. Akka made these beautiful jewelry with cotton to dress up the idol. She would get glittery, thin papers and other small trinkets to adorn those white necklaces. I did try my hands at it later on, when she was married and gone but mine were no where closer to what she used to make. She would also dress the idol with a nice, new piece of cloth.

I loved going to the market with my father on the day before the festival, crowded, extremely chaotic and noisy though it used to be. In addition to all the usual flowers and fruits and paan leaves and vegetables, special request would be for the lotus flowers. I don't remember getting lotus flowers for any other festival, maybe it was the season. But we would pick a few lotus flowers in yellow, red and pink colors, bring them home and put them in a bowl of water until the next day. These flowers do not open up on their own as they have been cut, so we gently pulled open each petal until a beautiful flower was ready. Both my parents being garden enthusiasts, we always had a lot of home grown flowers to deck up the altar.

Amma used to start the day very early, I don't even know when she actually got up as she made all the dishes for the naivedya after her bath. We joined her much later in the morning as we got up and took our bath. All little kids were assistants to other people and we would help Anna to build the mantapa. We picked out blemish free, green mango leaves that were uniform in size so he could build an aesthetically beautiful and geometrically perfect Torana/decoration with the leaves. Washing the front door, making nice Rangoli/kolam designs was part of the day and there always was an undeclared competition in the neighborhood to produce the best design in front of their home. This was one of the areas where I could mask away my clumsiness by making decent looking  'count and draw' designs :-)

The pooja used to start once all the ladies assembled and go on for an hour and half. After all the post-pooje events including the baagina exchange, it was lunch time. Having already eaten all the goodies from the time Pooje concluded officially, this was one of the lunches I used to pick at for a long time :-). Typical naivedya for Gowri habba is kayi obbattu (coconut-jaggery filling), kobbari mithai, chakli, chitranna along with the usual festival fare including saaru/rasam, palya, kosambari, paayasa. I left the big item out this year and prepared chakli, chitranna and kosambari.

I wish I had pictures to share with you about all this, I have been going through my albums for the last couple of days but haven't found blog worthy, non-personal pictures in my collection. Maybe some day I will revisit these posts to update pictures.

Chakli doesn't need an introduction if you are used to South Indian deep fried savories. It also goes by the name 'murukku'. The traditional chakli is one made with urad dal and rice and nammamma followed a process of soaking rice and shade drying it before sending it to be powdered with roasted urad dal. Since I don't have nammamma's home made chakli hittu/powder, I follow my SIL's recipe for a delicious urad dal chakli. You do not need to worry about making a fine powder as this recipe calls for making a paste of boiled urad dal which is so much easier on the blenders we have here.
What do you need to make Chakli/Chakkuli? 
Makes about 60-70 chaklis depending on the size, takes about 1.5 hours to fry them
1 cup urad dal (without husk)
4 cups rice flour
1 Tblsp sesame seeds
2 Tblsp butter
1.5 Tsp salt (adjust to taste)
3.5 cups water - divided use
Oil to deep fry

How do you make chakkuli?
  • Roast urad dal on medium heat until it turns light pick in color. 
  • Cook the roasted dal in your pressure cooker with 2 cups of water until it is soft.
  • When the dal comes to room temperature grind it to a soft paste using another 1/2-1 cup of water as needed.
  • Combine urad dal paste, rice flour, sesame seeds, butter and salt in a wide bowl and mix it into a soft, pliable dough. Use the remaining water as needed. 
  • Knead the dough for 5 minutes until it is a soft mass.
  • Heat the oil in a wide pan, if you drop a pinch of the dough it should come up to the surface right away. 
  • Put a handful of the dough in your chakkuli press and make chakkuli on a plastic sheet or aluminium foil.
  • Drop the chaklis one by one carefully into the hot oil, fry until golden brown and crisp and take them onto a plate lined with paper towels.. 
  • Finish up all the dough, let the chaklis cool off before storing them in airtight containers. This keeps well for a couple of weeks if you don't eat them :-)
Tips: 
  • Chakli making is quite easy but needs some practice to create those concentric circles. Hold the press at 2 inches above the surface and follow the flow of the dough as it comes out of the chakli press. Lightly press the tip of the outermost circle inside so the shape holds when it is fried.
  • Use a wide pan to heat oil, so chaklis have space to cook, do not crowd them one on top of other.
  • Keep the heat on medium and let the chaklis cook thoroughly so they stay crispy for a long time. Over heating of oil or quick frying results in a burnt outer layer and soft inner core. 
  • Chaklis tend to turn a shade darker as they cool, take them off the oil once the oil stops bubbling so they do not get over cooked.
  • Keep the butter outside for a half hour so it softens up before you use it in the dough. 
  • Before you load the chakli dough into the press, smear a few drops of cool water around the inside edges where it touches the dough so the press moves easily. 
  • Wet a paper napkin or a piece of cheecloth, squeeze the water out and use it to cover the chakli dough to keep it from becoming dry. 
Notes:
  • This Chakli dough is much softer and pliant than the regular chapati dough.
  • I usually make 5-6 chaklis on the aluminium sheet away from the hot oil and then slowly ease them one by one into the hot oil. I have seen some people use the chakli press directly in the oil pan to make chakli, it is just a matter of your preference and ease.
  • Once you put the chakli in hot oil, do not disturb them for a minute and half, Flip them only after they have had a chance to cook for this time else you will end up breaking the chaklis into pieces. 
  • A nice even golden brown color of chaklis indicate it is done as well as the stopping of the bubbles in the oil. 
  • Butter makes chakli crispy and light but too much of butter will break it into pieces. 
  • Amma usually added white sesame seeds to the chakli, you can get an alternate flavored chakli with cumin seeds.
Here is a plate of crispy, tasty chaklis for you to munch on while I will come back tomorrow with more dishes.

Sunday, July 29, 2012

Poli Purnam Boorelu - Varalaxmi Vratam sweet

Hope everyone had a good weekend, we had a good one starting with the Varalaksmi festival on Friday. There has been some planning going into the pooja preparation and menu finalization for the past week or so, now that my in-laws are here with us, we have 2 additional brains for menu ideas :-). Amma said we had to make 9 varieties for the naivedya/naivedyam (offering to God after the pooje), so I kind of tried to pick atleast one each of everyone's favorite in addition to the traditional must-haves and we actually ended up with a wonderful spread of dishes and all of us including some friends who came in the evening enjoyed the food.

Food is such an integral part of any festival, right? I notice it is true without any barrier of region or religion. I guess, for me that is where my earliest food related memories are, any festival or get together at home, nammamma would be up early and in the kitchen preparing variety of dishes, there were days on which we kids were strictly forbidden from entering the kitchen and my uncle would be in charge of driving any stray kids away from the place, I even remember him writing 'No Entry' on the kitchen door to drive home the point :-). Some of the festivals, nammamma would prepare things ahead of time (Sankranthi ellu being one of them) but most times, she would cook the naivedya dishes only on the day of the festival after bathing. We prepared all of the naivedya dishes on Friday morning too and so the pooje started a little late and took us right into lunch time which was perfect. We were famished, food was good and we had a great time.

Here is a quick look at our naivedyam thali(s), I will try to get all of them into the blog as soon as I can. Though I took the pictures for every dish, I don't have enough of them especially for a stand alone blog post, so some of them will be featured only when I make it next time :-).
But today's post is dedicated to a traditional Andhra delicacy - poli purnam boorelu. The name is a mouthful, so let me break that out for the uninitiated. Poli~steamed, purnam~sweet stuffing. This is a sweet prepared in weddings and other auspicious occasions, the process is slightly laborious but the end result will simply mesmerize you with taste. Ingredients are simple, used every day in the kitchen. There is another very popular form of boorelu with the chana dal stuffing (my personal favorite only because I like jaggery based sweets more than those made with white sugar) which is simply called purnam boorelu but the poli purnam boorelu is equally delicious. 

The stuffing is made with moong dal, sugar and lot of cardamom(yes, use lots and freshly pounded for flavoring), the outer shell is made with a dosa like batter made with urad dal and rice. Stuffing is dunked in the batter and deep fried to a golden brown, crispy perfection. I am told that this is traditionally eaten by making a hole in the middle of a hot, crispy boorelu and adding a spoonful of ghee before popping it into the mouth. Although, we didn't go to that extreme indulgence, we completely enjoyed the sweet, cardamom flavored, protein packed boorelu.
What do you need to make Poli Purnam Boorelu? 
The proportions below make about 18-20 golf ball sized boorelu. 
Ingredients for stuffing:
1 cup moong dal/pesara pappu
3/4 cup sugar (adjust to taste if you like sweeter)
4-5 cardamom - peeled and seeds freshly pounded
Ingredients for covering: 
1/2 cup urad dal/uddi pappu/minapappu
1 cup rice
Other ingredients: 
Oil to deep fry

How do you make Poli Purnam Boorelu? 
Making the stuffing: 
  • Soak moong dal in 3 times water for 2 hours.
  • Wash and drain the moong dal, grind it with as little as possible water to a paste. 
  • Put spoonfuls of the ground paste into idli moulds and steam it for 15 minutes until the dal is cooked. 
  • Once the steamed cakes cool down, break them into pieces and run it through your mixer on pulse mode to further break them, add the sugar and blend it once with the dal. 
  • This mixture will be slightly wet because of the added sugar, add the freshly pounded cardamom and working with your hands, knead the entire mixture for a couple of minutes until the consistency is good to make balls out of it.
  • Make golf sized balls with this mixture and keep aside.
Making the covering:
  • Soak the urad dal and rice together in water for 3 hours until they soften.
  • Wash, drain the dal-rice mixture and grind it in the mixer into a batter. Add water while grinding but make sure you get a dosa consistency batter at the end. 
  • This batter doesn't have to ferment and does not have to be overly smooth. Keep aside.
Boorelu assembly:
  • Heat the oil for deep frying preferably in a wide pan. Check the readiness by dropping a small droplet of the batter in the oil, if it comes right up to the surface, oil is ready. 
  • Take the prepared stuffing ball, dunk it in the batter, shake it to remove any extra batter and drop it carefully in the hot oil. Repeat for the remaining stuffing to just fill your frying pan.
  • Leave the boorelu to cook untouched for a couple of minutes before slowly turning them over to cook on the other side. 
  • When the boorelu reach a golden brown crust on all sides, take them out of the oil onto a paper napkin. 
Notes: 
  • Do not soak moong dal for more than a couple of hours as it tends to become oily when fried. 
  • Breaking the steamed moong dal idlis into fine powder along with sugar takes some hard work with your hands, make use of the mixer to pulse it down as much as possible before manually kneading it to make balls.
  • The batter covering should be flowy but not watery, it should coat the stuffing well at the same time not becoming very thick, adjust the consistency as needed. 
  • Use fresh pounded cardamom for best flavor burst.
  • You can make dosas with any extra batter, i added a spoonful of fine sooji, salt and the dosas were delicious.