Showing posts with label Healthy Diet Series. Show all posts

Sunday, May 1, 2016

Boodukumbala kaayi (Ashgourd/winter melon) dose - changed perspective with a swapped in ingredient

Changing one's vision changes one's sight - Acharya Vivek

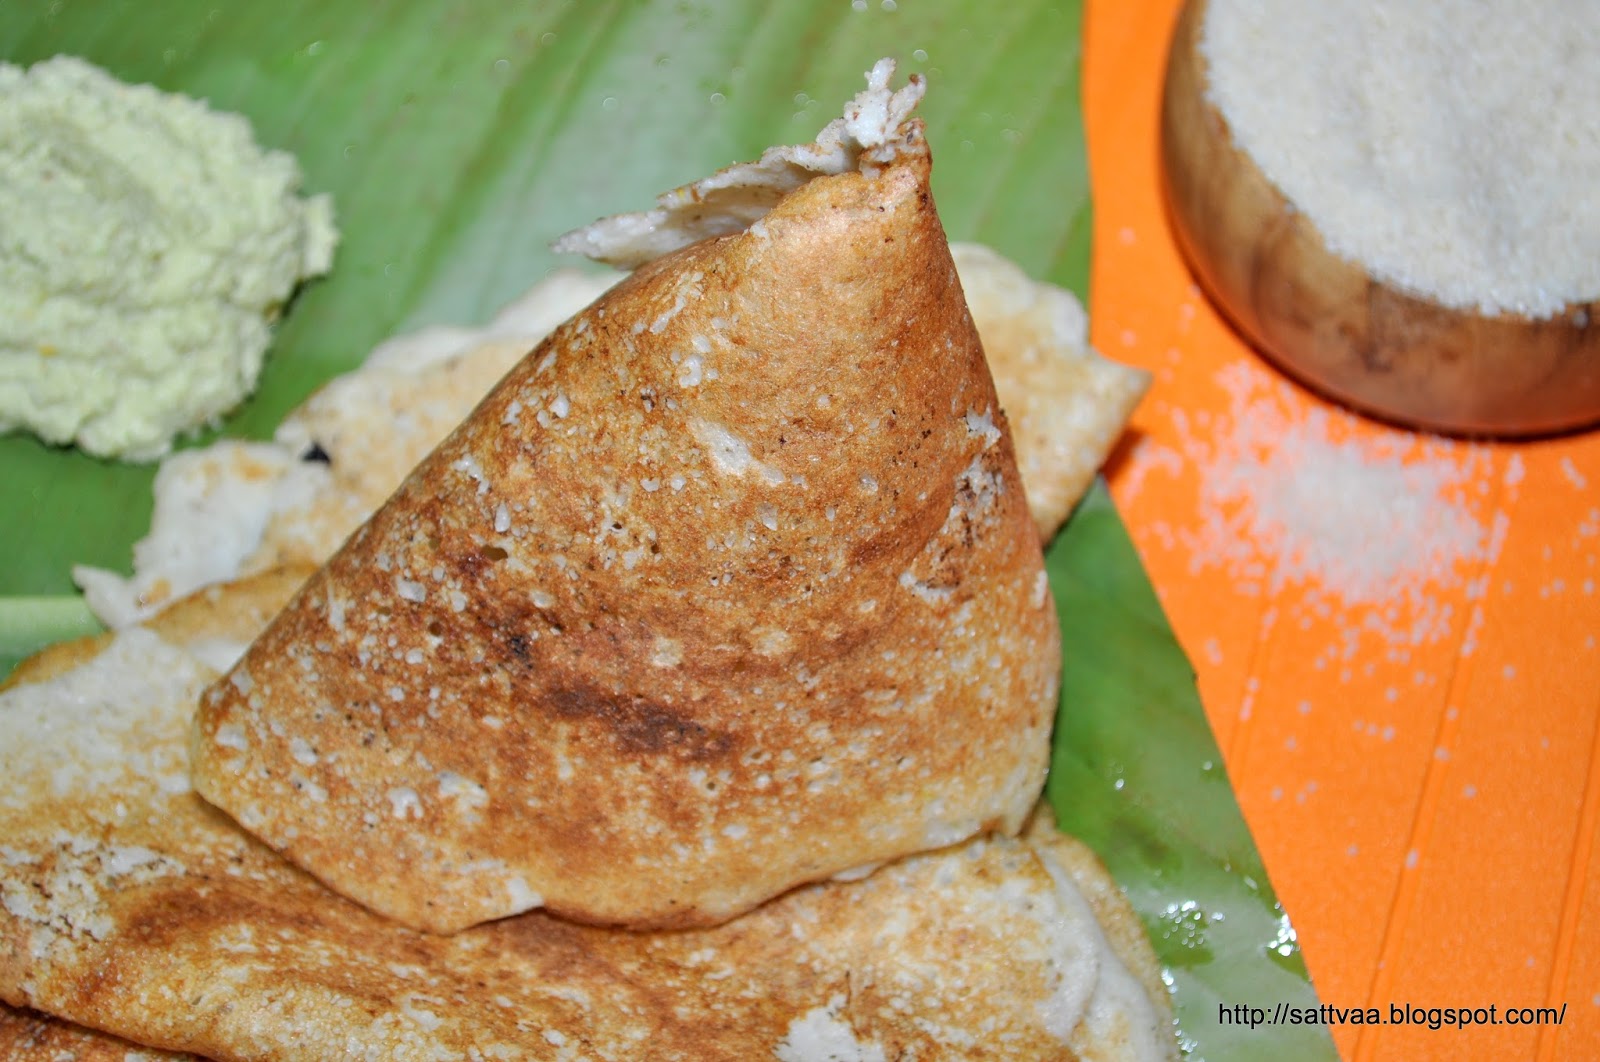
Random rambling alert on today's blog post:-). If you like to go to the recipe directly, please feel free to do so below. Let my ramblings not dilute the delicious dish I have today, I will say only this - this is a dose/dosa recipe that changes your perspective on dosa, the ingredients that are in the recipe are not what you would expect from a typical South Indian dose recipe, but then with so many changes around you, what really is typical anymore? Your last chance to scroll down to the recipe before the ramblings come down in an avalanche :-) and here is a teaser of the dish..
I wrote the quote at the head of the post today for a reason, that single sentence seemed to convey so much that I have been grappling to take in recently. Stereotypes broken, traditions created a-new.. isn't that part of life and while I am looking wide eyed around me, this quote finds its way into my inbox as if to summarize all that is happening.

I grew up in a small city, culturally vibrant, educational hub for some of the best education possible at the time, nonetheless small and contained. I also grew up in a family that was interested in music, literature and arts as well as scientific education. I am grateful for all of this and what it has made me in life today. But as life takes me to different places through different experiences, I learn every step of the way that my values are solidified with what I know thus far and the only way to broaden horizons is to be accepting of things that I may not know of and keep an open mind.
Music has been an integral part of life for me and I am no stranger to music concerts. But we went to a certain kind of music concerts always, mainly the classical kind. There was no dearth of concerts in Mysore and the music lovers in the city didn't need excuses to arrange concerts either. There were big scale concerts around Rama Navami and Dasara but rest of the year used to witness multiple music programs sponsored by various sabhas (organizations). I went to many, many concerts with family and enjoyed them all. Big brother studying in the Northern part of India introduced us to the joys of Hindustani classical, high school and college days saw me listen to many light classical ghazals, post marriage I enjoyed a lot more Lata, Rafi, Kishore Kumar style with BH and then as DD grew up into a music loving teenager, I was introduced to many of her favorites in Pop, jazz and all the new age genre. I love all kinds of music as long as it suits my mood at that time, but have really not attended many non classical concerts in my life. BH & I went to one last evening by a very popular musician, classically trained but into Indian movie music.
It was almost an eye opener, everything about the program was so different from my mental image of a music concert :-). The big stadium, the dancing crowd, loud speakers, flashing lights and the musicians engaging the audience all of it seemed to contrast and almost defy everything I held as part of my definition of a music concert where audience are engaged in a very subtle and gentle way, the most visible movement you see is a nod of the head or a pat on the knees as you try to keep with the percussion and the musicians themselves are more inward than outward. My initial reaction was one of total hesitation but as I got into the music, I found it totally enjoyable and in no time was enjoying the real music behind all the glitter. Great experience and only because I was ready to lift the veil off of my perceptions and change the vision!! Thanks to the local chapter of Sankara Eye foundation for organizing the program as they also fund raised for a good cause.
Today's recipe is one of changing the vision too. Millets started showing up as part of super healthy food on the blogosphere a few years back. There has been so much discussion about embracing healthy foods such Oats and Quinoa Versus the Desi grown millets. I accept that I am not an early adapter of changes, I let things settle down a little, feel comfortable before jumping on any band wagon. Though I kept hearing about the millets from various sources, I didn't spend a lot of energy researching them until much later. The only millet I was familiar with was Raagi or finger millet which I love and then jowar or sorghum. Raagi is a regular at home with the famed Raagi mudde and jowar has been silently sneaking into the kitchen for years since we love jolada rotti. Other than these two, I had pretty much stayed away from the millets, or rather was ignorant and uneducated about the existence of other millets.

For my background as a South Indian from Mysore, no meal is satisfying without the fluffy, white steamed rice. Most of us do not even consider brown rice as edible, it is almost snobbish the way people like me turn their noses to anything but the light, pearly white, super fluffy sona masoori rice :-). If you were to feed me a sticky jasmine rice, you would have to be a very patient, gently coaxing mentor :-), otherwise chances of success would be highly diminished. As we grew up, and also due to the lack of easy accessibility to rice made me add lot of wheat (another grain I was familiar with) and then slowly steer towards the easily reachable oats, quinoa and barley. Over the years, I have experimented with these different, possible supplements for my white rice. I still love my white rice but have successfully incorporated other grains and seeds in to the daily routine. And yes, brown rice makes its way into our kitchen too.

When I first heard of millets, I had no clue what they were. Nammamma never made anything like this, nor did amma. A year or so back, on a trip to my local grocery story, I found an entire shelf of packets that had different looking ingredients. Out of curiosity, I picked up each one of them and read the labels and then one of them caught my attention. The label said kodo millet and had the name in multiple Indian languages and the Kannada name was 'Harka'. This took me to a favorite novel of mine I have read and re-read many times by a famed Kannada author called S.L.Byrappa and there is a reference of Harka in that book as a rice substitute but the part I remembered was how people in plague ridden parts of the state had no access to rice for many months and had to survive on lesser desired things such as Harka which caused familial fights. While reading the book, I had never bothered to find out what harka was but here it was glaring in my face after all these years in my adopted country.

I brought small packets of every single variety of millet home that day and tried to cook with it. More than cooking, I was somehow trying to relate to and connect with all those ancestors that had lived the nightmare of the plague in those times. Millets are actually seeds very much like Quinoa which is the modern day super food and have higher fiber content than rice and better nutrition than polished rice too. I have been experimenting with these millets for almost 2 years now but haven't really written a lot about them. They are great rice supplements if you are looking for one and you can have them with any side dish just like rice. Depending on the variety, you may find and need to adjust how you cook or use them as some of them are bigger in size than others and may take longer to cook.
Initially I started adding them to my dose and idli batter while still keeping a major portion of rice. But once we got over the initial hesitation, I extended the proportion of millets and now have recipes which do not use rice at all. I am not saying rice is bad, my family has consumed rice all their lives and lived a pretty healthy life but as times change and if you are actively looking for other ingredients, millets are ready to take that spot without hesitation. Of the varieties I have used, 2 of my favorites are the foxtail millet (navane in kannada) and the little millet (Saama in Kannada). I find kodo millet to be dry and also the packages that I got had a lot of dirt that had to be picked. I don't get barnyard millet all the time here so no specific bias on that one.

Foxtail millet is good if you are making rice varieties (Ex: tamarind rice, chitranna etc) as it holds shape and can be cooked fluffy. Little millet is perfect for batters as it soaks and grinds easily. It is also great in and recipes like pongal, BBB etc since it tends to cook to a mushy consistency. Unlike quinoa, the millets do not have a smell or taste of their own thus making them invisible super ninjas as you replace them with rice in any recipe. Today's recipe is a coastal Karnataka favorite made with rice and ashgourd, I replaced the rice with little millet. Ashgourd is summer vegetable, when the mercury hits high and you are craving for something watery and cool, this is a go to vegetable. This dose is delicious whether you make it right out of the blender or let it sit for a few hours. All I had to do was change my vision to find better sight :-), go ahead and give it a try. If you are hesitant to try millets, make this dose with regular rice. Either way it is a keeper recipe!!

If this interests you to try other millet recipes, let me know with a comment on the blog post, I will get to post them sooner than following my lethargic pace :-)
What do you need? 
2-2.5 cups grated ashgourd
2 cups millet
1 Tsp fenugreek seeds
1 Tbsp urad dal (you can skip this if you like)
1 Tbsp poha or avalakki (thick variety)
1 Tsp cumin seeds
4-5 green chilies
1 Tsp salt (adjust to taste)
couple Tsp oil to roast dose
How do you make? 

  • Wash, pick any dirt from the millet and soak it in water along with fenugreek, urad dal and poha for 4-6 hours. Do it overnight if you have time or if you are using the thicker millets like foxtail millet. 
  • Wash, peel the outer skin and grate the ashgourd. Collect all the water it releases while grating and reserve for later use. 
  • Drain the water you have used for soaking and add the ingredients to a blender along with cumin and green chilies. 
  • Add all the grated ash gourd reserving about 2 Tbsp for later use to the blender and blend into a smooth paste. 
  • The water from the grated ashgourd can be added while grinding to get the required consistency, use it a little at a time to avoid making a very watery mixture. 
  • Once the ingredients have turned into a smooth paste of pouring consistency, take it out into a bowl and add the remaining grated ashgourd. 
  • Add salt to the batter if you are making dose right away or wait until you are ready to make them. 
  • Heat your dosa pan or griddle on medium heat, and once the pan is hot, take a ladle full of the batter and spread it in a circular motion. 
  • This can be made as thin or as thick as you choose. 
  • Add a few drops of oil around the edge of the dose, and let it cook covered on one side for a minute on medium heat. 
  • When the underside is golden, gently nudge the dose from the pan and flip it over. 
  • Cook on the other side for 30secs and take it out onto a plate. 
  • Repeat for the remaining batter or as many doses as you need.
  • Serve hot with ghee and chutney of choice. 
Notes: 
  • I used sawa/little millet this time but have made it with foxtail also. You can use either of these or other millets such as kodo, barnyard or little millet. Soaking millet makes it soft for grinding and makes the dose soft too. 
  • If you like thinly spread dosas, grate a small piece of the gourd in the small hole of the grater. The rest of the gourd that goes into the blender can be done on the big holes. This makes it easier to spread. 
  • The dosas get a nice golden color with the fenugreek so do not skip that. 
  • Urad dal is optional in this recipe and I don't add it sometimes. 
  • You can make this dose with the watermelon rind instead of the ashgourd. 
  • If you like crispy dose, don't cover it while cooking and cook on one side only. 
  • I add green chilies and cumin for flavor as both millet and ashgourd are sort of bland, you can omit these ingredients and eat it with a side dish if you choose. 

Wednesday, February 11, 2015

Masala Oats rotti - super food rolled into super yummy rotti

I thought I had put myself on a weekly routine for the blog until things became a little less rushed in life. But here I am, red faced with shame having missed my Sunday night posting :-(. It doesn't mean I love the blog any less but just that I am hardly finding the time to sit down and compose the post these past few months. if it is not the lack of time, it is the lack of words that just refuse to leave their cozy spot, come out and express themselves coherently. I called it the blogger's block once (yes, it has happened before) and lifts itself off as unpretentiously as it came in. I just need to wait patiently, that is all. When it does happen and I try to write a post, it feels exactly the same way as pulling an unwilling tooth at the dentist's :-). At other times, the words just gush out in torrents like the first rains of season - unstoppable, in tune and totally refreshing :-).
Now that I am reminded of dentists (category of people I live in mortal fear of :-)), I went to my dentist 2 days back, nothing major, routine visit and she asked me to schedule a couple of sittings for the cleaning just like that. Oh, before you all go off and start thinking of me as a stinky teeth, bad breath monster, let me tell you this. Here in US, we pay regular 'well check' visits to doctors, dentists and eye care professionals, this is part of life. Growing up in India, we went to a doctor only when sick and needed medical care. I don't remember going to a dentist at all. To top it, having an older sister in medical school, training to be a doctor only added to that routine. Everything from common cold to bruised knees were treated free of cost and with lot of love at home and we didn't feel the necessity to visit an outside doctor. The rare occasions I remember going to a hospital was when nammamma had a fractured wrist or I was falsely diagnosed with typhoid in my sister's absence :-). Other than that, of course when I delivered my little girl but then my sister was very much there throughout.

Anyways, my dentist visit was part of preventative care. I am not looking forward to her sitting me on a chair open mouthed (for what feels like eternity) while she goes about talking the entire time as she pricks, prods and hurts my gums, all in the name of cleaning. Dentists, I feel, tend to be talkative just to fill that void when the other person in the room cannot really talk much :-). All you can do is just nod your head and grunt even when she says unpleasant things like you need a filling or have a cavity. Well, my appointment is not for another 2 weeks and I won't spend much time thinking about it. All you compassionate people, send me some warm thoughts when you get a chance :-). But for now, away from the dentist's chair, my blogger's block seems to have lifted off magically and I am able to go yap, yap, yap :-)

Back to the recipe today, I have a delicious masala rotti loaded with vegetables and made with the healthy grain - Oats. Oats gained popularity in the last 2 decades or so as one of those super foods, a grain that beats everything else and is marketed and pushed for human consumption. I have elders in the family who still think oats is meant to be used as livestock only :-), some perceptions are very hard to change. I use oats regularly in my kitchen, I am not someone to dispute or uphold the various research around oats but like them in recipes just for variety. Oats being good for health - oh, I consider that as the fringe benefit. There are a bunch of recipes with oats on the blog already. If interested, look them up in the recipe index or search for them on the blog.
Being a South Indian, bred heavily on white, fluffy rice, it is my weakness. I crave for rice (a simple yogurt rice with pickle will bring me cartloads of happiness and cheer me up instantly) and sometimes go into withdrawal if I haven't had rice for a few days. When I was looking to incorporate more grains and bring freshness into the recipes a few years back, I stumbled upon oats, quinoa, different millets etc. Most of these work very well as rice substitutes especially if you mix them up with a spicy side dish. Many work well in idlis, dosas etc too. I have found this 'mix and match' strategy goes well not only with clothes but also with food. It gives the necessary break from monotony, keeps food interesting and invigorating.

Oats get some flak from people who say the carb content is as high or higher (depending on the type of oats) than rice. I would say it is a one sided argument. Oats, being high in soluble fibre is meant to be good for heart and to regulate blood sugar. It digests slowly and keeps you fuller for longer. I had seen the ready to eat Saffola brand oats in Indian supermarkets on my last visit but was surprised find them here locally in my grocery stores. I wouldn't buy them personally since processed oats do not really give you any advantage over white rice or refined flour. To actually benefit from oats, use either the rolled oats or steel cut oats.
Finally, to blow some trumpet - when I was making these rottis for dinner, DD had a couple of her friends at home working on some music practice. As I took hot rottis out of the tawa, I smeared a dab of ghee, rolled it up and gave it to the girls. Polite teenagers that they are, both said it tasted yummy but I really found it truthful when they rolled a few more rottis on their own accord, wrapped them in foils and took with them to munch on as they headed out. It is tried and tasted, so go ahead and make some in your kitchen too.

What do you need to make masala oats rotti? 
Makes about 10 rottis
1.5 cups oats
3/4 cup whole wheat flour
1 cup grated broccoli
1 cup chopped fenugreek or fresh methi (optional, I love it)
1 medium potato boiled until soft
1/2 cup grated carrots
2 Tbsp finely chopped onions
2 green chilies - finely chopped
1 Tsp salt (adjust to taste)
1/4 Tsp red chili powder
1/8 Tsp amchoor powder
1/2 Tsp sesame seeds
2 Tbsp oil - divided use
pinch of turmeric
1 Tbsp wheat flour for dusting

How do you make masala oats rotti? 
  • Heat 1 Tbsp oil in a pan, add chopped onion and saute for a min or until it softens. 
  • Add grated broccoli, carrots, chopped green chilies & methi followed by salt and mix well. 
  • Cover and let cook for 3-4 minutes until the raw smell of the vegetables fades away. 
  • Mash the boiled, peeled potatoes and add it to the cooked vegetables. This absorbs moisture. 
  • Add the dry powders now - red chili powder, amchoor and sesame seeds. 
  • Mix well, taste and adjust salt or spices. Switch off and let cool. At this time the vegetables mixtures should taste strong on salt and spices, or else the rottis turn bland when mixed with flour. 
  • Powder the oats into a fine textured powder. 
  • Take the wheat flour and oats flour in a wide bowl, add the cooked vegetables and bring them together. DO NOT ADD WATER AT THIS STAGE. 
  • The moisture from the vegetables helps bind the dough.
  • Add water in drops to get a slightly firmer dough than chapati dough. 
  • Knead for a couple of minutes until the dough turns into a smooth ball, cover and let it rest for 20 minutes. 
  • Heat a roti griddle or flat pan on medium heat. 
  • Divide the dough into 10 equal portions and smooth them into a round ball. 
  • Dip the ball into dry wheat flour, flatten it and smooth any cracks at the edges. 
  • Roll out the rotti with a rolling pin, do not use too much pressure. Gluten in this dough is very less compared to regular chapati dough so it cracks under pressure. 
  • Roll the rotti into a circle of 1/2 mm. 
  • Put it on the hot pan, brush it with oil on top. Let cook for a minute before turning it over to the other side. 
  • Brush with oil and cook until both sides develop tiny, bright brown spots all over. 
  • Take it out and serve it with a cup of cool yogurt. 
Notes: 
  • You do need some wheat flour to be able to roll the rottis, this 1:2 (oats:wheat) proportion works well.
  • You can replace cooked potato with cooked raw banana (plantain) or skip it all together
  • Use spinach instead of methi leaves. 
  • Use other vegetables of preference like grated radish, bell peppers, chopped green beans for variety. 
  • Green chilies and red chili powder both add to the heat, use according to your taste. 
  • Cook the rotti on medium heat until the sides turn a golden brown, raw oats takes time to cook. 
  • You can make kadak rotti (it is a North Karnataka specialty made with jowar flour) or crispy rotti by cooking it for longer until it turns brittle, perfect to store and carry on travels. 

Thursday, November 14, 2013

Barley Upma - World Diabetic Day - spreading awareness through food


On this World Diabetic day, Swati asked a few of us bloggers to blog about the disease in an effort to create awareness. Diabetes is a condition of the body when there is excess sugar/glucose in the blood stream. Type 2 diabetes found most commonly in adults is caused when the body either does not create enough insulin or the insulin does not work as intended. This insulin resistance creates a build up of glucose (sugar) in the blood stream impacting the body function and leading to complications with major organs in the system. Bleak as this diagnosis sounds, diabetes is a treatable condition with a combination of well managed diet, regular exercise and medication.

Coming from a South Asian community, most of us are pre-disposed to diabetes. While genetics play a major role in diabetes manifestation, individual life styles contribute greatly to it too. So, you are not spared if your parents or grand parents didn't have the condition, you could be the first one to start the trend as a sedentary lifestyle and obesity can trigger diabetic diagnosis. However, a diabetes diagnosis doesn't have to make life unbearable. 
One thing that helps most is to be consistent and consciously make healthy choices. 

As a kid, I had seen a couple of my relatives eat 'Godhi anna' which is cooked broken wheat instead of the white, fluffy rice the rest of the family enjoyed. It used to be mostly bland and devoid of any frills and many of these people also took daily insulin shots which meant that the diabetes was quite advanced. While every person has unique needs, there are some 'free foods' such as herbs to enhance the flavor, vegetables such as cabbage to add volume which can create miraculously yummy treats without them being 'bad' on your blood sugar. Key to diabetes regulation is to watch for foods that tend to create a spike in the blood sugar. Foods that digest slowly (high in soluble fibers) are considered best in diabetic diet. Your best source of advice should be from your health care professional or physician. With that disclaimer, I do want to share some things that I have learnt over the months now as I journey towards helping a family member keep diabetes regulated. 
While regular exercise helps everybody, it becomes a more essential need in diabetic care. Make sure you add regular exercise to your routine, simple changes like moving around instead of being glued to the chair can be a great first step.

When it comes to diabetic diet one should aim to eliminate or atleast limit the intake of processed foods. Replace your all purpose flours with whole wheat flour, upma rava with broken wheat as simple gestures that go a long way in controlling blood sugar. Sweets do not need to be totally off limits if included as occasional treats. Whole grains, beans, pulses make some of the best vegetarian diabetic friendly choices. Whole grain essentially means grains that have all 3 components - germ, bran and the endosperm (or starchy part). Oats, quinoa, brown rice, barley, cracked wheat, millet are some of the commonly available whole grains. These foods are high in soluble fibers and create a slow release of nutrients and hence does not spike sugar level in the blood. Reduce oily substances and use vegetable/plant based oils whenever possible. Freshly prepared food in place of a can of soup is a very welcome change in diabetic diet. Equally important is to control your portions at every meal and space them so there is no long stretches of starvation to the body. 

Here are some additional websites to go to if you are looking for diabetes related information -
International Diabetes Federation
American Diabetes Association


With that, I have a simple and delicious variety of upma (when you are in doubt or lack creative juices to name a dish, call it Upma and it works just fine :-)) made from Barley. I used some nutrition enhancers like garbanzo beans/chick peas and fresh Kale which is a protein power house. These additions make the dish different and yummy. You can use any other cooked beans or leafy greens instead. I hope this post is not all preachy but has some good take aways if you are looking for diabetic friendly recipes. I can guarantee that all of us at home enjoyed the Barley upma very much. Some of my other diabetic friendly recipes can be found here and here.

Side bar conversation: I was torn by conflicting reports on the inclusion of coconut oil in a diabetic friendly diet, while some reports say the high saturated fat content in coconut oil is a 'no-no' for diabetes, some swear by the lower GI effects of this oil. Again, I am not the expert in the subject, so I leave it to others.  


What do you need to make Barley Upma?
1 cup barley
2&1/4 cup water
1/2 cup cooked garbanzo
1 cup fresh kale
1.5 Tsp oil
1 Tsp mustard
2-3 green chilies
1 inch piece ginger
3-4 curry leaves
2 shallots/3 Tblps chopped red onion
1 Tsp salt (adjust to taste)
1/8 Tsp turmeric powder

How do make Barley Upma?
  • Soak Barley in 4 cups of water overnight.
  • Scrub and rinse barley in the morning, drain the water a couple of times to remove any impurities.
  • Bring 2&1/4 cup water to boil along with a pinch of salt. 
  • When the water starts to boil, add barley and let it come to a boil, keep stirring at this point.
  • Once the bubbles start again, cover and bring the heat to low and cook or 20-25 minutes until water is absorbed and barley is cooked.
  • Switch off and keep it covered for 10 minutes.
  • In another pan, heat oil and add mustard. When mustard seeds pop, add chopped green chilies, ginger and curry leaves and saute for a minute.
  • Add chopped shallots/onion, followed by remaining salt, turmeric powder and saute until onion turns limp.
  • Add chopped kale leaves and continue to saute until they wilt about 2-3 minutes.
  • Add the cooked chick peas, cooked barley and give a good mix.
  • Do a taste test, add lemon juice if you like, serve hot.
Notes:
  • Cooked barley is a little chewy (similar to brown rice texture).
  • Soaking barley reduces the cooking time drastically, you can otherwise cook barley in pressure cooker.
  • Adding salt to the boiling water helps barley absorb some salt and brings out its taste better.
Variations:
  • Add other cooked vegetables (beans, carrots, peas etc) to enrich this dish.
  • Sprouts & cooked beans make a healthy addition too.

Thursday, November 7, 2013

Granola bars - keep those famous mid morning hunger pangs at bay with a healthy treat

Do you have some 'grab & go' kind of recipes you keep handy? Much as I would love to sit down and eat every meal in a relaxed way with my family, it is not realistic. Especially, the week day mornings, we seem to hardly have time to eat something nutritious without worrying about it also being delicious. If both of us start the early morning off with meetings/calls, it sets a different pace and tone to the rest of the day and I try to plan for those frequent occurrences.

Then there are days I am out, need to be heads down in work or occasional travelling, I prefer to keep some ready made stuff that my folks can fall back on if their mega plans to make an elaborate meal in 'amma's absence' comes to a stand still for some valid but mostly invalid reasons :-). While BH & I enjoy our morning bowl of Oats most days, I have not been able to make DD fall in love or even tolerate the gooey stuff. So she gets other stuff for breakfast which is a mockery of breakfast because most days she has all of 2 minutes to eat before she has to run out the door. And then her carb and correspondingly energy levels are down by mid day. I should put this on my list to ask my mom on our next phone call about what I did when I was a teenager :-), hope what she says doesn't crush my ego.
High school is a huge transition from lower grades, all those circle time, snack time are long gone and so are the gold fish, cheese & crackers. In high school, most teachers seem ok with kids eating in the class as long as they do not disturb/distract others or make a mess. So DD likes to pack something to curb her mid day hunger pangs. Most days it is her favorite chick peas + avocado salad, or some saltine crackers but ever since I made this granola bars at home a couple of months ago, it has been granola bars that she carries every day. Says she could eat oats in that form any time :-), makes me laugh with joy as I can load them up with ingredients I know are good for her.

Why make granola bars at home when there are atleast a hundred different varieties stacked up, nicely wrapped for easy carrying in the grocery store aisles? Not trying to be a 'super mom' by making everything from scratch and at home. As you know I have my semi home made tricks to save my day when needed. Alluring as it was to bring a box of granola bars from Costco and stick it in for quick energy refreshers, as we tried different brands of these bars over the years, we found some to be too chewy (like card board), some way too sweet, some had ingredients we didn't care to put in our systems - what can I say, we are a picky bunch. We gave up the search for the perfect family approved nutri bars after many attempts while I kept coming across multiple versions of home made granola bars.
You will see an ingredient in the list below that may not sound familiar unless you have a background of Middle Eastern or Persian food. Don't worry if you do not have it, it is not a deal breaker here. Zereshk is a berry in dry form, rich in vitamin C with a sharp acidic flavor. Dried version tastes closer to dried cranberries but more tart. A good friend shared an entire bagful with me earlier last month, these berries are used as garnishing in Persian rice and give a very yummy burst of tang. I have just been popping handfuls into the mouth so far and added them into the bars here.

This is a very easy to make granola bar, you can customize it with your choice of dry fruits and nuts and make it your own. I started with 3 Tblsp brown sugar and have reduced to 1 Tblsp now, I will not recommend changing the quantity of the liquids very much because you need them to coat the dry ingredients an provide enough binding strength. You can add honey instead of maple syrup or keep it vegan as I did here.

What do you need to make Granola bars?
Source: Various on internet
Dry ingredients:
3.5 cups oats
1/2 cup coconut flakes (I used sweetened variety)
1 Tblsp brown sugar
**10-12 almonds
6-8 wlnuts
6-8 pecans
6-8 pistachio
1 Tblsp each of raisins, dried cranberries, dried blueberries
1 Tsp Zereshk (I used it since I had it))
Wet ingredients:
1/3 cup canola oil
1/3 cup maple syrup or honey
1 Tsp vanilla

1 Tblsp nutella :-) - key to my daughter's happiness kingdom
** Nuts & dry fruits should make approximately 1 cup
How do you make Granola bars?
  • Prepare a baking pan - I used a 11X7in baling pan with edges and the bars were about an inch & quarter in thickness. Cut and lay out a sheet of parchment paper in the pan and tuck in the corners. Give a light coating of non stick baking spray, I used my canola oil spray.
  • Pre heat oven to 325F.
  • Arrange the nuts (almonds, walnuts, pistachios, pecans, sunflower seeds or any other choice) in a baking sheet and toast them until fragrant (7-8 minutes, watch the oven so they don't burn) - Pre toasting the nuts gives a very fragrant aroma to the bars though you can use raw nuts directly.  
  • Take the nuts out, let them cool a little bit so you can handle them, chop up into small bits.
  • Mix oats, toasted nuts, coconut flakes and all other dry ingredients in a big bowl until they are uniformly distributed.
  • Add the wet ingredients and mix it well so that everything is coated nicely.
  • Pour the mixture into the prepared pan and using a flat & heavy dish, smoothen the surface while packing them up tightly - This is important to get the bars without them crumbling up, keep pushing the mixture down all the time - See notes below.
  • Spread nutella on top - make designs if you are creative :-), see notes below to know what I did.
  • Bake for 30 minutes, take out the pan and let it cool completely before cutting them up as bars or squares, use a sharp knife to cut through the bar.
Notes:
  • I spread another layer of parchment paper on top of the mixture and use the bottom of a heavy, flat cup to actually hit it down. Don't directly use your hands as oats keep getting stuck :-)
  • Since nutella refuses to fall down in dignity, I put it in a zip lock bag, cut a tiny hole at the bottom (very much like the cones you make for piping pastry toppings or henna designs) and pipe it out.
  • The reason my nutella is seen in blobs at some places is because I didn't notice that my zip lock came with its own hole which added to the double squirt, but then DD said nutella chunks tasted great, a win-win :-)
  • You can use melted chocolate instead of nutella or skip it altogether.
  • We like the texture of whole oats in this bar, if you like make a coarse crumble (do not powder) of oats.

Wednesday, September 11, 2013

Kuchida Kadubu - may be you know me as Kozukattai or Kolakatte?

What is in a name? Everything if you ask me. I can be blissfully ignorant to the mention of a kozukattai while the word kuchida kadubu makes me drool and salivate without any shame :-). With Ganesha Chaturthi this week, there are hundreds of versions of Kozukattais as they are called in Tamil Nadu and there are umpteen number of Kudumulu - a close relative in the same genre as they are called in Andhra Pradesh. If you want to go International, look up momos and dumplings. I will stick to my own Kuchida kadubu which is a steam cooked kadubu made for either Ganesha chaturthi or Nagara Panchami in Kannadiga homes.

As I said before, Gowri-Ganesha festivals used to be the biggest celebrations at home and in the community for us as kids. While we didn't have much to do other than dress up, participate in the pooje and eat and eat more of the goodies, parents had a lot to do in terms of planning the festival. By the time of these festivals, nammamma already used to be inundated with lot of other poojas and preparations during the previous month of Shravana and her entire family would have already started to resemble little Ganeshas with all the festive food. So she used to intersperse high calorie with lower calorie options, mix and match laborious preparations with easier ones and find a balance. She never told me this so it could be my imagination but I have seen my mother at the peak of her organizational skills and I honestly think a lot of planning went into it.

Just for the fun of it, I googled kuchida kadubu last week and came up with hits I could count on the fingers of one of my hands. Then I typed in Kozukattai and I was looking at oodles of search results - traditional recipes, new twists and everything else in between. So I decided to pay a tribute to this delicious dish I grew up eating and use the name I am familiar with though it may sound strange to a lot of you if you haven't heard it before. There is a little bit of work involved but nothing you can't pull off for a healthy, tasty breakfast.

If I were to demystify this strange named dish and were to introduce it to someone, I would say it is 'shuffled up' idli. Let me explain why - what does the traditional, authentic idli have for ingredients? -rice and urad dal. How is a traditional idli cooked? - by steaming. Bingo. Kuchida Kadubu has rice and urad dal in it and is also steamed but instead of grinding rice with urad dal, it is made into a cover to hold the dal. Innovative? I would think so. The end result is not the bland idli one is used to but an artistic presentation of the same ingredients in a form that feasts your eyes and palate.

Nammamma made this with moong dal & chana dal fillings sometimes with minor variations though the version I have below was by far the best loved and favorite of all in the family. If made on the Ganesha festival day, Nammamma also made sweet kuchida kadubu with coconut & jaggery filling but I skipped it since I made Hayagreeva this time.
What do you need to make Kuchida kadubu? 
Makes about 20 kuchida kadubus
For stuffing: 
1 cup urad dal
2-3 green chilies
1 inch piece of ginger
5-7 curry leaves - chopped fine
1 Tsp salt
2 Tblsp chopped fresh coconut (optional, highly recommended for the crunch)
2 Tblsp chana dal
1/4 Tsp freshly ground pepper
For outer covering:
1.5 cups rice flour (use home made flour preferably or store bought idiyappam flour)
1 Tblsp rice flour for dusting
3 cups water
1/2 Tsp salt
2 drops oil

How do you make Kuchida Kadubu? 
Stuffing Preparation: 
  • Wash urad dal in two changes of water, soak it in 3 cups of water for 4-5 hours. 
  • Drain the water out and grind it with as little water as possible (just like you would grind for idli) along with ginger and green chilies until you get a smooth, slightly foamy dough.
  • Take it out into a bowl, if preparing the previous evening, add washed chana dal to the dough, cover and refrigerate. 
  • If using immediately, wash and pre soak chana dal for about an hour and mix it into the ground urad dal paste. 
  • Add salt, pepper, curry leaves, chopped coconut and mix it well. 
Outer covering preparation: 
  • Bring 3 cups of water to a gentle boil along with salt and 2 drops of oil. 
  • Add the rice flour and mix it with a wooden spatula quickly so it forms a mass without any lumps. 
  • Cover and cook on low heat for 3-4 minutes, switch off and let rest for 5 minutes. 
  • Take the dough out on to a flat surface, knead it into a smooth dough and divide into small key lime size balls. Put the prepared balls back into a vessel and keep them covered with a wet dish cloth. 
  • Take one ball at a time and roll it into thin (1 mm) circle dusting with dry rice flour as needed, put them in a plate and keep covered with another wet dish cloth until ready to use. 
Assembly & cooking Kuchida Kadubu:
  • Get your pressure cooker or steamer ready to go.
  • Take a rolled out rice flour circle, spoon a Tblsp of the stuffing in the center, spread it out gently and fold the circle to bring one edge over the other. 
  • The edges do not need to be sealed, we kind of refer to this as the overloaded Ganesha's tummy, gently place one end of the circle on top of the other. 
  • Arrange these in vessels and steam them for 20 minutes. 
  • Switch off and let the kadubu rest for a few minutes before taking them out with a gentle nudge from the back of a spoon or a butter knife. 
  • Enjoy these milky white marvels with some coconut chutney on the side. 
Making rice flour at home: 
The rice flour used in this recipe is the same as the one used in making ottu shavige or bili rotti. You can prepare it in bulk. Wash 2 cups of rice a couple of times, drain the water and spread it on a thin dish cloth, keep it indoors in shade and let it lose all moisture. Make a fine powder of this rice, sieve it to get the fine powder and return big crumbs back to the mixer. Stored in air tight containers, this stays for a couple of months easily. 
Alternatively use the store bought idiyappam flour (I bring Nirapara brand) which works very well.
Notes: 
  • The stuffing is not a dry stuffing, it is slightly thicker than the idli dough in consistency. 
  • It is very important to keep the outer covering dough moist and soft. Make sure your knead it well - dough should not show any marks, breaks on it. Keep it covered with a wet dish cloth on both the balls to be rolled and the rolled out discs. 
  • If you are in a hurry and want to avoid making the outer cover altogether, follow this short cut - Use a banana leaf or an aluminium foil cut into small rectangles (2X3inches) and fold them over the stuffing. You will have to peel the leaf or the foil before eating though. 

Thursday, September 5, 2013

Oats-broken wheat idli - making healthy choices tasty and acceptable

Let us say you are hungry and famished and you reach a table where there are 2 things - a bowl of boiled spinach and a platter of fried spinach pakodas (if you are a spice lover like me) or a bowl of gulab jamoons(for those of you with a mean sweet tooth). How many of you reach out to the boiled spinach? Not many (unless you are popeye himself), I thought so. I am guilty of this too. Food is a very complex thing - it encompasses taste, visual and sensory appeal but beyond all this there is a sub conscious effort that feeds the decision making process. Most of us just refuse to eat things that are touted as 'healthy' as we seem to brand it immediately to be 'tasteless' or worse 'bad tasting'.

If I haven't said this before, I am a person who thinks prevention is better than cure. A few years back, I started looking for healthier choices in the kitchen and started to experiment to include ingredients not familiar to me. I strongly believe that the diet my parents (and ancestors) followed was a good one but diet alone does not contribute to a healthy life. Our life styles have changed vastly from what it used to be in my grand parents or parents life time. My Dad brisk walked every day as long as I can remember, his morning walk is when I learnt my cycling with big brother to put me and get me off of the bicycle until I learnt how to do it myself :-). I only knew how to steer the cycle and keep peddling, my brother sat me on the cycle and ran next to me until I was ready to get off.  So it was exercise time for the family. My dad also did what he called 'Shatha Patha (literally meaning 100 steps)' after every meal sometimes outside in the compound wall, some times inside our huge rectangular living room. Nammamma had no dearth of physical activity given her cleaning, washing, walking etc. My day doesn't resemble either of that now, I am plopped infront of my laptop most of the days either for work or (you guessed it) for blogging and surfing. If I go out somewhere, it is a drive and not a walk. So, even if I were to follow the same fantastic diet my parents did, there is no guarantee I will be blessed with the same excellent physical health they had, right? So I need to make adjustments to compensate.

Since I am not a dietician, I read, absorb and use common sense to make my food choices. Without overdoing anything, I try to get the benefits from old and new ways of living and I hope it works :-). The mantra for me atleast for now is 'less processed', I will let you know if it changes after I read some more and analyze more..

So on that note, here is a healthier than regular rava idli made with a combination of oats and broken wheat. If you are averse to introduce 2 new ingredients in your rava idli, go ahead and keep the regular upma rava but I strongly encourage you to use the broken wheat, it tastes more wholesome and the idlis are truly delicious. A healthier option you will not regret trying.

What do you need to make Oats-Broken wheat idli?
1 cup oats (I used old fashioned oats)
11/4 cup broken wheat
2.5 cup yogurt (preferably home made and a day old)
1/4 Tsp baking soda
2 Tblsp grated coconut
1 big carrot
1 Tblsp oil
1 Tsp mustard
1 Tblsp chana dal
1 Tsp black pepper
5-6 cashews broken into pieces (optional, I didn't use it)
8-10 curry leaves - chopped fine
fistful of cilantro (I didn't have any this time and skipped it)
1 Tsp salt (adjust to taste)

How do you make Oats-Broken wheat idli?
  • Heat a pan on medium heat, add oats and stirring frequently roast for 3-4 minutes until it starts to crisp up. Keep aside.
  • Add broken wheat to the pan and roast it for 4-5 minutes stirring until it just starts to change color and you can smell the roasted flavor. Keep aside.
  • Once cooled, make a powder of roasted oats.
  • Wash, peel and grate the carrot.
  • Add oil to the pan, add mustard seeds, chana dal, black pepper and cashews (if using) and roast them stirring continuously until mustard pops (30seconds to a minute)
  • Add the chopped curry leaves followed by grated carrot and coconut.
  • Fry for a couple of minutes until carrot turns limp, add the powdered oats, roasted broken wheat, salt. Give it a good mix and switch off the stove.
  • Whip or vigorously mix the yogurt to make it homogeneous.
  • Once the mixture is cool to touch, add baking soda, mix it in well.
  • Add the yogurt to make a dropping consistency batter (just like regular idli dough)
  • Take a table spoon at a time and drop it into oil smeared idli moulds.
  • Steam like regular idli without weight for 20 minutes on medium heat.
  • Switch off, let it stand for 2 minutes outside the cooker and remove using a spoon or butter knife.
  • Enjoy the healthy breakfast with chutney, spice powders or sambar.
Notes:
  • There is no fermentation involved in this idli and the dough should not be kept for long once the baking soda is added. If you are making large batches than your idli mould can hold at a time, mix soda and yogurt to small batches and steam them immediately. If you let the batter sit for long with soda, the idlis tend to fall flat.
  • Coconut gives it taste and helps to make idlis lighter and fluffier. You can omit this if you do not use coconut.
  • I used a finer variety of broken wheat (called #1 on the packet), this is slightly bigger grain texture than upma rava and works fine. If you get much coarser grained broken wheat, run it in the mixer to break it slightly.
  • Roasting oats until they crisp up makes the idli not to have a sticky texture (which is what cooked oats tend to be), when you squeeze the oats between your fingers, it should crackle and break and not bend over.
  • Just like rava idli, this tastes good if the yogurt is slightly sour, I keep the yogurt out on the counter top over night to make these idlis in the morning.

Thursday, August 29, 2013

Whole Wheat bread - it is 100% this time :-)

It has been exactly 2 weeks since I wrote my last post. Anybody missed me? Just say yes and make me happy:-), won't you?. Hope everyone is having a great time cooking, eating and chatting away especially with the Hindu festivals lined up this month. I did all of that and much more, we had a bunch of friends over on varalakshmi habba and made little Krishna's favorite snacks for Gokulashtami/Krishnashtami/Janmashtami. With so much food around me, why wasn't I still posting anything? This is when you guys ask me what was the thing that consumed me so much without feeling the urge to blog about food. Well, without going into a lot of personal details I will tell you, we had the time of our lives as our DD performed solo and did her Bharatanatyam Arangetram. She did a splendid job and we are so very proud of her. An Arangetram is sorta graduation for an Indian classical dance student where she or he presents a solo performance with the blessings of the teacher or Guru in the presence of family, friends and a gathering. The learning doesn't end but the event grants the dancer permission to pursue it with additional passion, get deeper into the art with a more mature perspective. DD has been learning for a decade now and all her hard work and dedication to the art sparkled in last weekend's performance. Last two weeks were hectic not only for the dancer but for the rest of the family and now we are feeling completely dazed out and drained out :-) in a very happy way. The young dancer is taking rest while her parents are trying to tidy up the house, get back to work, push for the photos, video etc. So that is where I have been these last two weeks.

Let me return to our usual chatter about food after that glimpse into my personal life. I cooked up a storm as we had loads of people but didn't stop to take any pictures and also didn't experiment much as I was focused on being efficient and making tasty food for the people that had gathered at home. While I am yet to revert back to my picture taking regimen again, I do have a few posts in the draft with a whole bunch of pictures that I made recently and I plan to use those as fillers. Old or new, every recipe is tested and tasted and certified :-).

I had earlier posted a whole wheat bread (not 100% whole wheat, there was an honest declaration in that blog post), today's post is a 100% whole wheat with no trace of all purpose flour and this is one of the best and healthiest wheat breads I have ever had. It is very easy to make if you are game for a 15 minute kneading exercise, if not you have alternatives - buy a bread machine, recruit the spouse to do the kneading, everything is fair in love, war and bread making. I saw this recipe first on King Arthur's website and while I wanted some more testimonials when I saw it on our versatile baking whizz Priya's website, and I knew I had the right recipe :-).
The best part of this wheat bread is you make it at home and the sturdy loaf is ready in under 4 hours and the wonderful aroma of the fresh bread fills your senses the whole day. You can freeze the slices for upto a week so if you eat bread regularly, go ahead, double the recipe and bake 2 loaves. I made this bread 3 times in the last few weeks as my FIL is on a diabetic diet and I feel comfortable feeding him this home made bread instead of the store bought version since I know exactly what goes into it.

I don't have kitchen scales or a thermometer. So when I say warm, it should pass 'baby test', remember how you would put a drop of the warm milk on the back of your fist before giving the bottle to the little one? Just repeat that test and it works like a charm :-)
What do you need to make (100%) whole wheat bread?
Makes 1 regular loaf (9X5 bread pan)
3.5 cups whole wheat (I used Bob's Red mill flour)
2.5 Tsp Rapid rise yeast (also called bread machine yeast)
1/4 cup oil (I used canola, choose any non-flavored oil)
2 Tblsp honey
1+1/4 cup warm water
1/4 cup dry milk powder (I used fat free)
1 Tsp salt
1 stick of butter - no you don't use all of that, infact any of it, it is just easy to hold the stick and brush it on top of hot bread :-), think 2 drops of melted butter if it makes you feel better

How do you make (100%) whole wheat bread?
  • Heat the water for 30 seconds in microwave or until water is luke warm.
  • Bring all ingredients into a large bowl, add water and mix it until the dough comes together.
  • Put the dough on a flat surface and knead it for 10-12 minutes until the dough becomes supple.
  • Put it in a lightly oiled bowl, cover with an lightly oiled cling wrap and set aside in a warm place for an hour or until the dough increases 1.5-2 times in volume.
  • At this time, take the dough out onto a flat surface, gently punch it down and shape it into a loaf (see here for detailed instructions on shaping the dough)
  • Put the prepared loaf in the bread pan, cover with the cling wrap and let it rise for 45 minutes to an hour.
  • Mean while preheat the oven to 350F.
  • Bake the bread for 35-40 minutes or until the bread sounds hollow when tapped on the top, turn it half way once at 15 minutes or so. 
  • Take it out of the oven, let it stay in the pan for 5-7 minutes, turn it over onto a cooling rack, brush butter lightly on the bread. 
  • Cover it with a thin wash cloth and let it cool completely for 2-3 hours. 
  • Slice the bread with a sharp knife and enjoy it hot or cold, toasted or untoasted in any combination that pleases you.
Notes:
  • Add 1 cup of water first into the bowl and then slowly add the remaining 1/4 cup as needed. The resulting dough is not sticky but soft and firm. Since I do not weigh the flour, the measurements depends completely on how you use your measuring cups.
  • This dough does not need extra flour while kneading.
  • If you are kneading by hand, there is not really an 'over knead' possible so go on and switch the timer for 12 minutes, whistle a tune or two and knead it.
  • I like to sprinkle a spoonful of oats or flax seeds at the bottom of the pan and on top of the loaf before baking, this gives a nice crunch while eating.
  • You can substitute molasses or maple syrup in place of honey depending on your taste preference.